
Dehydrated Chicken Bone Broth Powder
A delicious, nutritious and versatile powder that’s great on its own as a hot drink or in numerous dehydrated hiking meals

A cup of unctuous deliciousness!
Chicken stock and bone broth are the foundation of countless delicious recipes, but commercial chicken stock tastes completely different to the richly layered flavour of home-made. It is a fantastic lightweight nutritious addition to the backpacking pantry.
This recipe, which slow cooks bone, skin, fat and meat remnants with aromatic vegetables is tastier than pure bone broth and more nourishing than stock: the large amount of collagen converts to gelatine so the liquid sets when cool. It’s impossible to assess exact protein content in homemade stock: commercial powders range from 37.5% to almost 100% in collagen extracts. The longer you cook your broth, the more protein is extracted; acidifying your cooking liquid with a tablespoon or two of vinegar or lemon juice helps extract more protein but affects flavour (we prefer without). Bone broth powders are extremely expensive to buy, but cheap to make.
For hiking, use your powder:
on its own as a yummy hot nutritious drink instead of commercial cup-a-soup, perfect as a lightweight lunch
to replace the sachet in two minute/instant noodles as part of many healthy noodle additives
as a base for dinner recipes such as minestrone or tomato and bean soup (just add powder after dehydrating other ingredients)
in any assembled-ingredient recipes (eg our carbonara recipe, coming up next!), or
to add protein and flavour or to replace flavour powders in commercial freeze-dried or supermarket readi-meals.
to boost flavour in any insipid hiking meal

Hot soup lunch on a cold day, Grampians Peaks Trail. Use on its own, add to commercial or homemade soups, or to boring supermarket readi-meals.
Buy raw chicken frames at supermarkets or butchers. If your weekly shop includes a hot roasted chicken, strip the meat and stuffing, place it into a sealed container and refrigerate. Freeze bones together with any excess skin, wingtips, fat, parson’s nose etc, plus juices from the bottom of the bag. When you’ve accumulated enough frames, defrost and follow the recipe below.
Increase the recipe by 50% or even 100% for economies of scale if you have a large enough stock pot to hold the ingredients: you’ll reduce the stock before dehydrating anyway. The recipe below covers 4 Excalibur dehydrator trays and was cooked in a 10L/2.6gal stock pot. Chicken frames with more left on them obviously take up more room in the pot, so decide how many you want when you see them in the shop.
Ingredients (makes approx 300-400g/10-14oz depending on your chicken frames and cook time)

6-9 chicken frames*
2 sticks celery, roughly chopped
2 leek tops, washed and chopped
2 carrots roughly chopped
1 onion roughly chopped
2-3 knobs garlic roughly chopped
1 tbspn olive oil
2 tablespoons black peppercorns
4 bay leaves
1 cinnamon stick
stalks from a bunch of parsley
30g dried porcini or sliced shittake mushrooms soaked in hot water
parmesan rinds (optional)
guanciale rinds (if making carbonara recipe, coming up next).
3 tablespoons lemon juice (optional)
salt and pepper
MSG (optional but recommended)
*Save and freeze individual bachelor handbag roast chicken bones and trimmings, or buy raw frames all at once.
Method:
Preheat oven to 220C (430F) fan-forced.

With a cleaver, chop chicken frames — including previously roasted ones — roughly so they lay flat and jigsaw with a little space between on baking-paper-lined trays. Place in oven until very well-browned, turning once or swapping trays if necessary.
Meanwhile, saute celery, onion, leek, carrot and garlic in oil over medium-low heat until translucent in a large stock pot.

Tip in the browned chicken frames and their fat, using a silicone spatula to scrape any browned bits from the baking paper. Add the lemon juice if using. Mix well and cover with cold water; for illustrative purposes, I haven’t yet fully covered the bones above. Add bay leaves, parsley, mushrooms and their soaking water, peppercorns, cinnamon stick, half a tablespoon of salt and parmesan/guanciale rinds if using. Bring to the boil over medium-high heat.
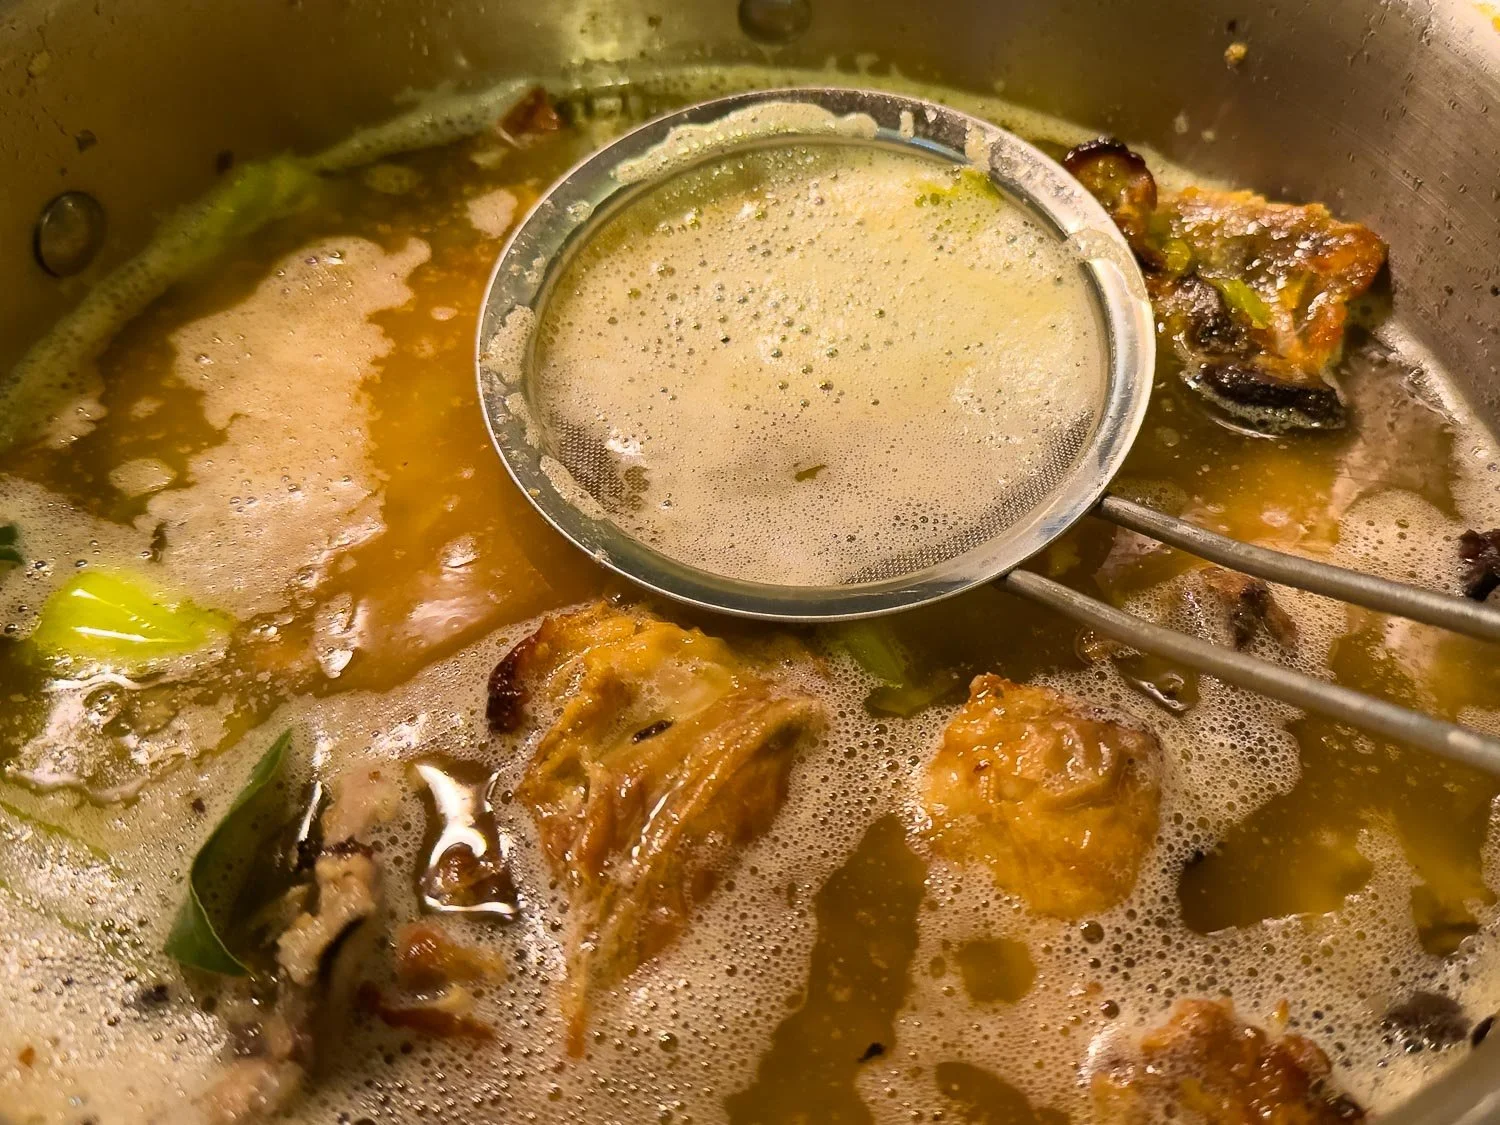
When the stock comes to the boil, skim impurities from the surface, reduce heat, cover and simmer very gently for 7-10 hours. Check every hour or two and skim or top up with water if necessary.
After 7-10 hours — longer makes a more nutritious broth — strain stock through a colander into a second large pot or a bowl.

With a spoon or ladle, carefully skim off the fat. Drag a paper towel across the surface of your stock to remove any last vestiges.
Pour the collected fat into a frypan and boil until all moisture evaporates, then strain through a fine sieve into a lidded container. Freeze this delicious chicken/parmesan/guanciale flavoured fat for other uses, or use it to top up the bacon or guanciale fat if you’re making our carbonara recipe.

Alternatively, chill stock overnight so the fat solidifies. Lift off the fat in the morning before reducing stock.
It’s essential to remove all the fat. If you don’t, it forms a thin film on the surface of your reduced stock when you spread it onto dehydrator trays, and prevents moisture from evaporating. Your dehydrated bark will never be snap dry, won’t powder, and won’t be sufficiently dry to prevent bacterial contamination.
Measure your defatted hot stock; there should be 3.5-6L/1-1.6gal. Record the amount.
Taste and adjust seasonings if necessary with a little MSG, salt and finely ground black pepper. If you plan to drink the stock as is, season to your taste, plus a little extra to compensate for the loss of flavour that happens in the dehydration process. However, if you plan to use the stock in recipes as well, undersalt because you can always add more in camp, or to the powder if adding it to assembled recipes at home.
I highly recommend adding MSG either now or when packaging because it really brings out the flavour of the broth. It’s available in all Asian groceries and supermarkets and, increasingly, in Australian chains such as Foodland.
To dehydrate the stock:

Pour stock into a wok or large pan and bring to the boil.

Regularly scraping down the sides, boil stock vigorously until reduced and thick and syrupy enough to spread onto silicone-lined dehydrator trays.
Don’t worry about the colour: reduced home made chicken stock and powder made in this way is always is brown, not yellow!

IT’S ESSENTIAL TO SPREAD THE REDUCED STOCK VERY THINLY so it dehydrates properly: spreading too thickly creates a gluey mess that never dries. Dehydrate at 65C/145F.

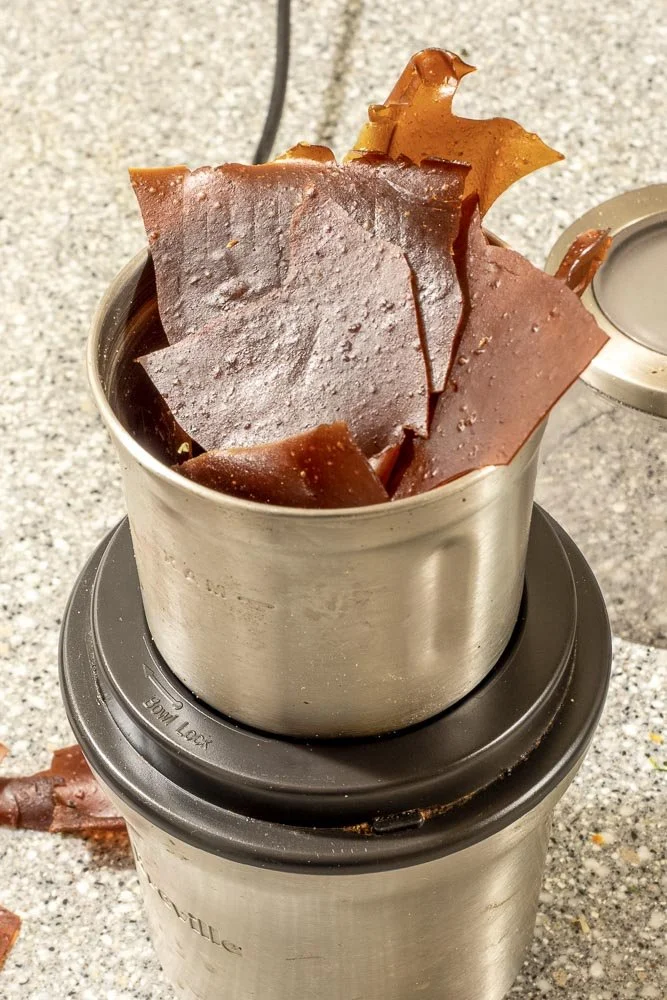
When it has dried enough to do so, peel stock from the silicone sheets and invert onto mesh to complete dehydrating.

The sheets are pliable when warm due to all the gelatine but crack easily into shards when cool. Note how thin the bark is: this is what you are aiming for.
Place shards in batches into a spice grinder; this batch from a few years ago was a little thick in places but most of it still powdered. Spread powder onto silicone-lined dehydrator trays and dehydrate at 65C/145F for another 10 minutes to condition.

Weigh your powder. You know that this amount makes up the volume of liquid broth that you recorded and tasted earlier. Now is a good time to calculate how many grams/oz or teaspoons of powder make up, say, a 250ml/8.5oz cup, or whatever size your backpacking cup, or 500ml/17oz if you plan to use it in recipes. Record the number of g per ml or oz per floz. Cool and place into a sealed container with a dessicant sachet. Shake whenever you pass the bench for the next three days, then package.
Or you can make up a test cup, tasting as you go. The amount of powder for a hot cup of broth depends on the concentration of your stock and your tastebuds. As a guide, we find that 10-12g/0.35-0.42oz per 250ml/8.5oz cup, plus a pinch of white pepper and MSG each produces a rich, full-bodied broth that tastes good on its own. We like strong flavours, so you may prefer a bit less. And of course, you can always add just a bit more or less hot water in camp to adjust concentration!
Storage:

Measuring out powder for storage in small mylar sachets.
Package in a par-vacced vac seal bag with a dessicant sachet: vaccing super tightly can make the powder clump. Alternatively, separate into serving-size portions in small mylar bags. Label with date, description and number of grams or teaspoons to make up 250ml/1L/your backpacking cup volume.
An oxygen absorber sachet in the vac seal bag also preserves flavour. However, regardless of what preservative agents you use, store this powder in the freezer to maximise flavour retention. It keeps for longer, especially with an oxygen absorber, but aim to use it within 3 months for best flavour.
In Camp
If you’ve packaged your powder into a single bag, know how many sporkfuls you need per cup or per meal. I add the pepper and MSG before packaging; alternatively, season with salt and pepper in camp.

Bring water to the boil in your pot.

Place requisite amount of powder into your cup. Or, add it direct to your pot of water as it comes to the boil. The tiny unpowdered shards are no problem.

Pour boiling water into cup and stir, scraping the bottom and corners. This powder dissolves within about 30 seconds.

You can practically see the umami! Yum!

We prefer the broth on its own, but it marries well with all the usual pairings: freeze dried corn or peas, dehydrated spring onions, 2 minute noodles. If you like, add a squirt of olive oil for extra calories.

Geoff tucking in: Here’s Cheers!