
How to Choose the Right Backpacking Stove for YOU
Step through this article to find the exact pot and stove combination that best suits your hiking style and environment!

A relaxing cuppa with lunch, South Coast Track, Tasmania
You’ve read Part One for what options are available, but now you’re ready to choose your first stove, or perhaps choose one that suits you better. As always, we won’t prescribe a single ‘best’ option, because which one suits you best is different for everyone. This article will ensure you choose a stove that meets your hiking style, your preferences and your environment, rather than one that is merely popular. Fine-tuning gear to your specific needs always has a better outcome!
Of course, many of you reading this already have a favourite stove. That’s great: a stove you’ve used for years is likely familiar and comfortable, like an old friend. But if you’ve ever wondered whether perhaps there might be something better – say, faster or lighter or more compact than what you have now – keeping an open mind means you may find a system even more suited to you and your hiking style.
This article functions as a decision tree and matrix. In the first half, you’ll eliminate options one by one based on what stoves are useable and legal where you hike. In the second half, you’ll award points to the remaining ones based on personal preferences that are most important to you in a stove. The stove type (not brand) with the most points at the end is your personal winner!
But first, some considerations to help you make the right choice.
What do you want to do with your stove?

We usually snuff the stove when the water starts to boil but, on the final night of this hike, Geoff is distracted!
Do you want to cook? Are you planning to fry and/or cook food, or just heat food? Is that food in sachets or not? Or will you only boil water for drinks and to rehydrate freeze dried or dehydrated meals? Do you need to melt large quantities of snow for hydration? Will you be pasteurising drinking water?
Where Will You Use Your Stove?
In some places, certain stoves are banned and therefore immediately struck from your list. As we’ve seen in Part One, different temperature extremes may require certain kinds of stoves too. In other places, certain fuels may be difficult to buy or completely unavailable.
For how many are you preparing food?
This affects pot size, fuel requirements and stove selection. Will you use one cook system for two people, or one each? Families and groups have different requirements again. The examples, recipes and tips across our website are generally for hiking partnerships and couples rather than for solo hikers, but here we’ve also included information for the latter.

A family-sized Primus Heat-Exchanger Pot on the go over a remote liquid fuel stove (image credit: Li Sa)
How many days will you be hiking?
Stove and fuel weight and efficiency become more important the longer your trip.
What are your personal preferences?
The previous four points are physical constraints, whereas the following are personal preferences. What is most important to you: A light weight? Reliability? Convenience and ease of use? Speed of boil? Is environmental sustainability important? Packed size? Do you prefer a noisy or quiet stove? What is your budget? Is odour an issue?
All these factors can seem overwhelming, but let’s step through the process to narrow your choices to arrive at the best one for you.
First, list your fuel choices across the top of a sheet of paper (or, if you’re like Geoff, in a spreadsheet):
Gas Canister: integrated, upright, upright remote, inverted remote
Alcohol
Liquid Fuel (Shellite/petrol/kerosene)
Solid Fuel: twig, hexamine
As you step through the points below, cross options off this list, or place queries beside them if you’re unsure. By the end of this first section, you’ll be confident that the stoves left will 1. work in your chosen hiking environment, 2. are legal, and 3. have available fuel.
1. Fuel Choices and Constraints.
So your starting choices are gas, alcohol (ethanol), liquid fuels, and solid fuels.
Fuel Bans

South Coast Track, Tasmania. No solid fuel of any kind.
Most Parks and Reserves in Australia have bans on the use of solid fuel stoves, not just in summer but year-round. This means twig stoves can be crossed off your list immediately. We doubt Parks Services considered hexamine (Esbit tablets) when the above law was drafted but it is technically a solid fuel, so that option is out too. Remember also when hiking in Australian summers/early autumn that total fire bans on high fire risk days mean that no stove with an open flame may be lit. This rules out every backpacking stove.
In some US jurisdictions and seasons, only fuel stoves with a shut off valve are permitted, leaving only gas and liquid fuel. Check to see if this is the case in your region and, if so, cross alcohol and solid fuel stoves from your list.
Fuel Availability
What fuel is available? Some liquid fuel stoves run on all liquid fuels, but others are designed specifically for one and do Nasty Things if you try to use something different in them. Gas canisters are usually stocked by shops in popular hiking areas, but what if you’re travelling somewhere frequented by few hikers? In a South Australian wine-growing region we fruitlessly searched for gas canisters in shops, petrol stations and hardware stores, whereas even the tiniest town along the long-distance Bibbulmun Track in Western Australia sells them. Kerosene can be difficult to find in parts of the UK. Twig stoves will be of little use in some parts of Iceland.
Air Travel

Sign at the little airport before we flew to the start of the South Coast Track.
Are you flying with your kitchen and stove system? Clearly, gas canisters are not permitted (nor are some matches and certain kinds of lighters with fuel in them). Fuel containers must be thoroughly washed – the slightest whiff of fuel on inspection at either end and they will be confiscated with a big fine. We carry a tiny match-sized fire steel in checked luggage and this has never been queried, perhaps because it’s not recognisable as such; many jurisdictions allow them. Some people clip a small fire steel on their key ring.
If flying, will you be able to purchase fuel at the other end? When we hiked the South Coast Track in Tasmania, a light aircraft carried us to a tiny airstrip at the start of the walk in the middle of wilderness. In this situation, you pay for either gas canisters, ethanol or liquid fuel before boarding, then pick up/decant from a shed at the airstrip at the other end.
However, convenient arrangements like this are rare, especially when you fly to small towns in remote areas. Check beforehand what’s available: that Pocket Rocket Deluxe won’t be of much use if you can’t buy a gas canister! Also ensure you know the name of your fuel in the local language: it may be widely available but, unless you know what to ask for, you may not get what you expect! As we saw in Part One, kerosene has many different names around the world in English, let alone other languages! In some places, a twig stove using gathered fuel may be your only option.
Very Wet Conditions

A rare fire for us on Western Australia’s Bibbulmun Track. Our friend Pat has done a marvellous albeit time-consuming job of starting a campfire with drenched materials during a break in the rain. A squirt of ethanol helped! Cooking over a twig stove in the open would have been impossible.
We Australian and New Zealand hikers envy the dry cold of Northern Hemisphere winters, where dessicated twigs can fuel your stove or even a small fire in the snowy landscape. In our neck of the woods that get snow, everything is usually drenched. Good luck finding dry anything, let alone burning it!
Very low temperatures
If you are hiking in temperatures around -8C to -15C – rarely the case in Australia but common in the Northern Hemisphere – certain fuel stoves are far less efficient than others. Many twig and alcohol stoves simply don’t produce enough heat to compensate for the loss to ambient air temperatures, or become difficult to light (see Part Three, coming soon, for tips and tricks). Tepid water is the best you’ll get.
Even at around -8C, some upright canister stoves (and Bic lighters!) can also fail to light or quickly sputter out when you can’t choose a suitable propane mix in the canister: as we saw in Part One, this makes a huge difference. It all depends on what is available: choose the right brand with an appropriate propane/isobutane blend. Many Northern Hemisphere outlets stock winter fuel blends; some canisters have internal modifications that reportedly allow the canister to perform slightly better in extreme cold. Of course, there may be no choice at all and you are stuck with whatever happens to be on the shelf.
Other upright canister stoves are advertised as useable at lower temperatures, depending on the gas mix in them, the burner, your ability to insulate the canister and various other tricks. Nevertheless, an inverted canister stove is more reliable. Another 5C lower, say around -20C (temperatures almost never seen in Australia) and liquid fuel stoves become the only reliable option. That’s because, if you need to melt snow for hydration in remote areas, where you will die from dehydration if your stove fails, a liquid fuel stove with high BTUs that also allows you to manually control fuel pressure is your safest bet. This doesn’t matter for local hikes a short distance from civilization or your car but, if you are relying on your stove to melt snow for hydration, you want not only 100% reliability, but also 100% familiarity with your stove. Or are you feeling lucky?

MSR Windburner. The Australian Alps commonly have winter temperatures around 0C, +/-5C, so integrated canister stoves with a suitable fuel blend perform well. (Image Credit: Gerard Blacklock)
How is your list looking? Have you crossed anything off yet?
Length of Hike
If you only do short trips of one or two nights, you’ll need little fuel; it is only on longer hikes that fuel efficiency becomes increasingly important because of its weight. But calculating weight based purely on efficiency is misleading. For example, wood is heavy and relatively inefficient but, if you gather it at every campsite, it will be your lightest option. Gas canisters are potentially highly efficient if you use a full canister, and least efficient if you use only a little. Alcohol burners and fuel containers are incredibly light, so are often preferable to gas even though the fuel itself is less efficient. This is one reason so many long distance thru-hikers use alcohol stoves.
It's worth weighing your fuel bottle/gas canister before and after each short hike so you know just how much you’ll need for a longer multiday of 8-15 days when you come to do them. There will be differences with climate, altitude and your meal plan – on very long hikes, Geoff and I sometimes swap out a few hot breakfasts for cold, and skip the hot chocolate! – but it’s essential to know your daily useage so you don’t carry excess fuel or, worse, run out halfway through your walk. See Personal Preferences: Fuel Efficiency/Weight below to compare the lightest options.
Take a look at your list. Which fuels remain? Hopefully, you’ve narrowed your choice! Let’s narrow it still more.
2. Pot Choices

A silicone pot paired with an upright canister stove on the Sunshine Coast Hinterland Great Walk (Image Credit: Dave Rees)
It seems counterintuitive to suggest considering your pot next but, with only a few exceptions, the size of the pot and its material pair better with certain stoves and uses. Add the following to your sheet of paper, below the Fuel Choices but leaving a gap:
Pot size*
400-900ml/13.5-30oz (1 person)
900-1300ml/30-44oz (two people)
>1300ml/44oz (families).
* Remember that it’s impractical to fill pots to the brim so, depending on pot size, you want one 50-100ml bigger than the actual amount of water you need to boil.
Pot material
aluminium
titanium
silicone
Pot style
standard
wide
kettle
heat exchanger
Get ready to cross some options off this list!
Pot Size

Three couples on the Grampians Peaks Trail. We all had different kinds of alcohol stove and different sized pots!
If you’re in a hiking partnership, will you use two smaller separate pot and stove combinations, or a single larger shared one? For most pot and stove options, especially gas canister and liquid fuel stoves, a single shared setup saves a lot of space and weight because burners and fuel containers are relatively heavy compared to pots; doubling integrated systems like Jetboils that also have heavy pots imposes a particularly significant weight penalty. However, alcohol and twig stoves are so light – often just 15-20g – that the additional weight is minimal when you use two half-sized pots. You can boil the same amount of water more quickly, or use one pot for food and the other for drinks or for melting a little snow. Or, you can prepare different meals. Geoff and I prefer a shared kitchen, but YMMV (your mileage may vary).
Are you only boiling water? Or will you add food to the pot? The size depends on how much water you need to boil, of course, and this varies between hikers. Geoff and I found a 900ml/30oz pot too small for the two of us; a 1300ml/44oz Evernew wide pot is just right for our meal sizes/drinks. Families and groups will need even bigger volumes as will those who are melting snow for hydration.
Conversely, many solo hikers choose pots 450-750ml/15.2-25.4oz. Remember that dehydrated food added to the pot takes up a lot of volume if you plan to rehydrate meals in your cookpot: our 1300ml/44oz pot boils the right volume, but many of our greedy-size meals don’t fit in after adding the requisite amount of water. However, with the ‘freezerbag cooking method’ , we decant the boiled water into a bag with the food to rehydrate, so can use a smaller pot than if we were rehydrating in it. This is helpful for solo hikers who want to take the smallest pot possible.

With our generously sized meals for two, we rehydrate in a larger sousvide bag rather than in the pot.
Are you likely to brew a cuppa at the same time as your breakfast or dinner? Boiling one batch is more fuel efficient and faster than boiling two sequentially because of heat losses from the pot. We opt for cuppas with drier breakfasts like poha and porridge when we can boil all the water at once, and go without if we are using a full pot of water for breakfast noodles to avoid a second boil.
If you’re unsure what pot capacity you need, test at home in similarly-sized pots or your car camping gear, measuring volumes. Ask:
Will your dehydrated meal fit inside or will you rehydrate in a bag instead?
Do you have enough water for porridge and a cuppa? Is your morning brew a larger volume than you thought or are you happy with a very short black?
Will you carry a cup, or use the pot for both food and hot drinks?
Will you bring a plate or eat directly out of your pot like most ultralight hikers? Geoff and I don’t carry plates: one eats out of the pot, the other out of the rehydration bag. We do carry cups. Consider meal logistics and whether you can minimise or improve what you’re carrying. Plastic cups are extremely light, just a few grams, and can save faffing about at meal times.

On this short trip where weight is less critical, Geoff has brought his portable espresso CoffeeJack for a morning brew.
What pots suit the fuel categories you have left? For example, Geoff and I know we need a pot of about 1300ml to boil our water. Integrated gas canister stoves are available in 1000ml and 1500ml capacities, neither of which suit us not least because even a small increase in integrated stove size creates a big increase in space and weight. And minimal weight is our highest priority on longer trips. If you want a 1300ml pot and speed and convenience are a high priority, you’ll choose differently.
If using a gas stove, do you want enough width for the canister to nest inside your pot? Will your entire kitchen – burner, fuel bottle, cups, fire steel, folding cutlery, dishcloth, matches – nest inside your pot? Is it worth getting a slightly larger one so this is possible? We’ll come back to this below in Stove Preferences: Packed Size!
Pot Material
Backpackers today avoid steel – and cast iron! – instead choosing aluminium, titanium or silicone pots.
Contrary to widespread belief, titanium is actually heavier than aluminium by a surprising 66 percent. However, because it is vastly stronger than aluminium, pot walls can be extremely thin (and therefore light) whilst remaining rigid. With a few exceptions, such as DIY beer can pots, aluminium backpacking pots rely on thicker walls for strength, and that strength is considerable. The countless decades-old dented but perfectly functional aluminium Trangia pot sets still in use around the world confirm they are durable and excellent for backpacking. Titanium backpacking pots are usually lighter than aluminium ones of the same size but grams saved isn’t huge with a small solo pot. A larger pot for two has more substantial weight savings.
And of course titanium is significantly more expensive. Aluminium is not only cheaper but also far superior for frying and cooking: it has about fifteen times the heat capacity of titanium, which means it doesn’t develop those hot spots to the same degree. It is inordinately easy to burn food in thin titanium pots (guess how we know this!). It’s also why aluminium is less likely to scorch lips; try silicone ‘hot lips’ if drinking out of your titanium pot/cup.
Silicone pots with metal bases have recently become popular. They are similar in weight to heavier anodised aluminium pots:
Sea to Summit silicone 1.3L Xpot 215g/7.6oz
Evernew Titanium 1.3L pot 132g/4.7oz
Evernew titanium non-stick 1.3L pot 310g/10.93oz
MSR’s 1.3L anodised aluminium Trail-lite at 206g/7.3oz
Goshawk 1.4L anodised aluminium pot 150g/5.3oz

Goshawk 1L and 1.4L pots (Image Credit:Goshawk). The 1.4L pot is just 150g/5.3oz including frypan lid and pot lifter: pretty good for a pot of that size!
You can see that aluminium pots can also be very light, comparable to titanium.
Silicone pots have one huge advantage: they concertina flat and are extremely compact. If space in your pack rather than weight is important to you, you may prefer them. However, many stoves are now so compact that clever tetris often fits your entire kitchen inside your aluminium cup or pot too; gas canisters may nest neatly inside a pot together with a burner. Don’t assume a silicone setup always saves significant space.
As you can see from the examples above, non-stick pots tend to be heavier. They are irrelevant for those who only boil water but may be helpful if you intend to cook, not least because the flame pattern of backpacking stoves is concentrated rather than diffuse. However, the few non-stick backpacking pots and pans we’ve tried over the years have been underwhelming: don’t expect them to perform like kitchen nonstick pans. Another option is to place a thin sheet of copper or metal flyscreen under your pot to help diffuse the flame; we use a sheet of copper with propane gas burners when car camping and it is effective in reducing hotspots.
This website is worth browsing for the range of pots available. Because the main page displays many of the weights, volumes and materials, you can easily and quickly compare options. Unless you’re in the UK, we’re not suggesting you buy from them because all the pots are sold worldwide and shipping is cheaper closer to home!
Pot Design
When you buy an integrated stove such as a Jetboil or Primus ETA system, pot shape is matched to burner; Trangias and many other alcohol systems such as Caldera Cones also match pot size and shape to burner for optimal performance. In other cases, you’ll mix and match.
Pot shape (and distance from the burner) matter. As we saw in Part One, stoves work most efficiently when the flame is applied to the bottom of the pot rather than escaping up its sides. Geoff and I find a wider pasta-style pot more efficient for two than a tall narrow pot because we originally teamed it with an alcohol stove that throws a relatively wide flame. If you use a side-burner alcohol stove, you’ll need a wider pot than for a top-burning one. Some gas burners have a wider diameter and also throw a wider flame than others.
Stability is also important: tall narrow pots can be tippier on certain stoves, such as gas burners with short arms.
Lids are heavy and Gear Skeptic has made an excellent series of tests debunking the value of a lid with many pots: you do use a little more fuel without a lid, but the weight of that extra fuel is less than the weight of the lid. Of course exceptions and provisos apply; the entire series is worth watching.

MYOG Alcohol stove, windscreen (titanium sheet from AliExpress) and ultralight 66g/2.3oz lid. (Image Credit: Erdei Maholy)
Many people replace their lid with a thick but very light piece of aluminium foil cut from a disposable pie pan, (google DIY backpacking pot lids).
Pot sets with frypans as lids are usually – but, as we’ve seen above with the Goshawk pot, not always – heavy. They are great for car camping or if you’re actually frying but, in most cases, hikers who aren’t cooking food should avoid them.
Handles are important on pots and some are lighter than others, but we don’t recommend removing existing handles. Pot lifters vary in weight too: compare the 33g/1.2oz MSR to the 48g/1.7oz Trangia.
Back to that Goshawk 1.4L aluminium pot, 66g/2.3oz with a 34g/1.2oz potlifter as part of a set that also includes a 1L pot and a second frypan/lid. With the 50g/1.8oz frypan lid, the 1.4L is just 150g/5.3oz, an excellent weight; swap out the frypan lid for a baking foil one and you’ll have a large pot that’s going to be about 110g/3.7oz, at a fraction (AUD23 at time of writing) of a titanium price.

Trangia and kettle on Dinner Plain, Australia. Image Credit: James Camera-On
Kettles are preferred by a few hikers who only boil water but, for most backpackers, they are less versatile. It is more difficult to stack anything inside – or anything at all for those without lids – and their shape makes them difficult to nest. Nor can you eat or drink from them. Storm kettles combine pot and stove and divert flame through the centre of the pot, but their double wall makes them heavy.
Heat Exchanger Pots have fins/vanes/flux ring on the bottom that traps heat and significantly speeds boil times, but also make them much heavier; the 1.3L Primus Heat Exchanger Pot, part of a set designed for winter with a liquid fuel or remote canister stove, weighs 300g/10.6oz. The MSR Reactor 1L pot weighs 420g/14.9oz. The Firemaple Petrel is a 600ml option that the manufacturer says fits all gas canister stoves with arms at 120 degrees.

Optimus Pot with flux ring and an impressive damper bread. Image Credit: Clive Powsey
Integrated gas canister stoves like Jetboils all use heat exchanger pots (hence their weight).
MSR market an 170g/6oz add-on heat exchanger that attaches to any pot 16-18cm in diameter:
MSR Heat Exchanger (Image Credit: MSR)
MSR claim a 25% increase in fuel efficiency, but two big questions must be answered for not only this, but any HX pot.
First, will the HX pot even fit your stove system? Many gas, alcohol and liquid fuel stoves will be incompatible with these pots, although some people adapt the latter by cutting off fins to make them fit.
Second, as for lids, will the fuel weight saved be more than the extra weight of the exchanger on the pot? We did some quick calculations. For us on a recent ten day hike, boiling water for two people having a hot breakfast (600-1300ml/20.3-44oz daily) and hot dinner (900-1200ml/30.4-40.1oz daily), plus two cups of hot tea or chocolate each per day (1200ml/40.1oz daily), plus the occasional hot soup or extra cup of tea at lunch (600ml/20.3oz), we boiled a total of at least 32L. This is much more than most hikers, and we used about 720ml/24.4oz of alcohol fuel with our Starlyte stove paired with a Caldera Cone system.
If – if – MSR’s claims are true for real world conditions, a 25% increase in fuel efficiency would save us 180g/6.4oz of fuel… but MSR’s heat baffle weighs 170g/6oz. So we would have saved just 10g/.35oz in pack weight at the start of the hike on Day 1. But as we continued our hike… on Day 2 we would have been 10g/.35oz worse off and the disadvantage would be getting greater each subsequent day until Day 10 when we’d be carrying an extra 170g. And over the ten days of the hike we would have carried a total extra cumulative weight of 800g/27.1oz by using the heat baffle. Our fuel bottles are plastic with most of the weight in the cap, so negligible weight is saved in containers, even though we could have used a slightly smaller one.
When might you consider a separate HX pot?
When combined with an effective windscreen, they can save a lot of fuel in windy conditions. If you’re boiling large quantities of water or melting snow in very cold conditions with an inverted canister or liquid fuel stove, these pots are outstanding.

Primus 1.3L HX Pot on a liquid fuel stove. Image Credit: Ozbackcountry.com
The sums may also add up better for people who cook extensively rather than just boil water, for larger groups or families, or on very long trips with gas canister or liquid fuel stoves, especially if it means you can take one canister instead of two, or a smaller metal liquid fuel bottle. You could, for example, buy a cheap aluminium pot as well as a heat exchanger pot, and take the most appropriate for each trip.
You can see that it is all enormously complex, and differs with every hiker’s individual circumstances; Geoff explores this in more detail under ‘weight preferences’ below. We suspect that, for most people, the fuel weight savings are insufficient to warrant HX pots. However, if boil speed is more important to you than weight, then a heat exchanger pot will suit you well.
Take a look at your pot list. Have you crossed anything – pot size/material/style – off it yet?
Stove Options and Personal Preferences
You have now narrowed your stove options in the fuel and pot sections, so let’s see what we can do to fine-tune your choice. What is left on your list? You know everything will suit the places you plan to hike. Fuel will be available, your stove will be legal and it will work in the climate. So this is the fun part: personal preferences. None of these are right or wrong: here is where you choose exactly what suits you! And it is subjective; other experienced hikers may disagree with our scoring system and that’s fine, swap them around if you wish!

It’s raining but we will be having a hot lunch, this time Homemade Cup-a-Soup on the Grampians Peaks Trail with the Caldera Cone and Starlyte. As relaxed hikers, Geoff and I find that this stove system suits us perfectly. Those in more of a hurry would be frustrated by the boil speed.
Let’s step through your preferences now, to see which stove best meets your needs. First, list the ten preferences below. Next, number them from most to least important for you:
Convenience/Ease of Use
Weight /Fuel Efficiency
Fastest Boil Time/Speed
Packed Size
Ability to Cook (vs just Boil Water)?
Lowest Price
Noise
Odour and Fumes
Reliability
Environmentally Sustainability
Go back to your list of remaining stoves (alcohol, solid, liquid, unright/inverted/integrated gas canister) at the top of your page that haven’t been crossed out and get ready to add points below them.
Ignore your last three preference categories (say, odour, noise, environmental sustainability), and jump to your top three categories. Time to add points into your spreadsheet!
If your first priority is much more important to you than the second and third, give the first priority points a 20% or even 50% loading (eg 10 points becomes 12 or 15 points). Your spreadsheet/table might look something like this:

This decision matrix will help you arrive at the stove that suits YOU best. If you’d like a copy of our spreadsheet template Subscribe and we’ll send you a link to download it.
1.Convenience/Ease of Use

Jetboil at Lake Will on the Overland Track, Tasmania. Integrated Stoves like this are undeniably fast and convenient. Image Credit: Kristy Jane
This is a tricky criteria because every stove, no matter how simple, has a learning curve and once you’re familiar with your own system it becomes easy. Nevertheless, some stoves are certainly easier to master. Here is our (subjective) ranking:
The most convenient and easy to use is the integrated canister stove (eg Jetboil) with piezo ignition. Simply screw the pot with integrated burner onto the canister, fill with water, switch on the gas and click the piezo. 10 points
Next is the upright canister stove with or without piezo ignition. Here, you’ll need to be more aware of wind protection, and that your pot and burner match. 8 Points
Remote Inverted and Upright canister stoves require the additional step of joining your stove and canister with a hose. Reliable brands include MSR, Soto and Primus. 7 points
An equal second or very close third (about equal to remote canisters in our opinion) is the alcohol stove; we’ve explored many designs in Part One. Here you’ll need a separate fuel container and match fuel to the amount of water each boil. Wind protection is essential. You’ll need an igniter: matches, Bic, or firesteel. All these things are quickly learned: Geoff can accurately judge by eye the amount of fuel needed to boil a particular amount of water to within a few millilitres. Alcohol stoves that you can snuff and cap without having to decant leftover fuel back into a bottle are more convenient. 7 points
Liquid fuel stoves

Boiling a kettle on a liquid fuel stove. Image Credit: David Thomson
Liquid fuel stoves are far from rocket science but they do require more of an understanding of how they work. You need to connect the burner and fuel bottle and some require preheating at the burner to warm the fuel before lighting. There are valves to open and close at both ends of the hose and ignition timing and fuel pressure are important for some. Despite this, in very cold conditions, these stoves re much easier to use than even a gas canister stove which will splutter along sub-optimally or not light at all. 4 points or 10 points if you’re hiking in extreme cold (-20C)
Solid Fuel Stoves
These can be either very easy and convenient or impossible depending on conditions. Hexamine fuel tabs are certainly convenient and easy, about the same as alcohol stoves or even upright canister stoves: 8 points. Twig stoves are easy with dry twigs and impossible with drenched fuel. However, once you have the knack of lighting them with fine material, and feeding in additional twigs to get your pot to the boil, they are convenient because you can collect fuel from around your campsite. 3 points
2. Weight
Shaving grams from your fuel system is most important at two seemingly contradictory ends of a spectrum. The first is when everything else you carry is ultralight, and your stove and fuel are therefore a significant proportion of your carried weight. At the opposite end is when you are nearing the limit of your capacity with a heavy pack, and every gram saved makes a difference to your enjoyment.
Stove, fuel load and fuel container all play significant roles in determining the weight of your kitchen, so let’s take a deeper look to calculate what best suits our needs if minimising weight is a priority.
The inherent efficiency of your stove design determines fuel use, as does fuel type. In addition, fuel useage also depends on how efficiently you use your stove (dialled down, good wind protection), number of people, whether you’re cooking or just boiling water, ambient temperatures and wind: all these things combine for the weight efficiency of your system. We can therefore only share our experiences and results from boil tests we’ve conducted: it’s a guide but doesn’t mean our system will be most efficient and light for you.

Wind and ambient temperatures, windscreens and more affect fuel use. We’ve used our own as well as manufacturers’ data; the latter is done under perfect conditions so YMMV IRL!
For example, a solo hiker boiling 500ml for dinner may have different results because they don’t boil three litres per day like we regularly do! Most gas canister stoves dialled back use a fraction of the fuel as one on full blast. Weight efficiency for gas canisters can be reasonable if you drain one canister on a trip, and poor if an extra day requires you to pack a second canister that is only partially used; we’ll explore this in more detail in Part Three: How to Use Your Stove. Similarly, liquid fuel stoves with their heavy fuel containers are more weight efficient on trips where the container needs to be filled, than on a short trip with a dribble in the bottom.
And our results may differ from what you can achieve, so when you do decide on a stove system, it’s definitely worth running your own tests to determine its best weight efficiency. We took 1 litre of water to the boil and repeated the test three times for different stove and fuel configurations, ensuring ambient conditions and start water temperature each time were the same. If you use a gas canister stove, test using a full canister each time to determine at which throttle it burns most efficiently whilst still boiling within a time that’s acceptable to you. We’ll expand on this in Part Three.
So with those caveats, our ranking for weight efficiency is:
Lightest: Solid fuel stove systems – eg ESBIT or twig stoves. But in most places we hike, solid fuel stoves aren’t permitted. 10 points
In second place is our alcohol stove system. It is the best choice we have available for us at least. 8 points
Third is gas. And this order remains the same for us on all hike durations up to 10 days: 5 points. Remote canister stoves are heavier with the hose: 4 points. Integrated canister stoves are the heaviest of the gas options: 2 points
Heaviest: Liquid Fuel Stoves. Our ancient Optimus kero stoves were our go-to decades ago but we’ve since changed to lighter options. However, you need a liquid fuel stove in extreme cold. We have two, snapped up discounted and secondhand respectively, the Omnifuel and the lighter Soto Muka. 2 points

Firemaple upright remote canister stove at Shadow Lake, Tasmania, on the coldest night on record. (Image Credit: Cameron Semple).
Let’s see how we arrived at these results.
There are two weights to consider.
Hike starting weight, and
Total weight for the duration of the hike.
For longer hikes, depending on your stove, a gas configuration can be lighter than alcohol at the start of the hike, but you’ll end up carrying more weight over the duration of the hike. How can this be? We all know that gas has so much more energy per gram than alcohol! The reason is that although the gas fuel itself is light, the canister is heavy relative to the fuel, and you carry the canister for the duration of the hike. For alcohol the opposite is the case.
For our 230g fuel canisters the weight of the canister is 149g or a whopping 39% of the combined fuel and canister weight. On a five-day hike, with our lightest gas stove (59g), we’d have a total start weight of 438g (excluding a windshield).
For a five-day hike with our alcohol setup, the fuel bottle weighs only 39g, just 14% of the combined bottle and fuel load. And the fuel weight drops at a faster rate through the duration of the hike than for gas. Our five-day hike start weight would be 405g including our caldera cone windshield/pot stand. So, we are ahead at the start of the hike, and it gets better each day.
Incidentally, a liquid fuel stove configuration (Primus Omnifuel) for us would have a start weight of 700g for a five-day hike, and the drop in weight through fuel use each day would be slower again than for gas.
What happens on day six you ask – well, we’d need a second gas canister so alcohol for us is still a lighter option (we’ll get to larger canisters later).
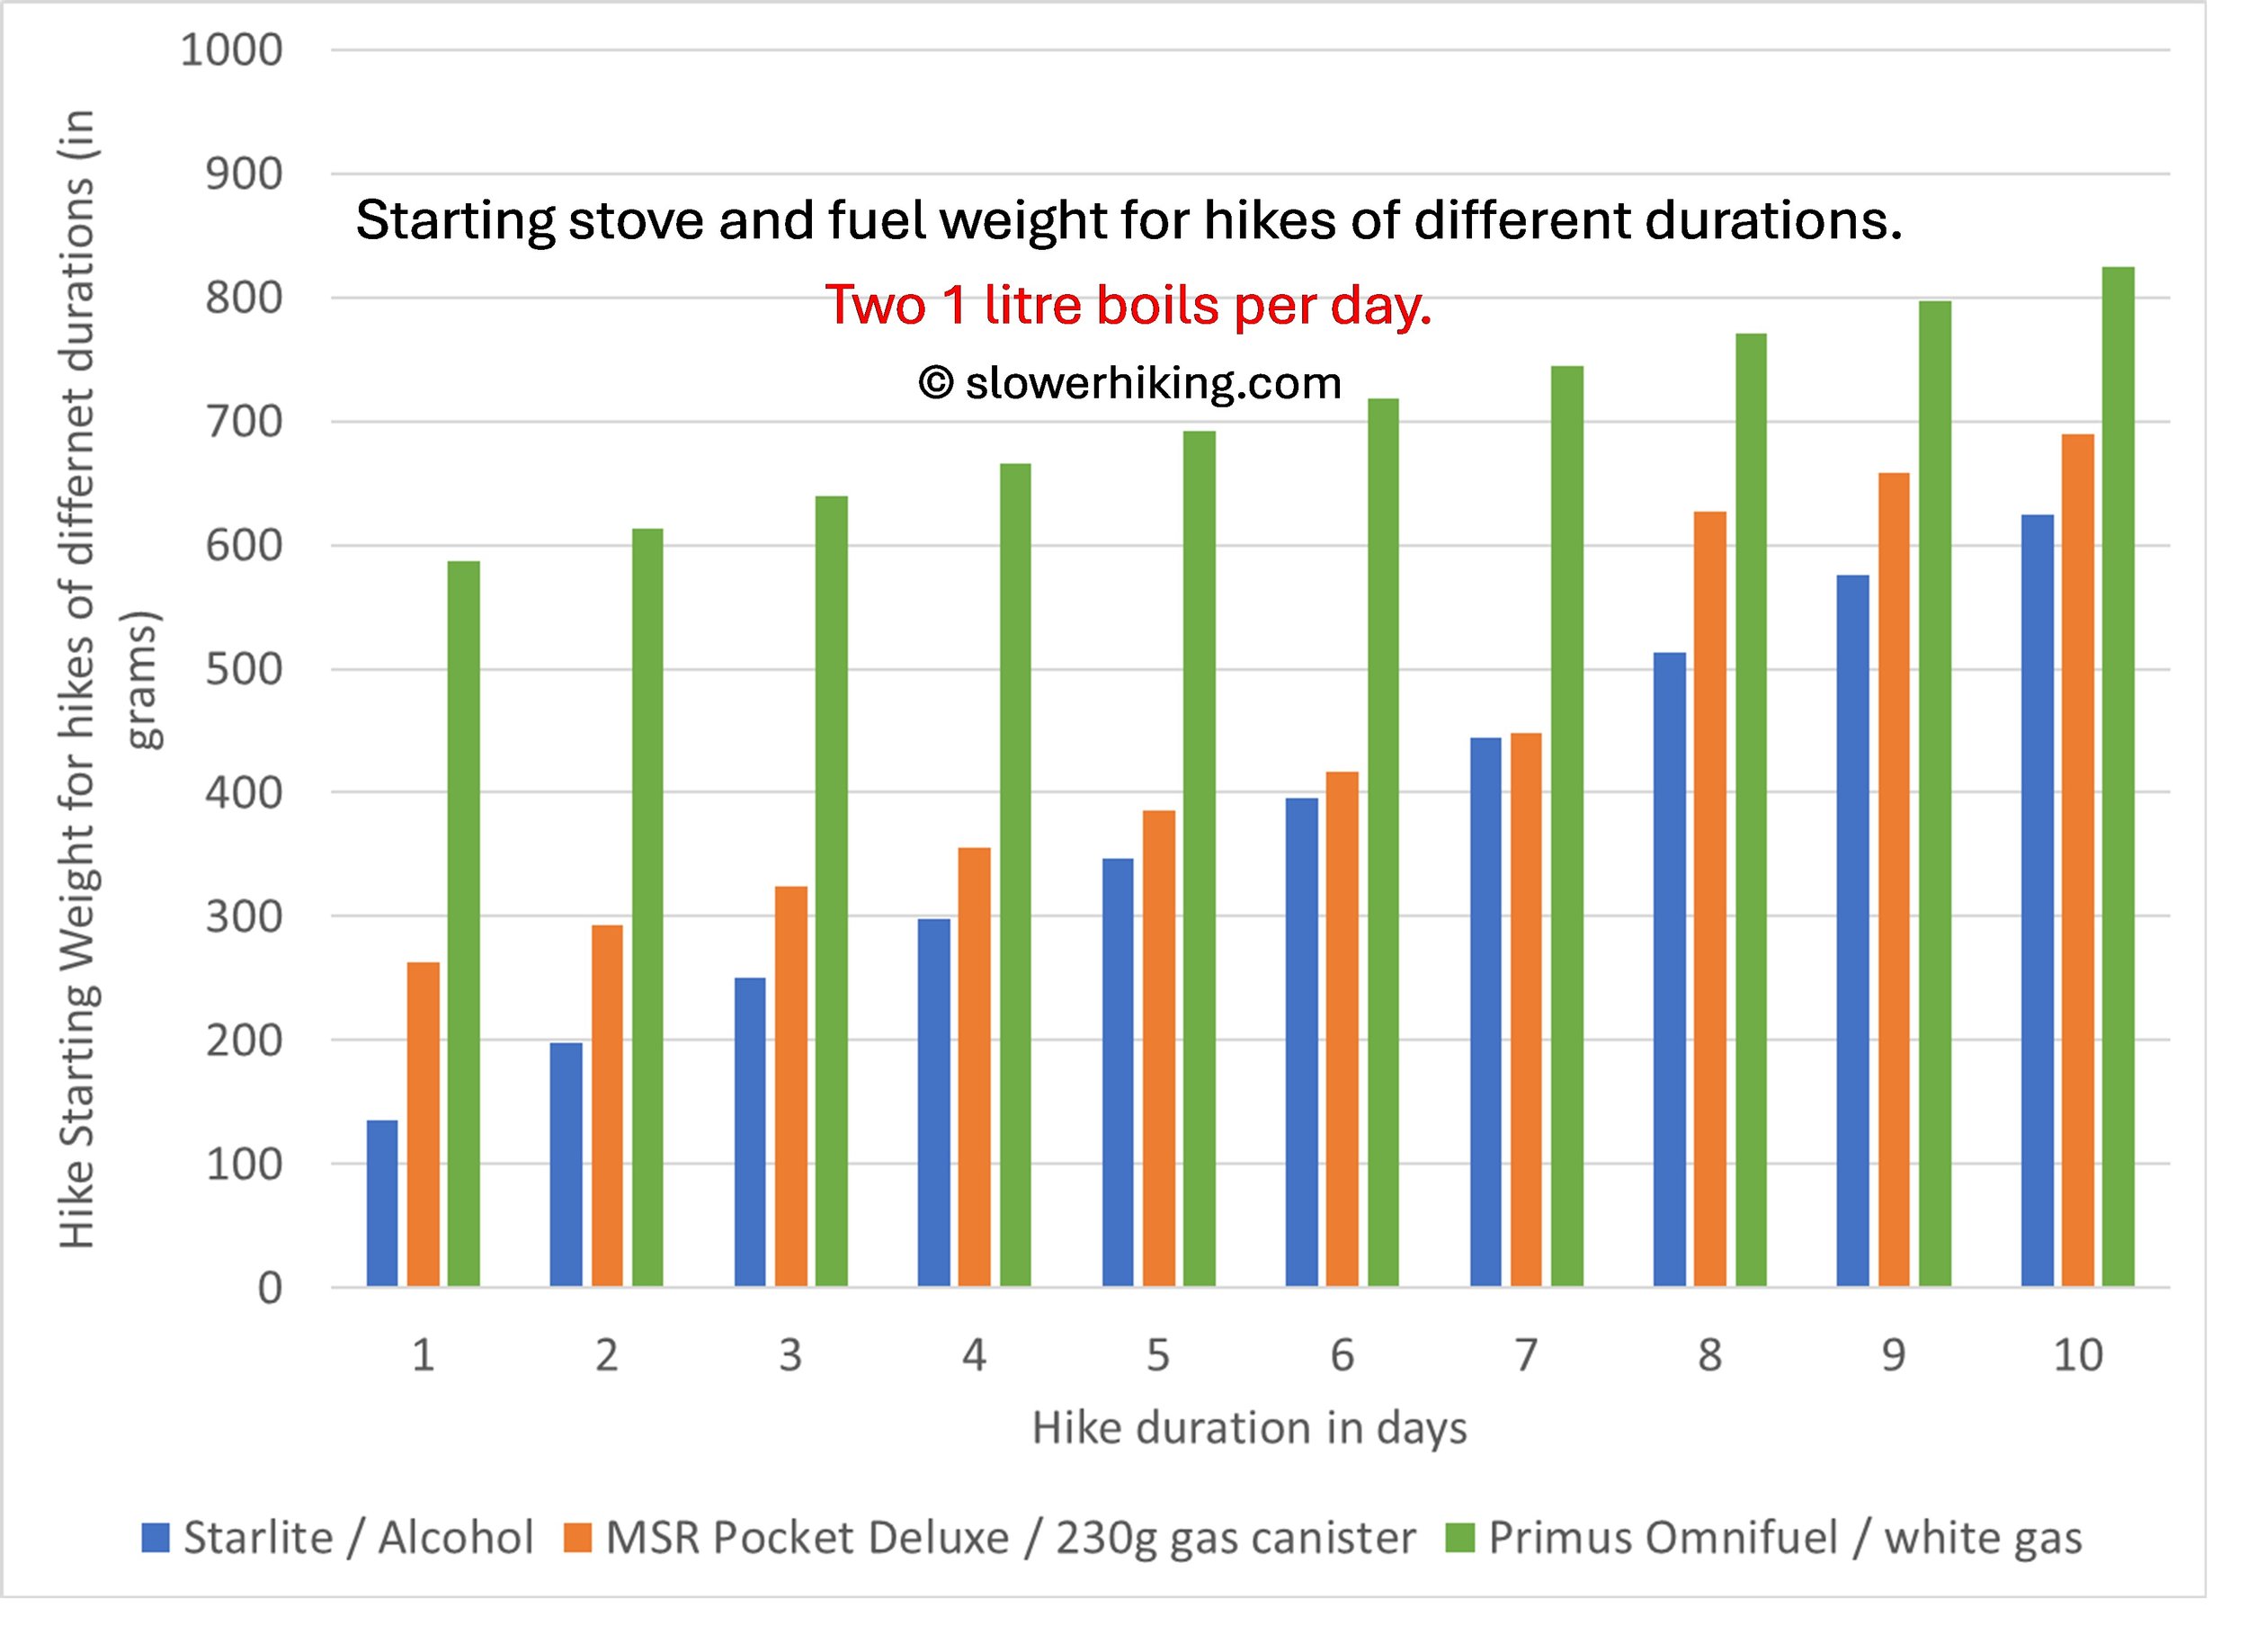
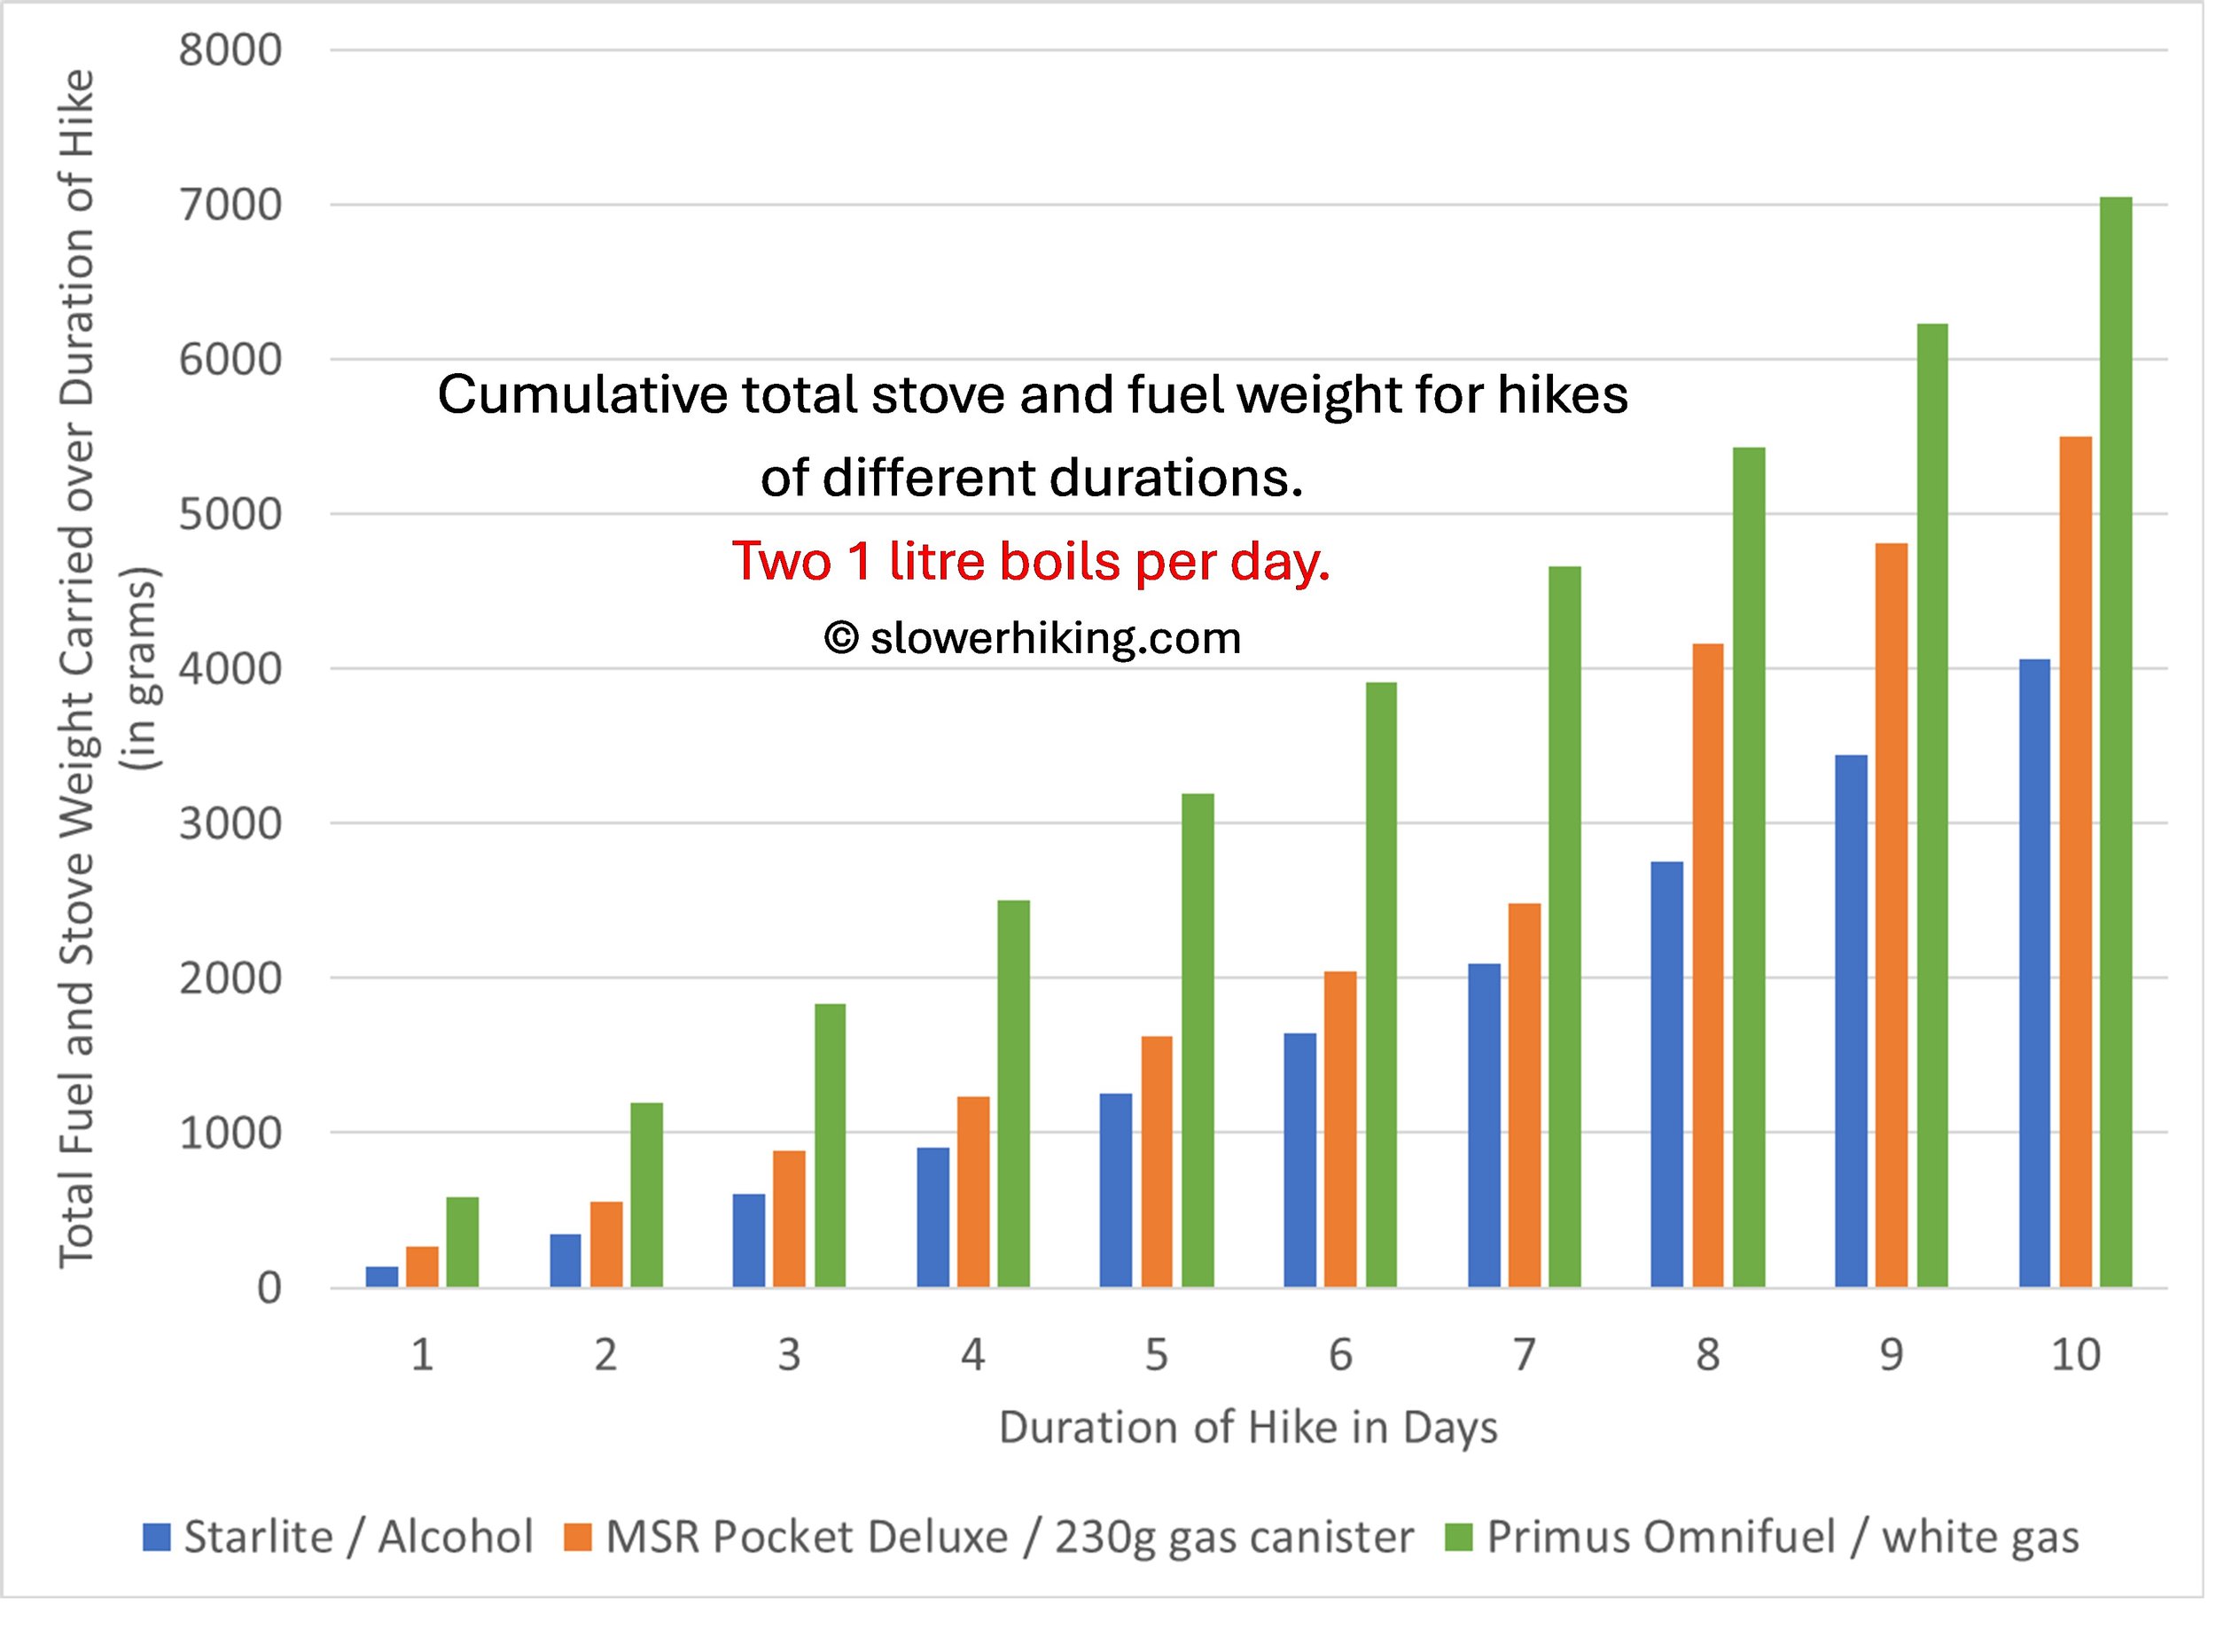
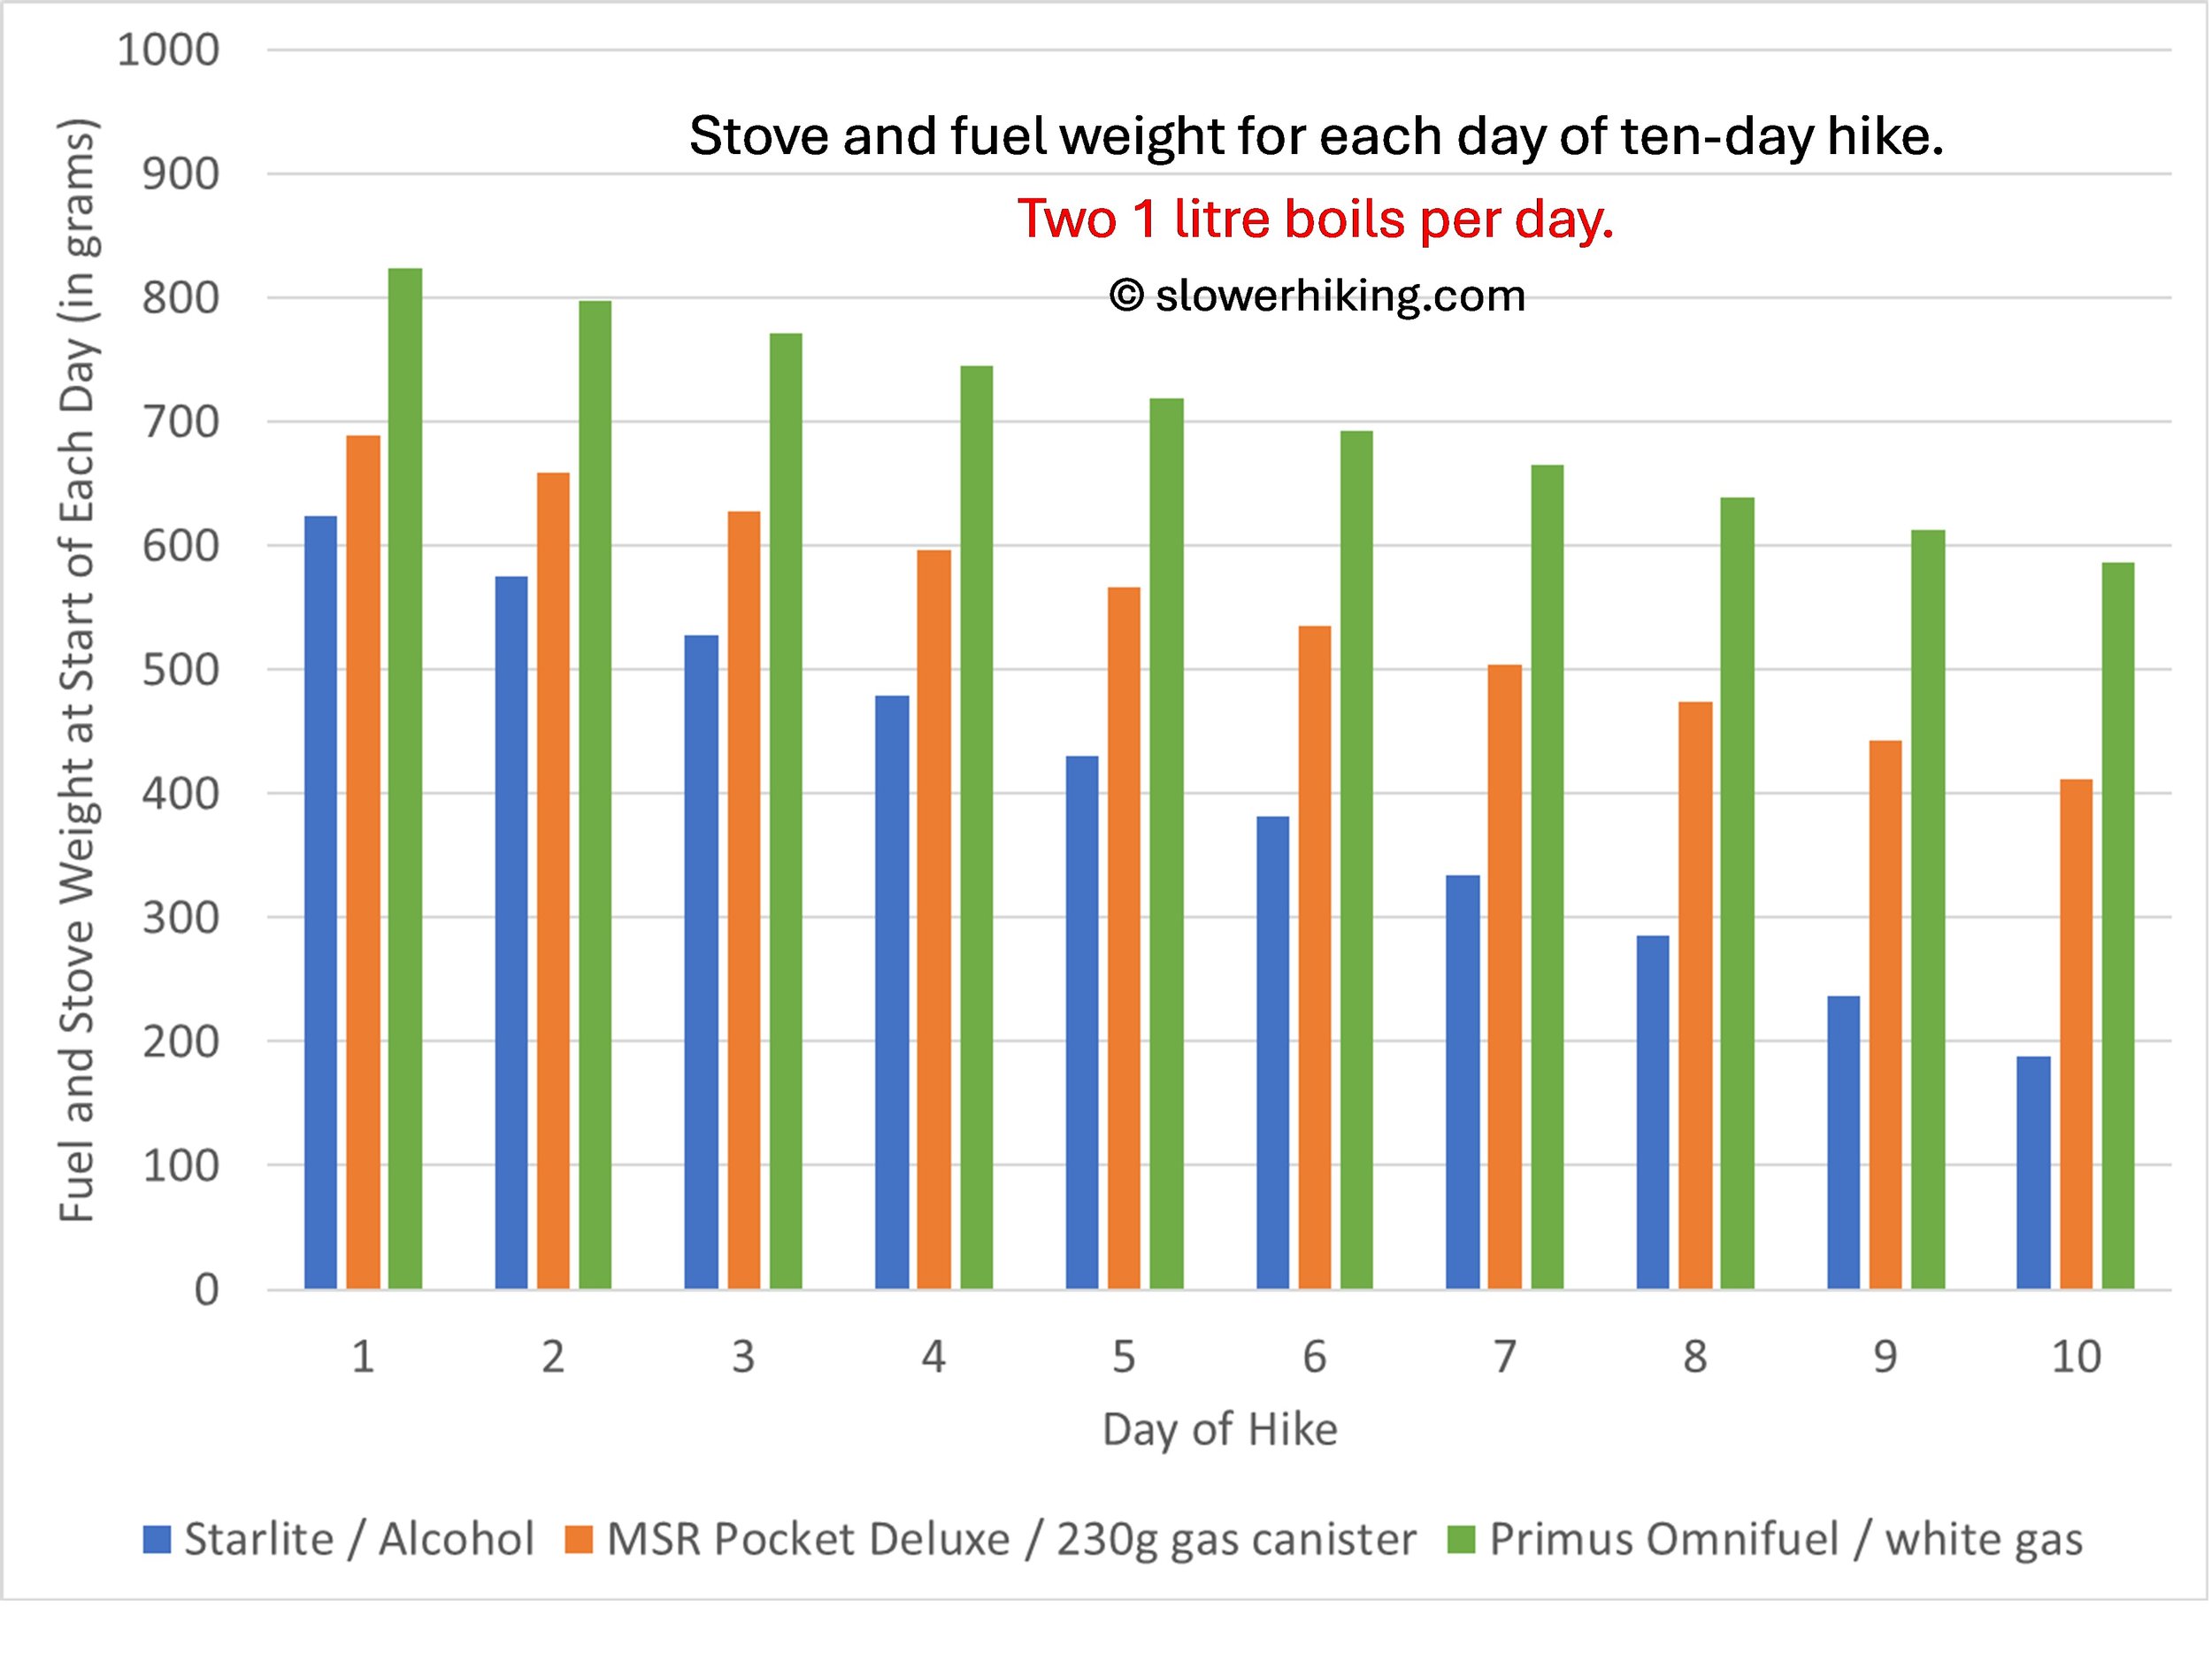
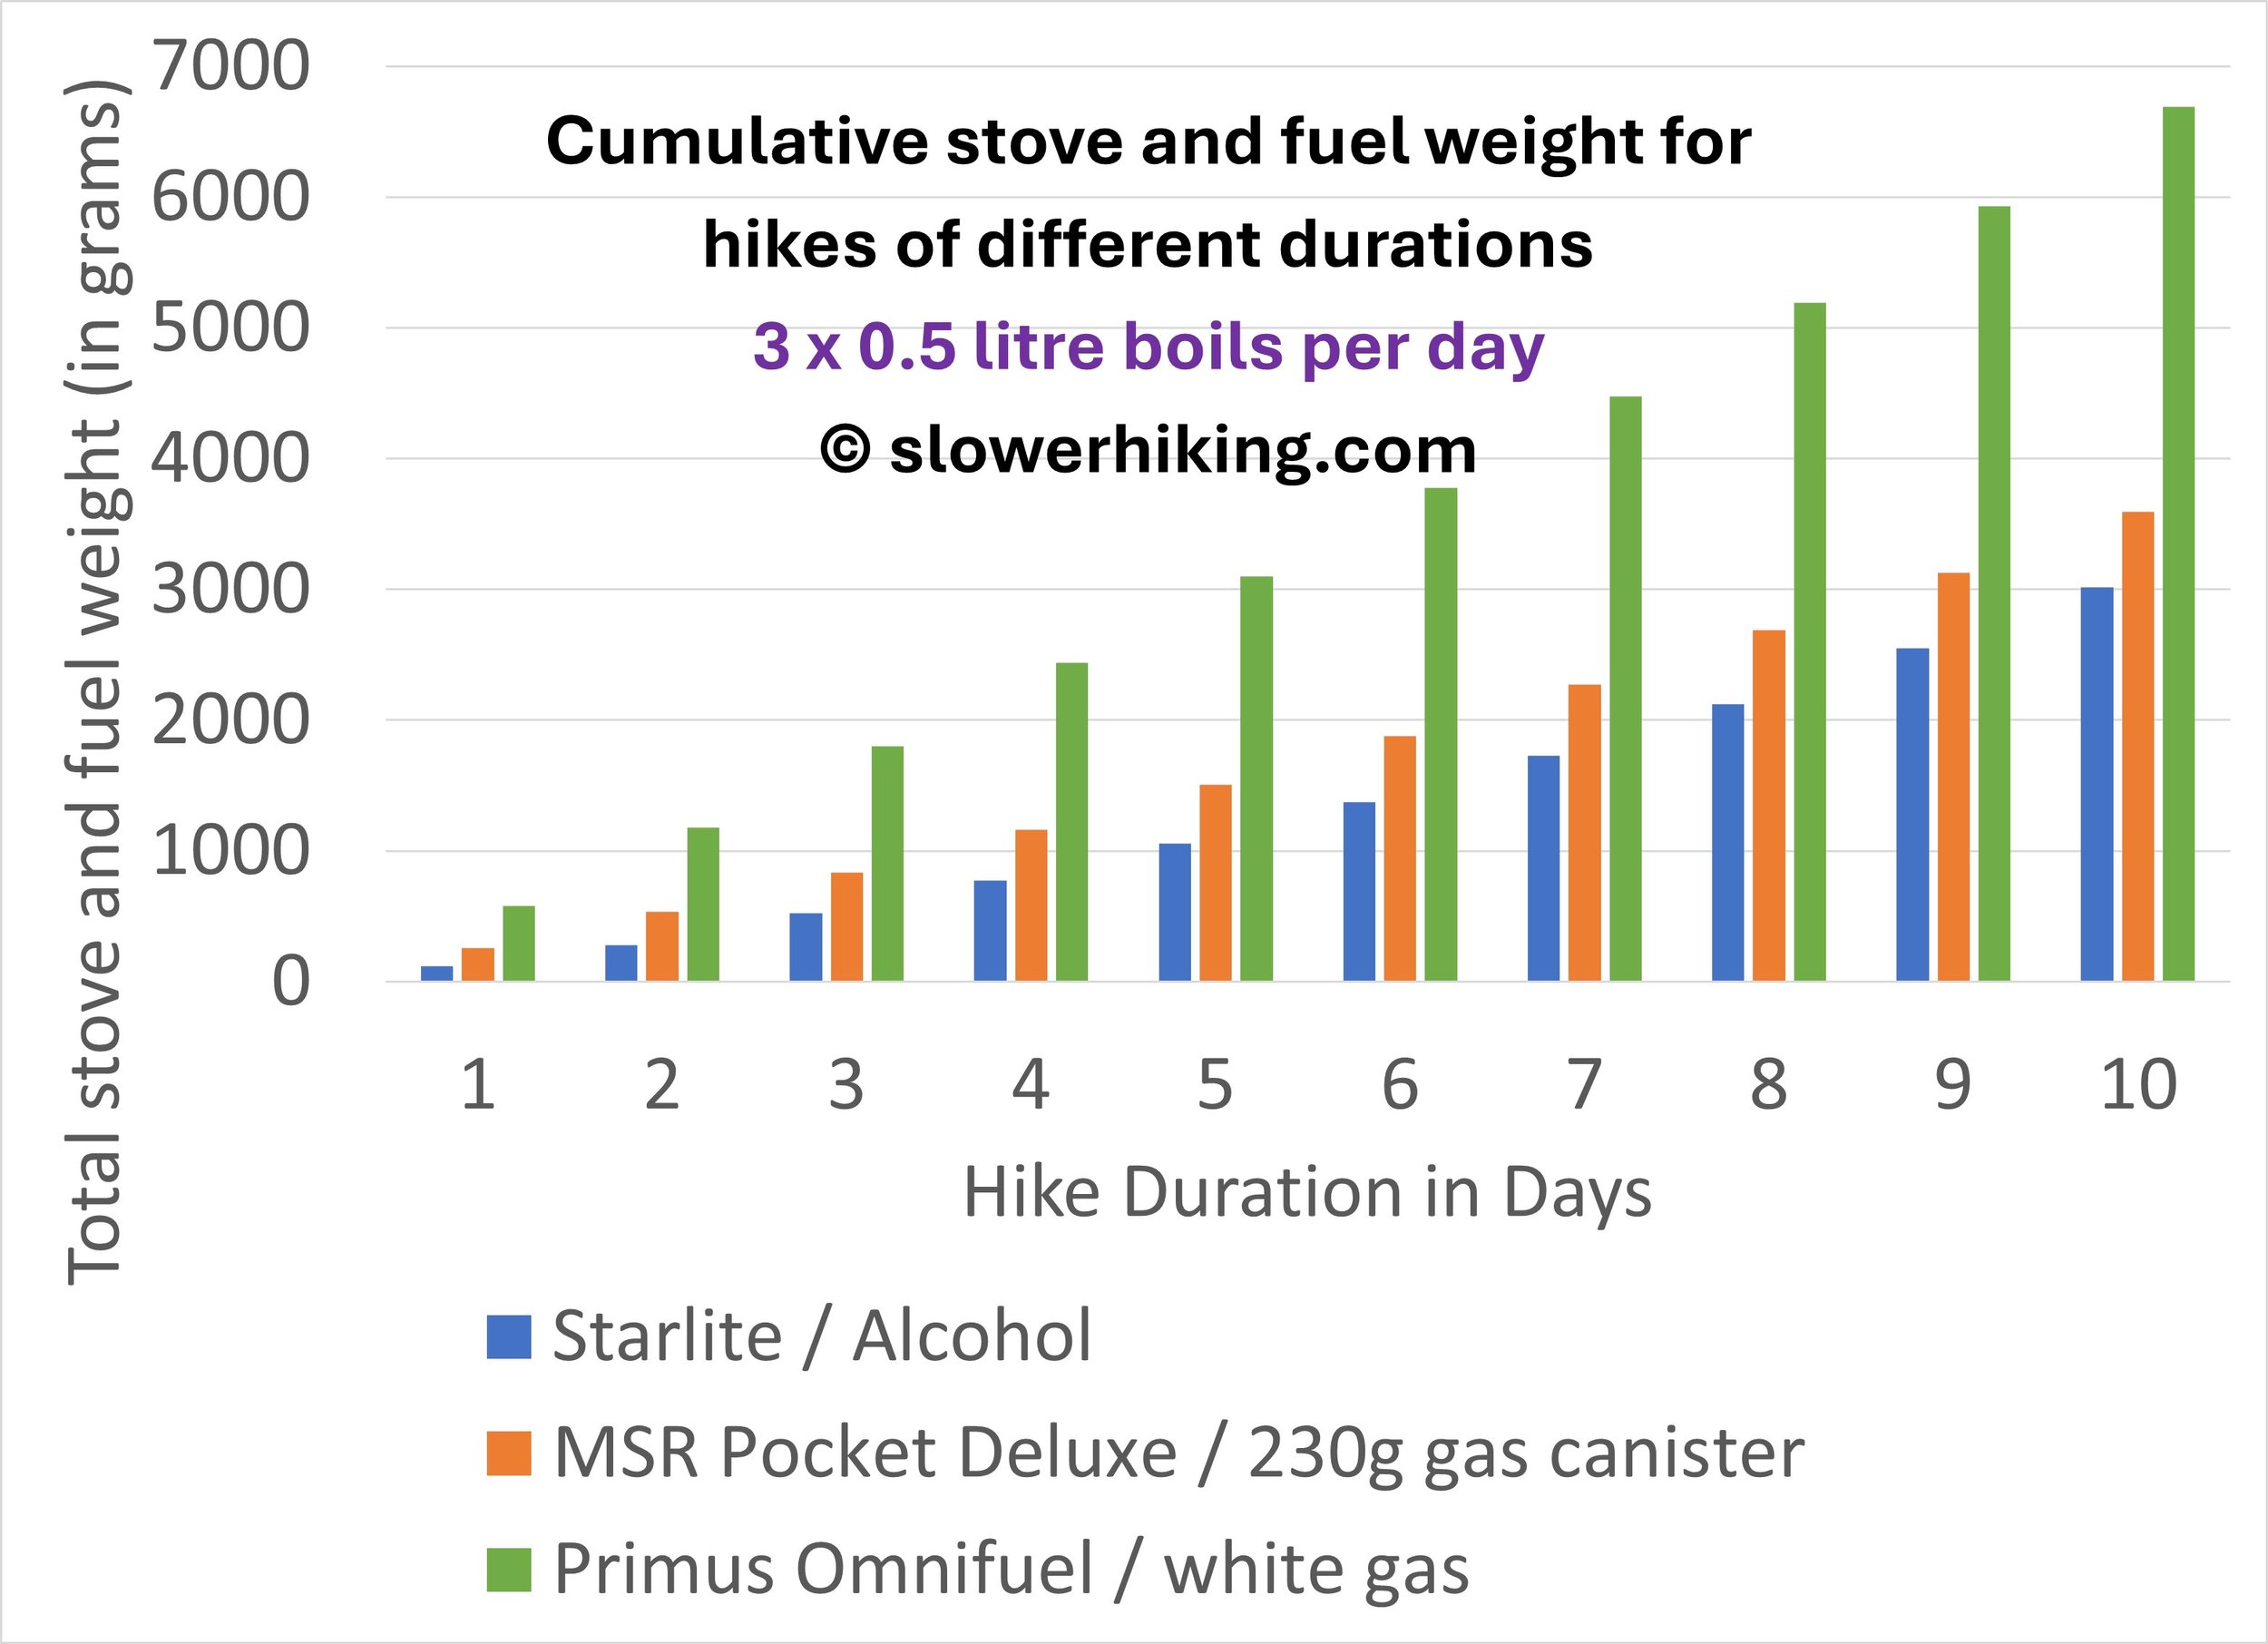
The following graphs illustrate the above points for both starting hike weight and total carried weight for hikes of different durations. We’ve also plotted the stove and fuel weights for each day of a ten-day hike. You can toggle between these three graphs. They assume you’d have the equivalent of 3 x 1L boils per day (which is what we did recently on the South Coast Track in Tasmania). Click on the graph to toggle through each series.
When looking at these graphs, remember that these are what work for Geoff and me in the temperatures we hike: different alcohol and gas stoves have different results. The famous BRS 3000T — just 25g/0.9oz — gas burner may outperform our alcohol system on short hikes, for example, because even small differences in weight and fuel efficiency can switch results. Our fast but heavier and less fuel efficient 36g/1.27oz Evernew EBY254 alcohol stove would also score differently. There are ways to make even efficient stoves more so: we don’t use a pot stand with our Starlyte but it would perform even better weight-wise if we did. But very cold conditions, where heat losses to ambient temperatures are greater, favour more efficient systems. So these graphs don’t suggest that all alcohol stoves outperform all gas stoves in all conditions and all hike durations, or vice versa. They don’t. By elimination, we’ve seen that liquid fuel stoves outperform the other two on very long hikes in very cold conditions. Instead, these graphs are intended to illustrate how you can begin to fine tune your stove selection for the kinds of hikes you do.
The numbers improve for gas for long durations of ten days or more between resupplies, particularly if you can use a 450g canister. This has the best fuel:container ratio (the container is 31% of the total weight), but these canisters aren’t always available in small towns. Most people don’t seem to do this but instead carry two 230g canisters which adds an extra 93g each day of their hike.
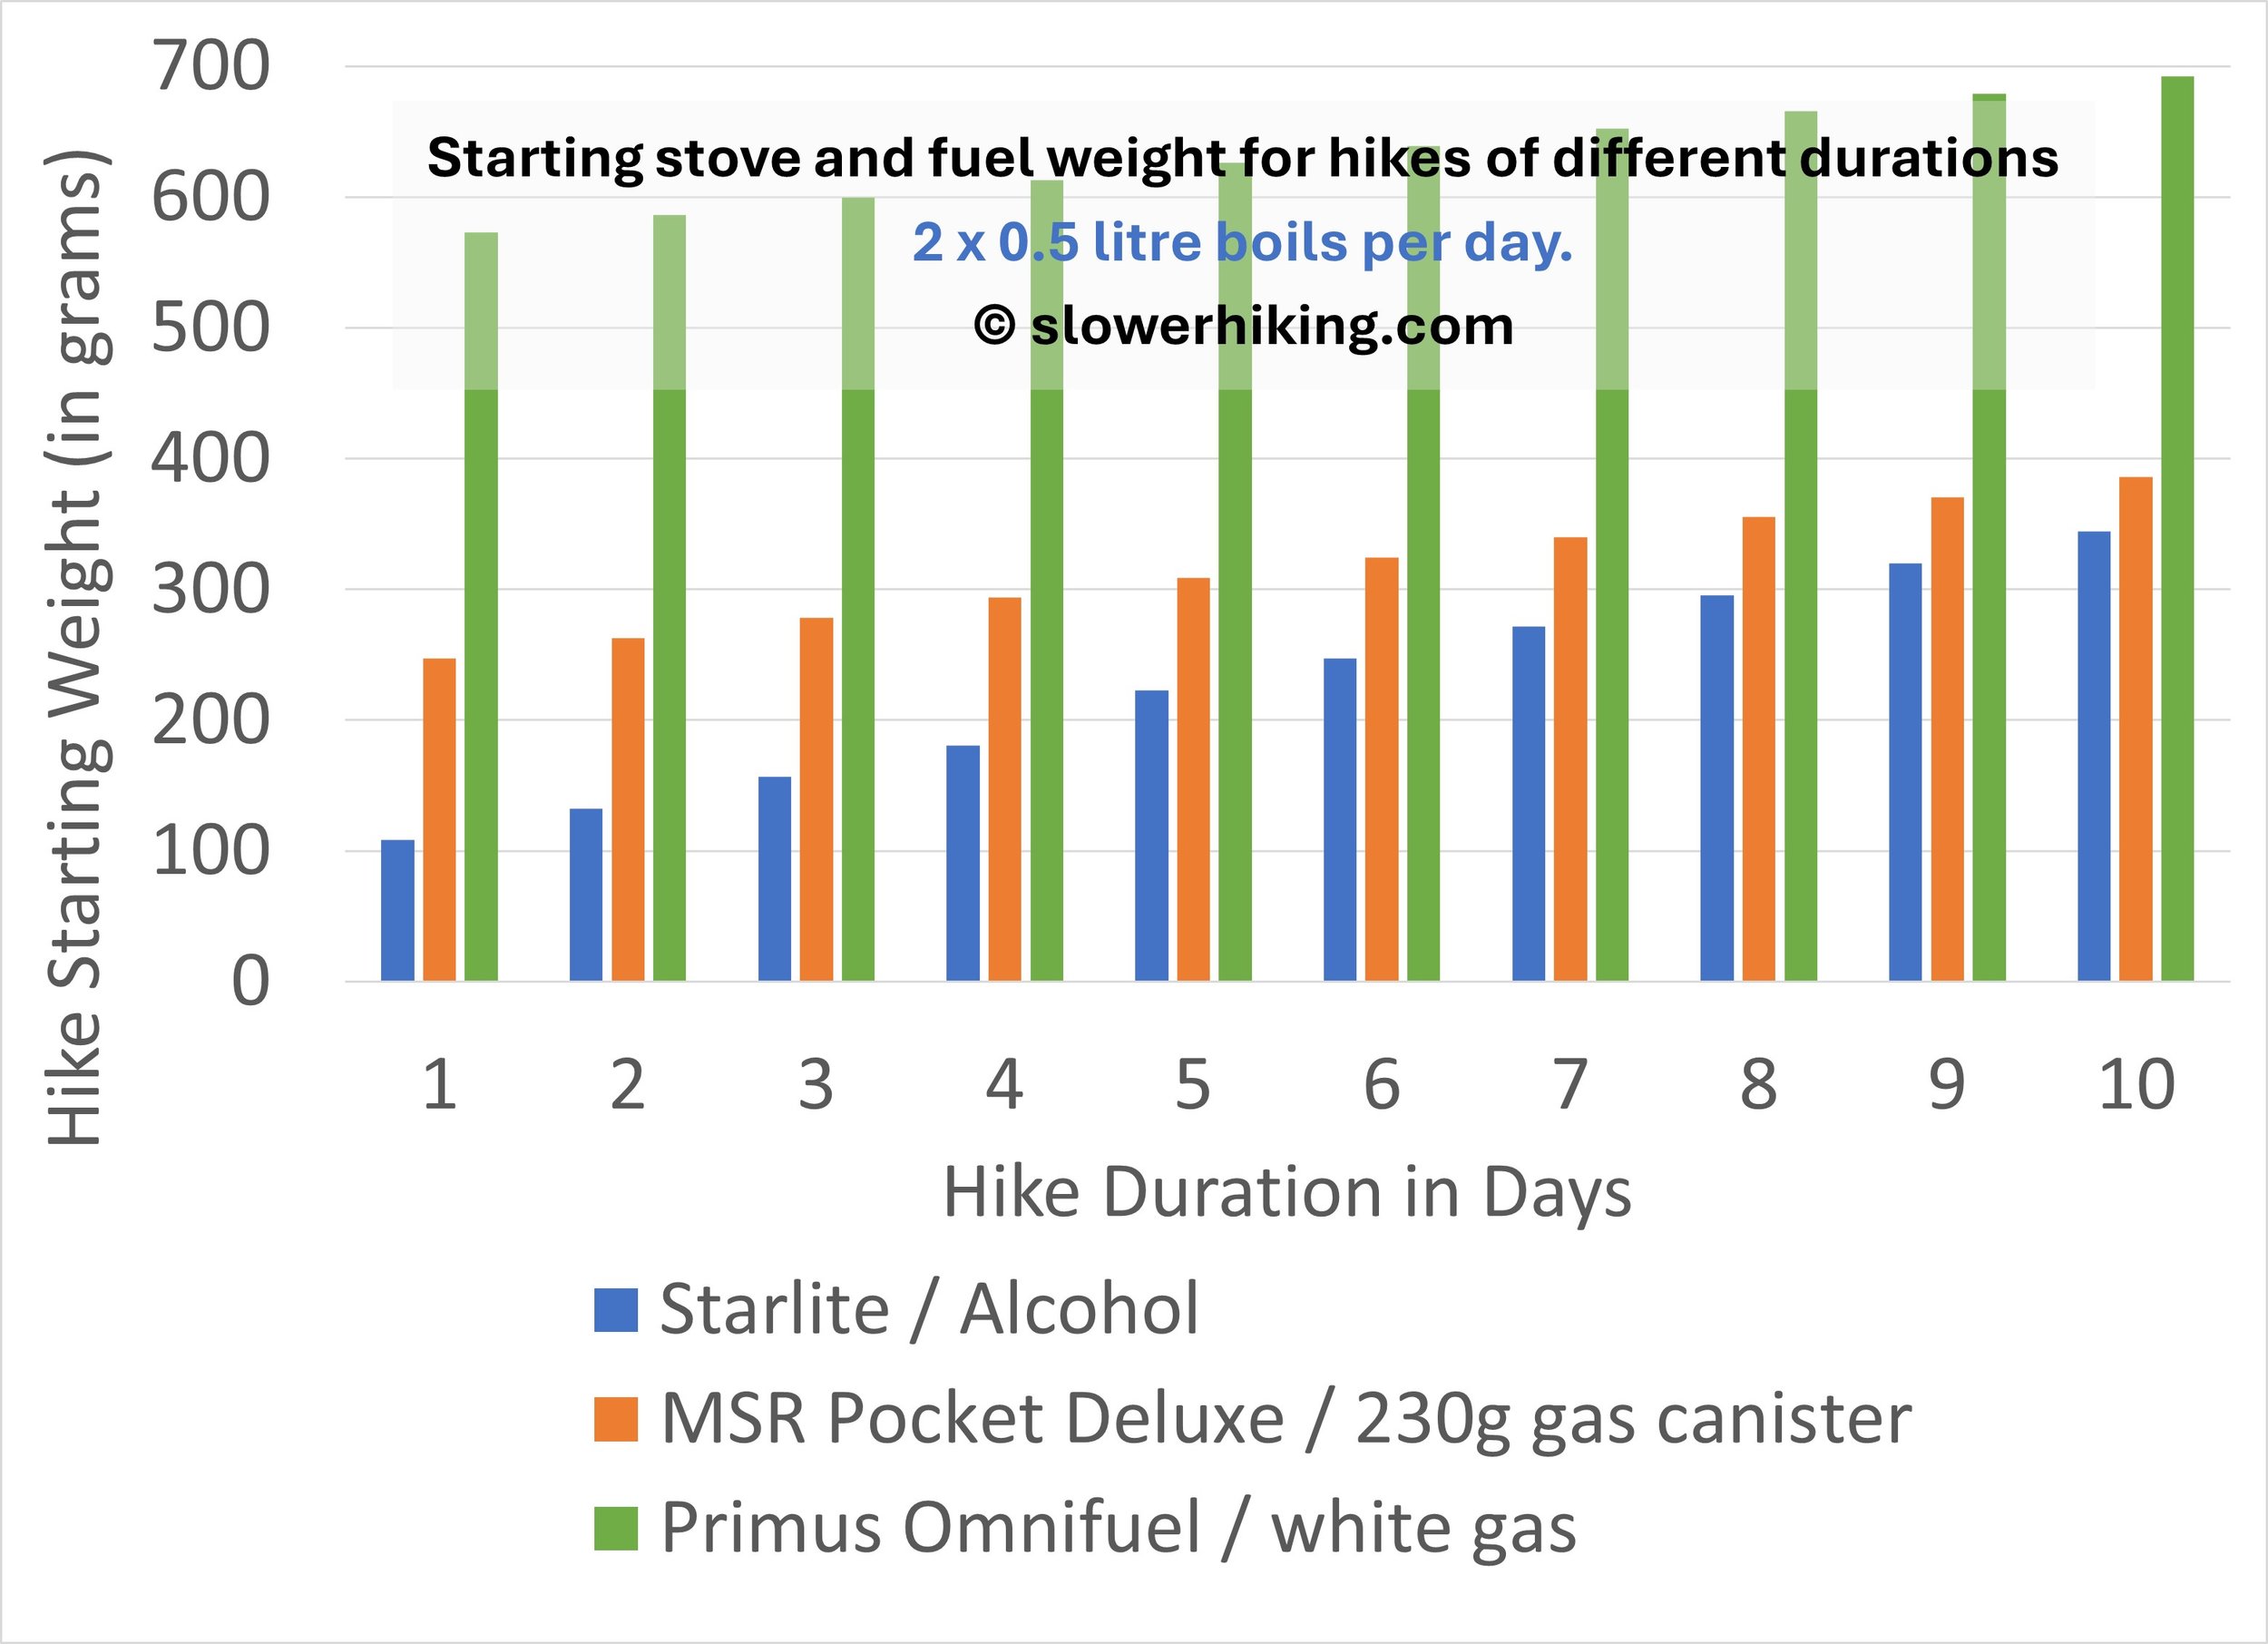
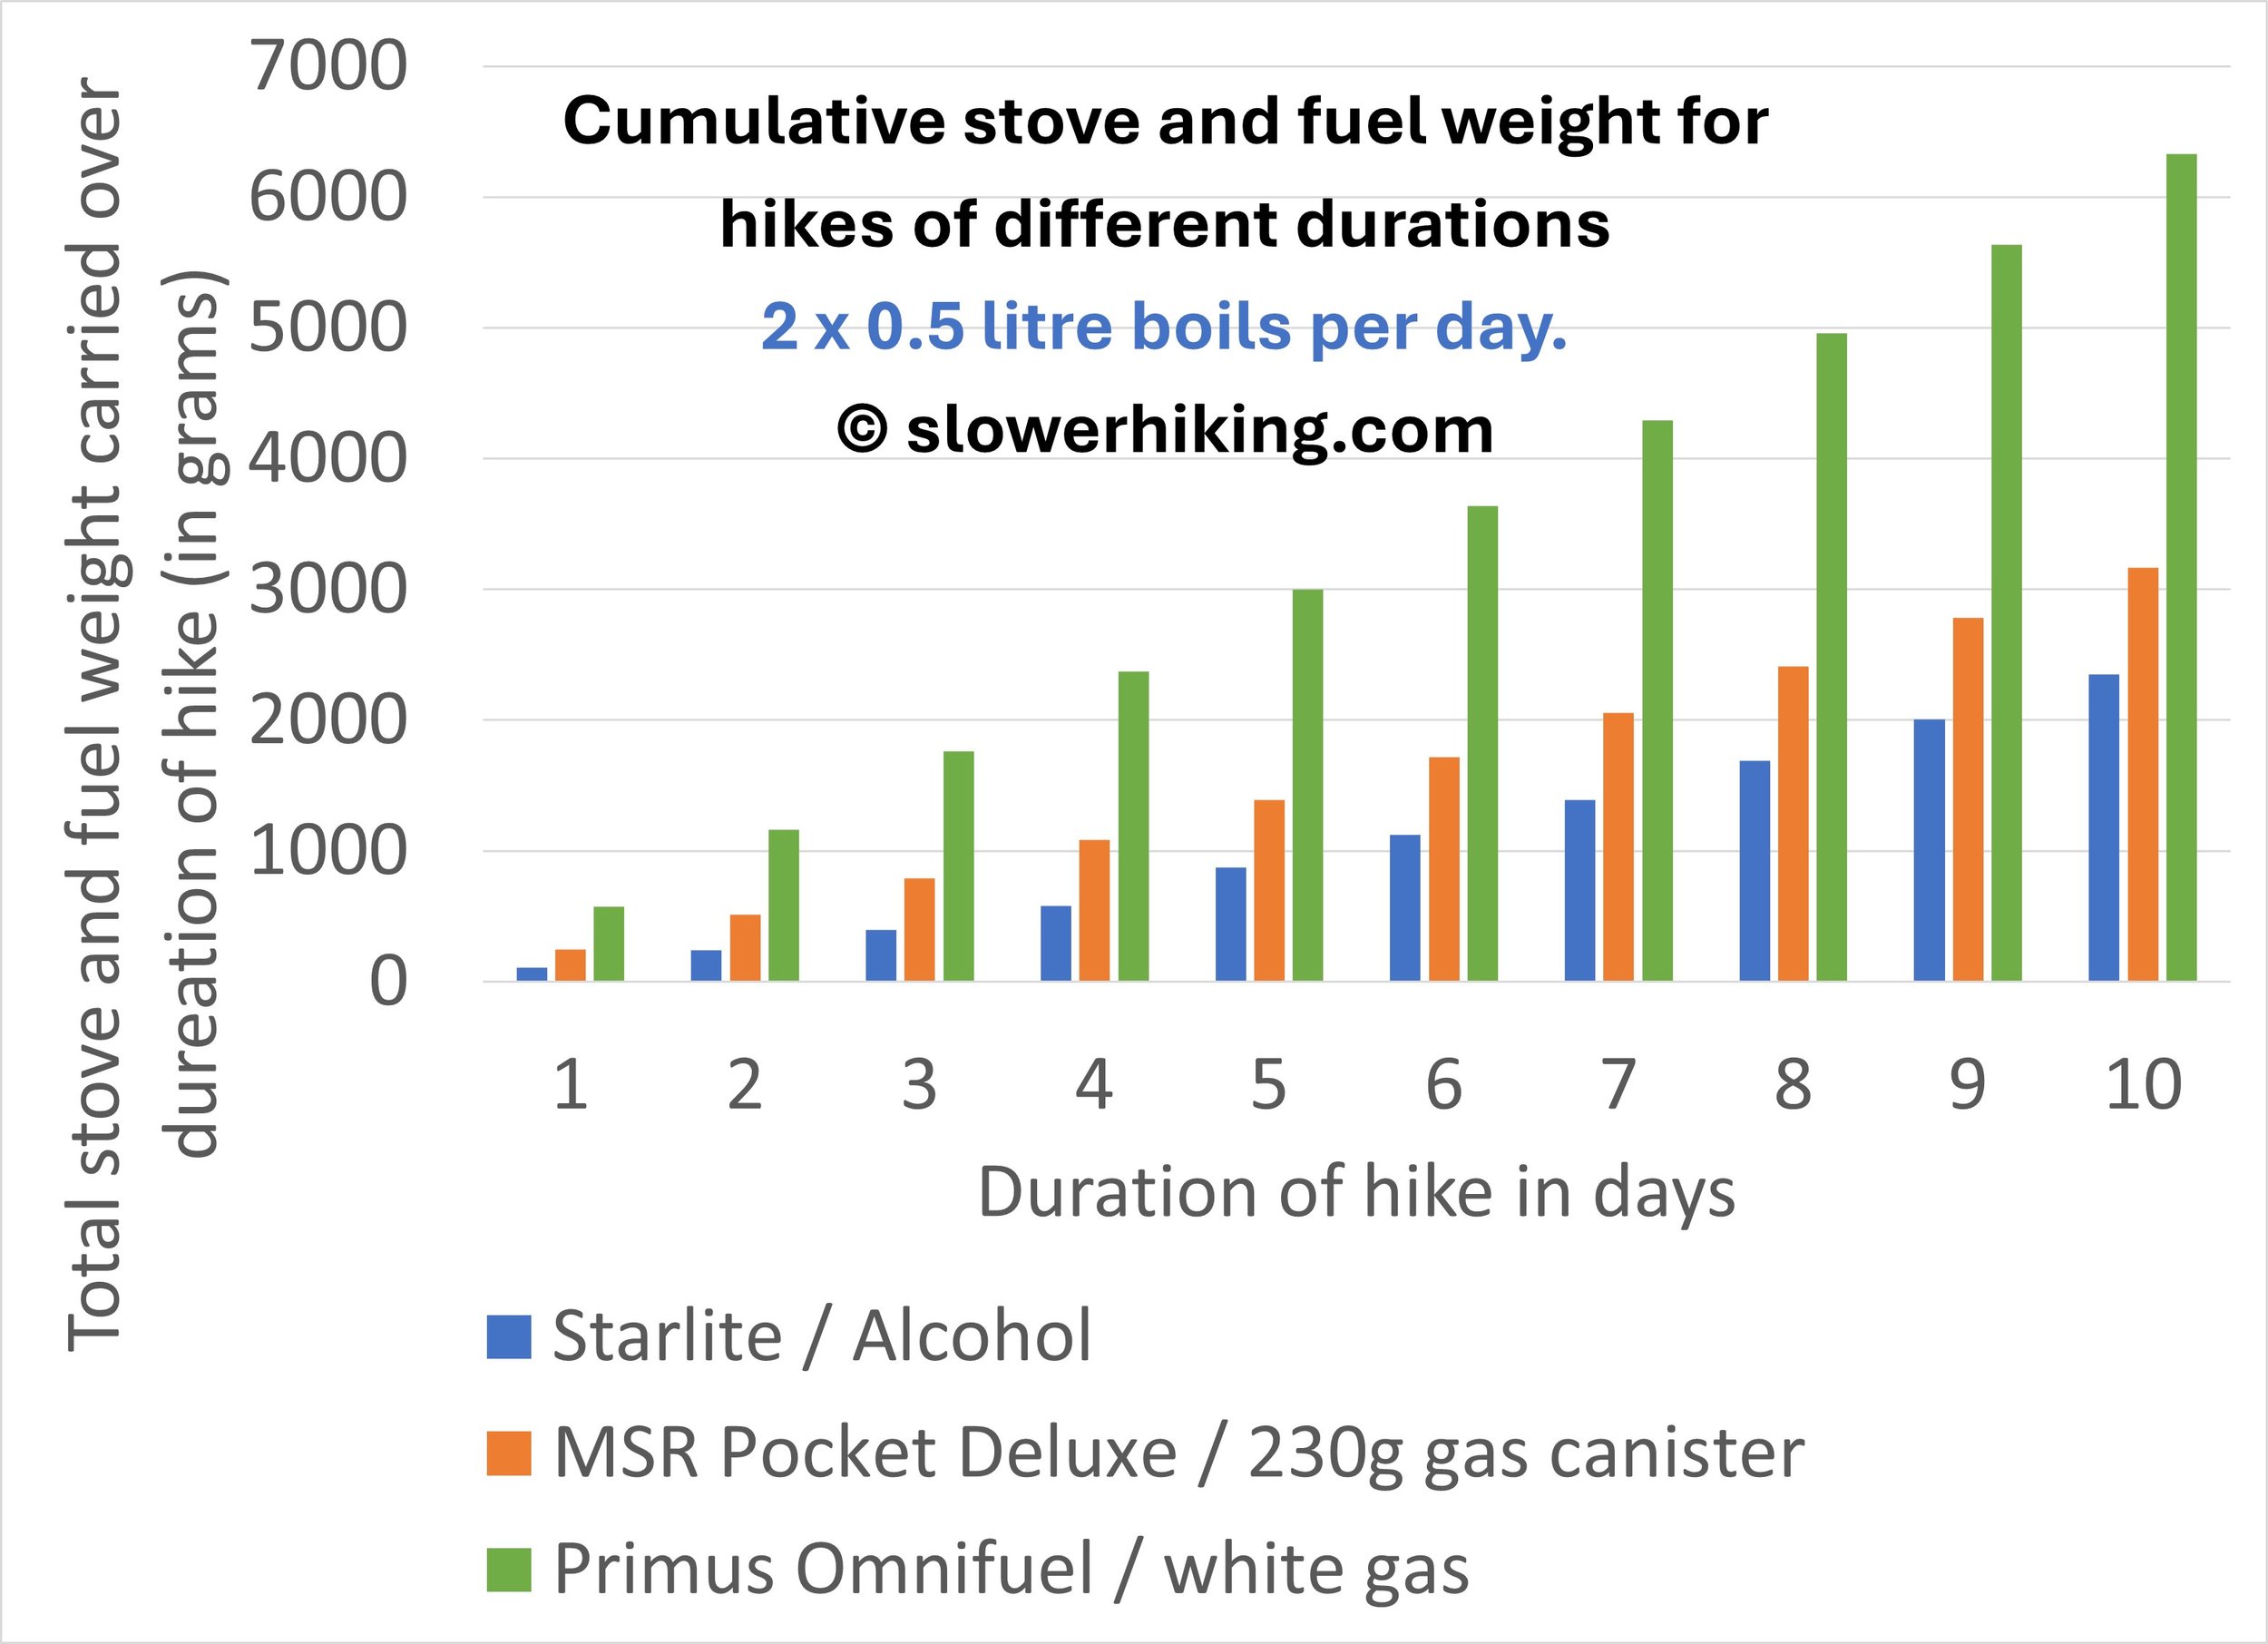
What if you use significantly less fuel than us and you delay the need for a second canister? Well, the results remain similar and are presented in the two litres of water per day graphs below (two boils of 1 litre each). (Click on the graph to toggle through each series).
And yes we’ve also looked at half litre boils either three times or twice per day. The same outcome holds true for our stove configurations. See the series of graphs that follow. (Click on the graph to toggle through each series).
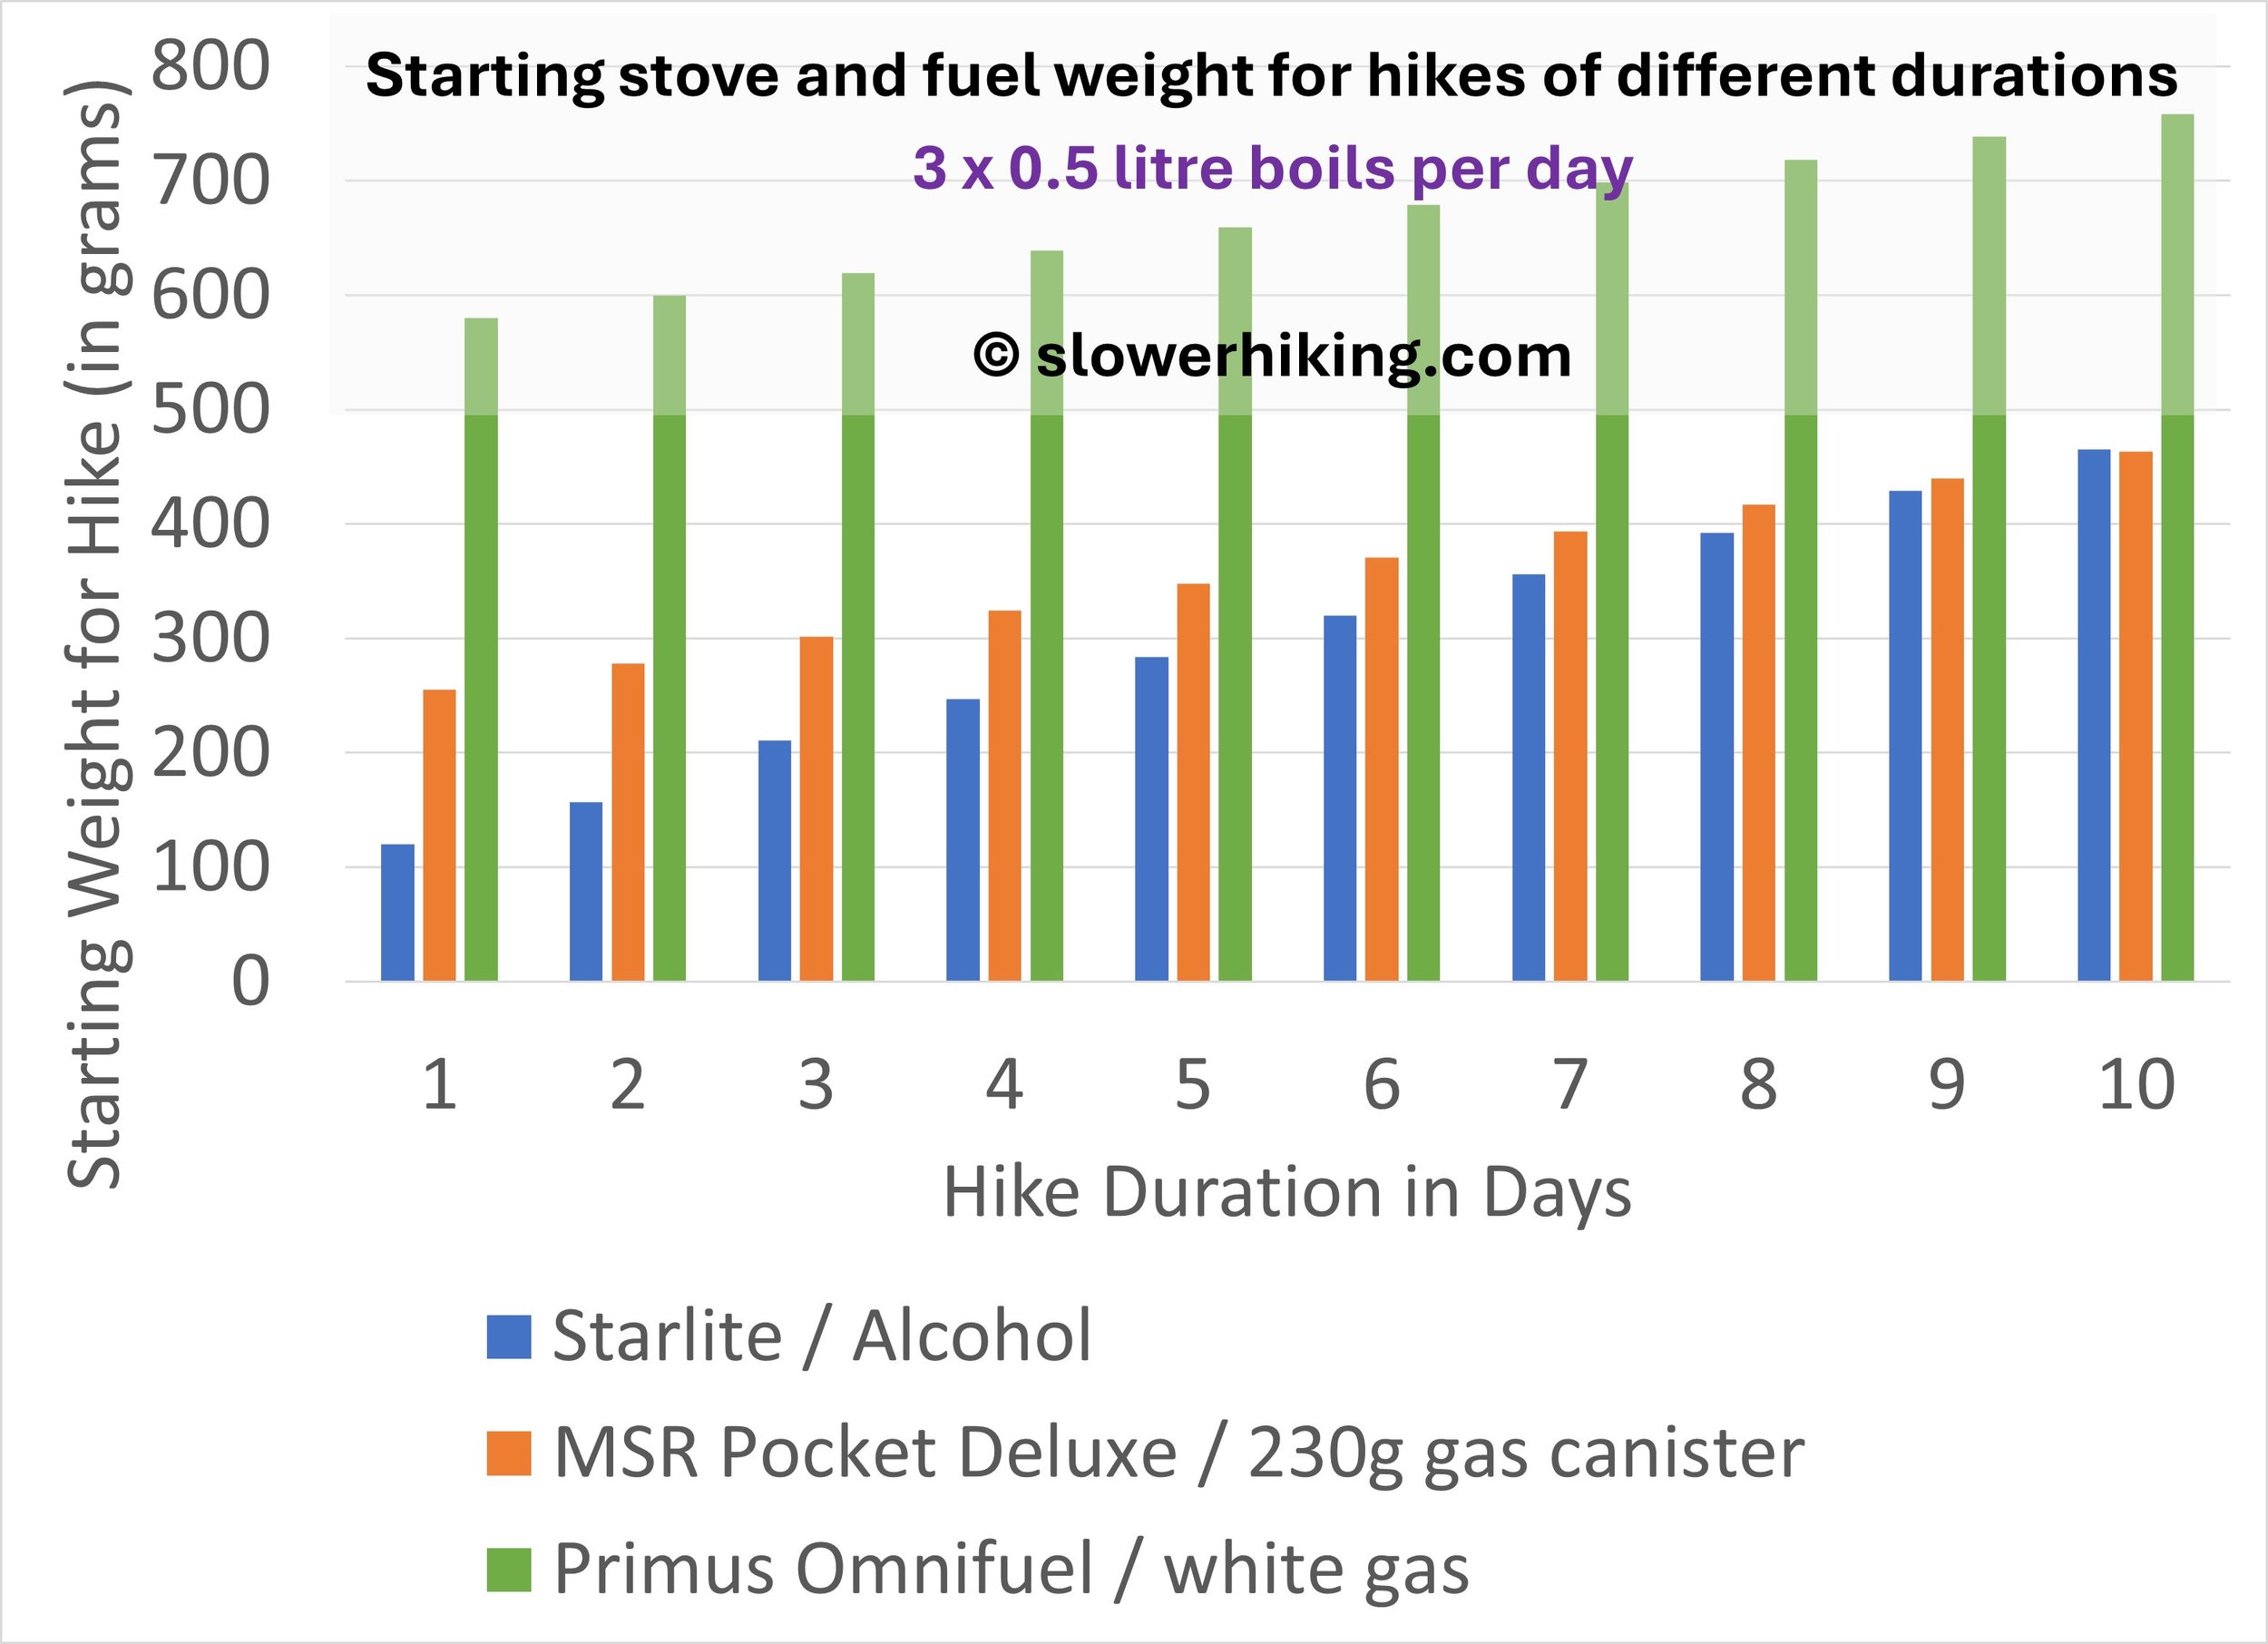
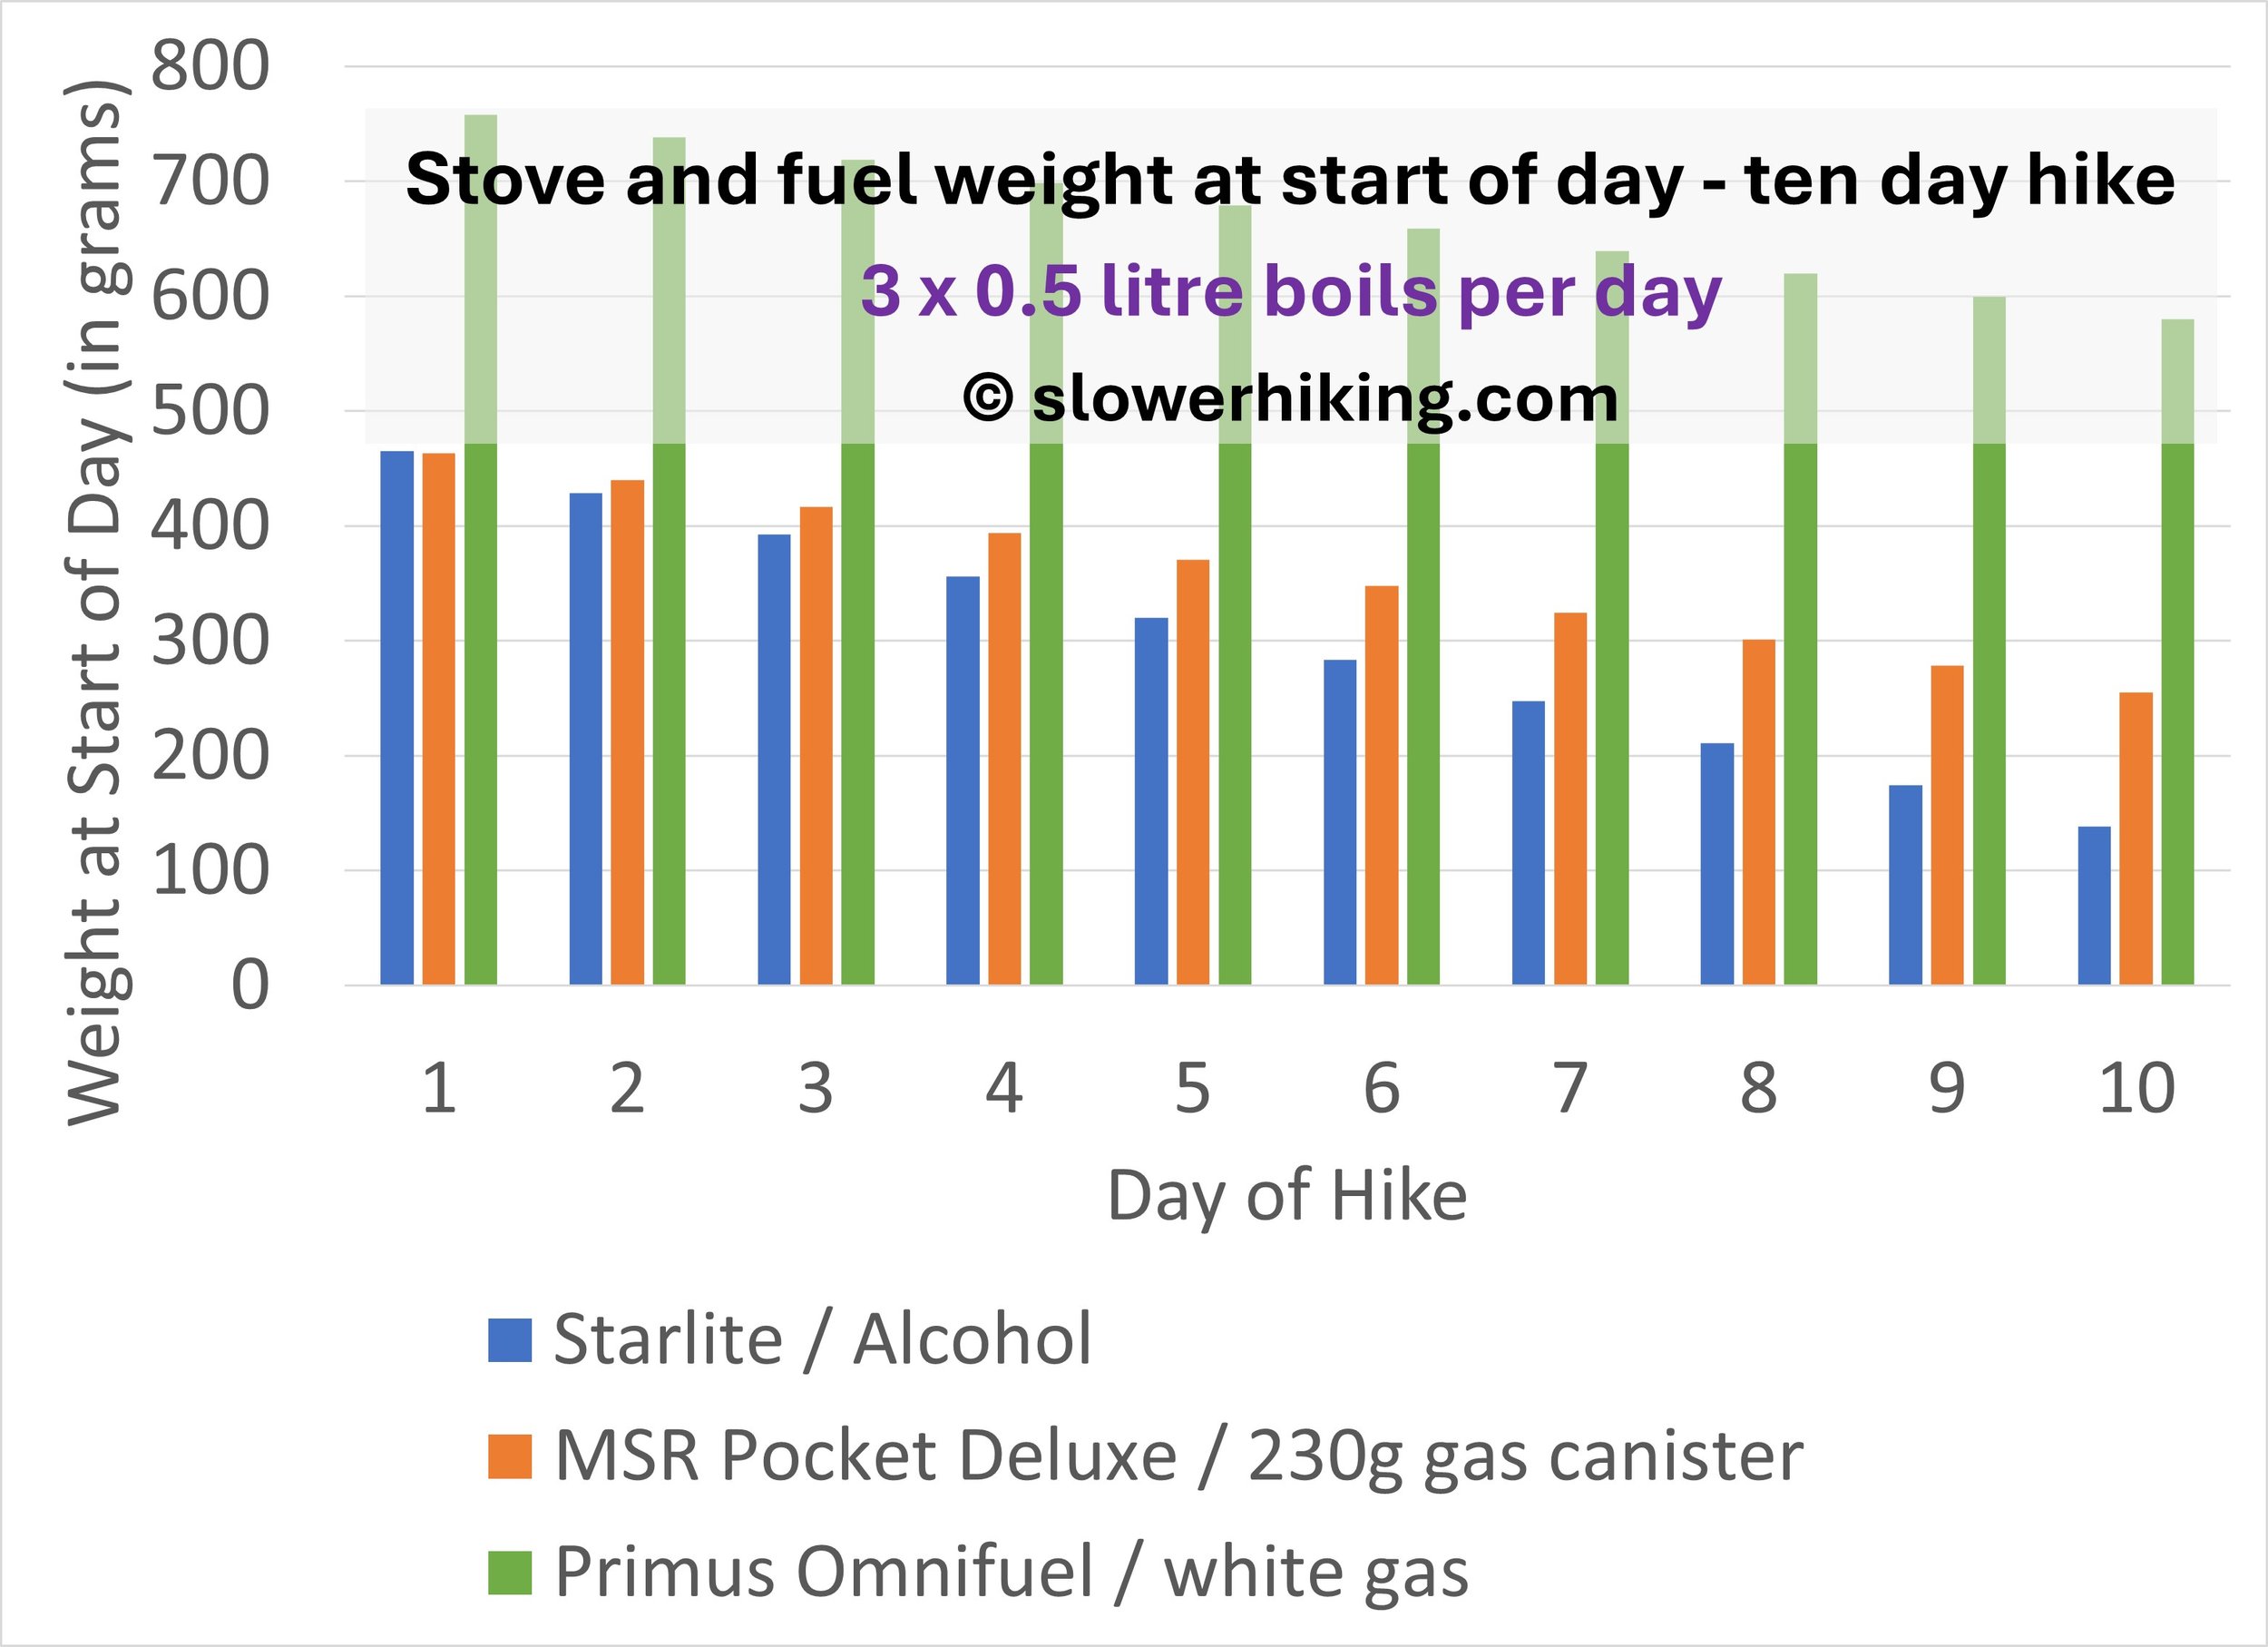
And below are the series for 2 by 0.5 litre boils per day.
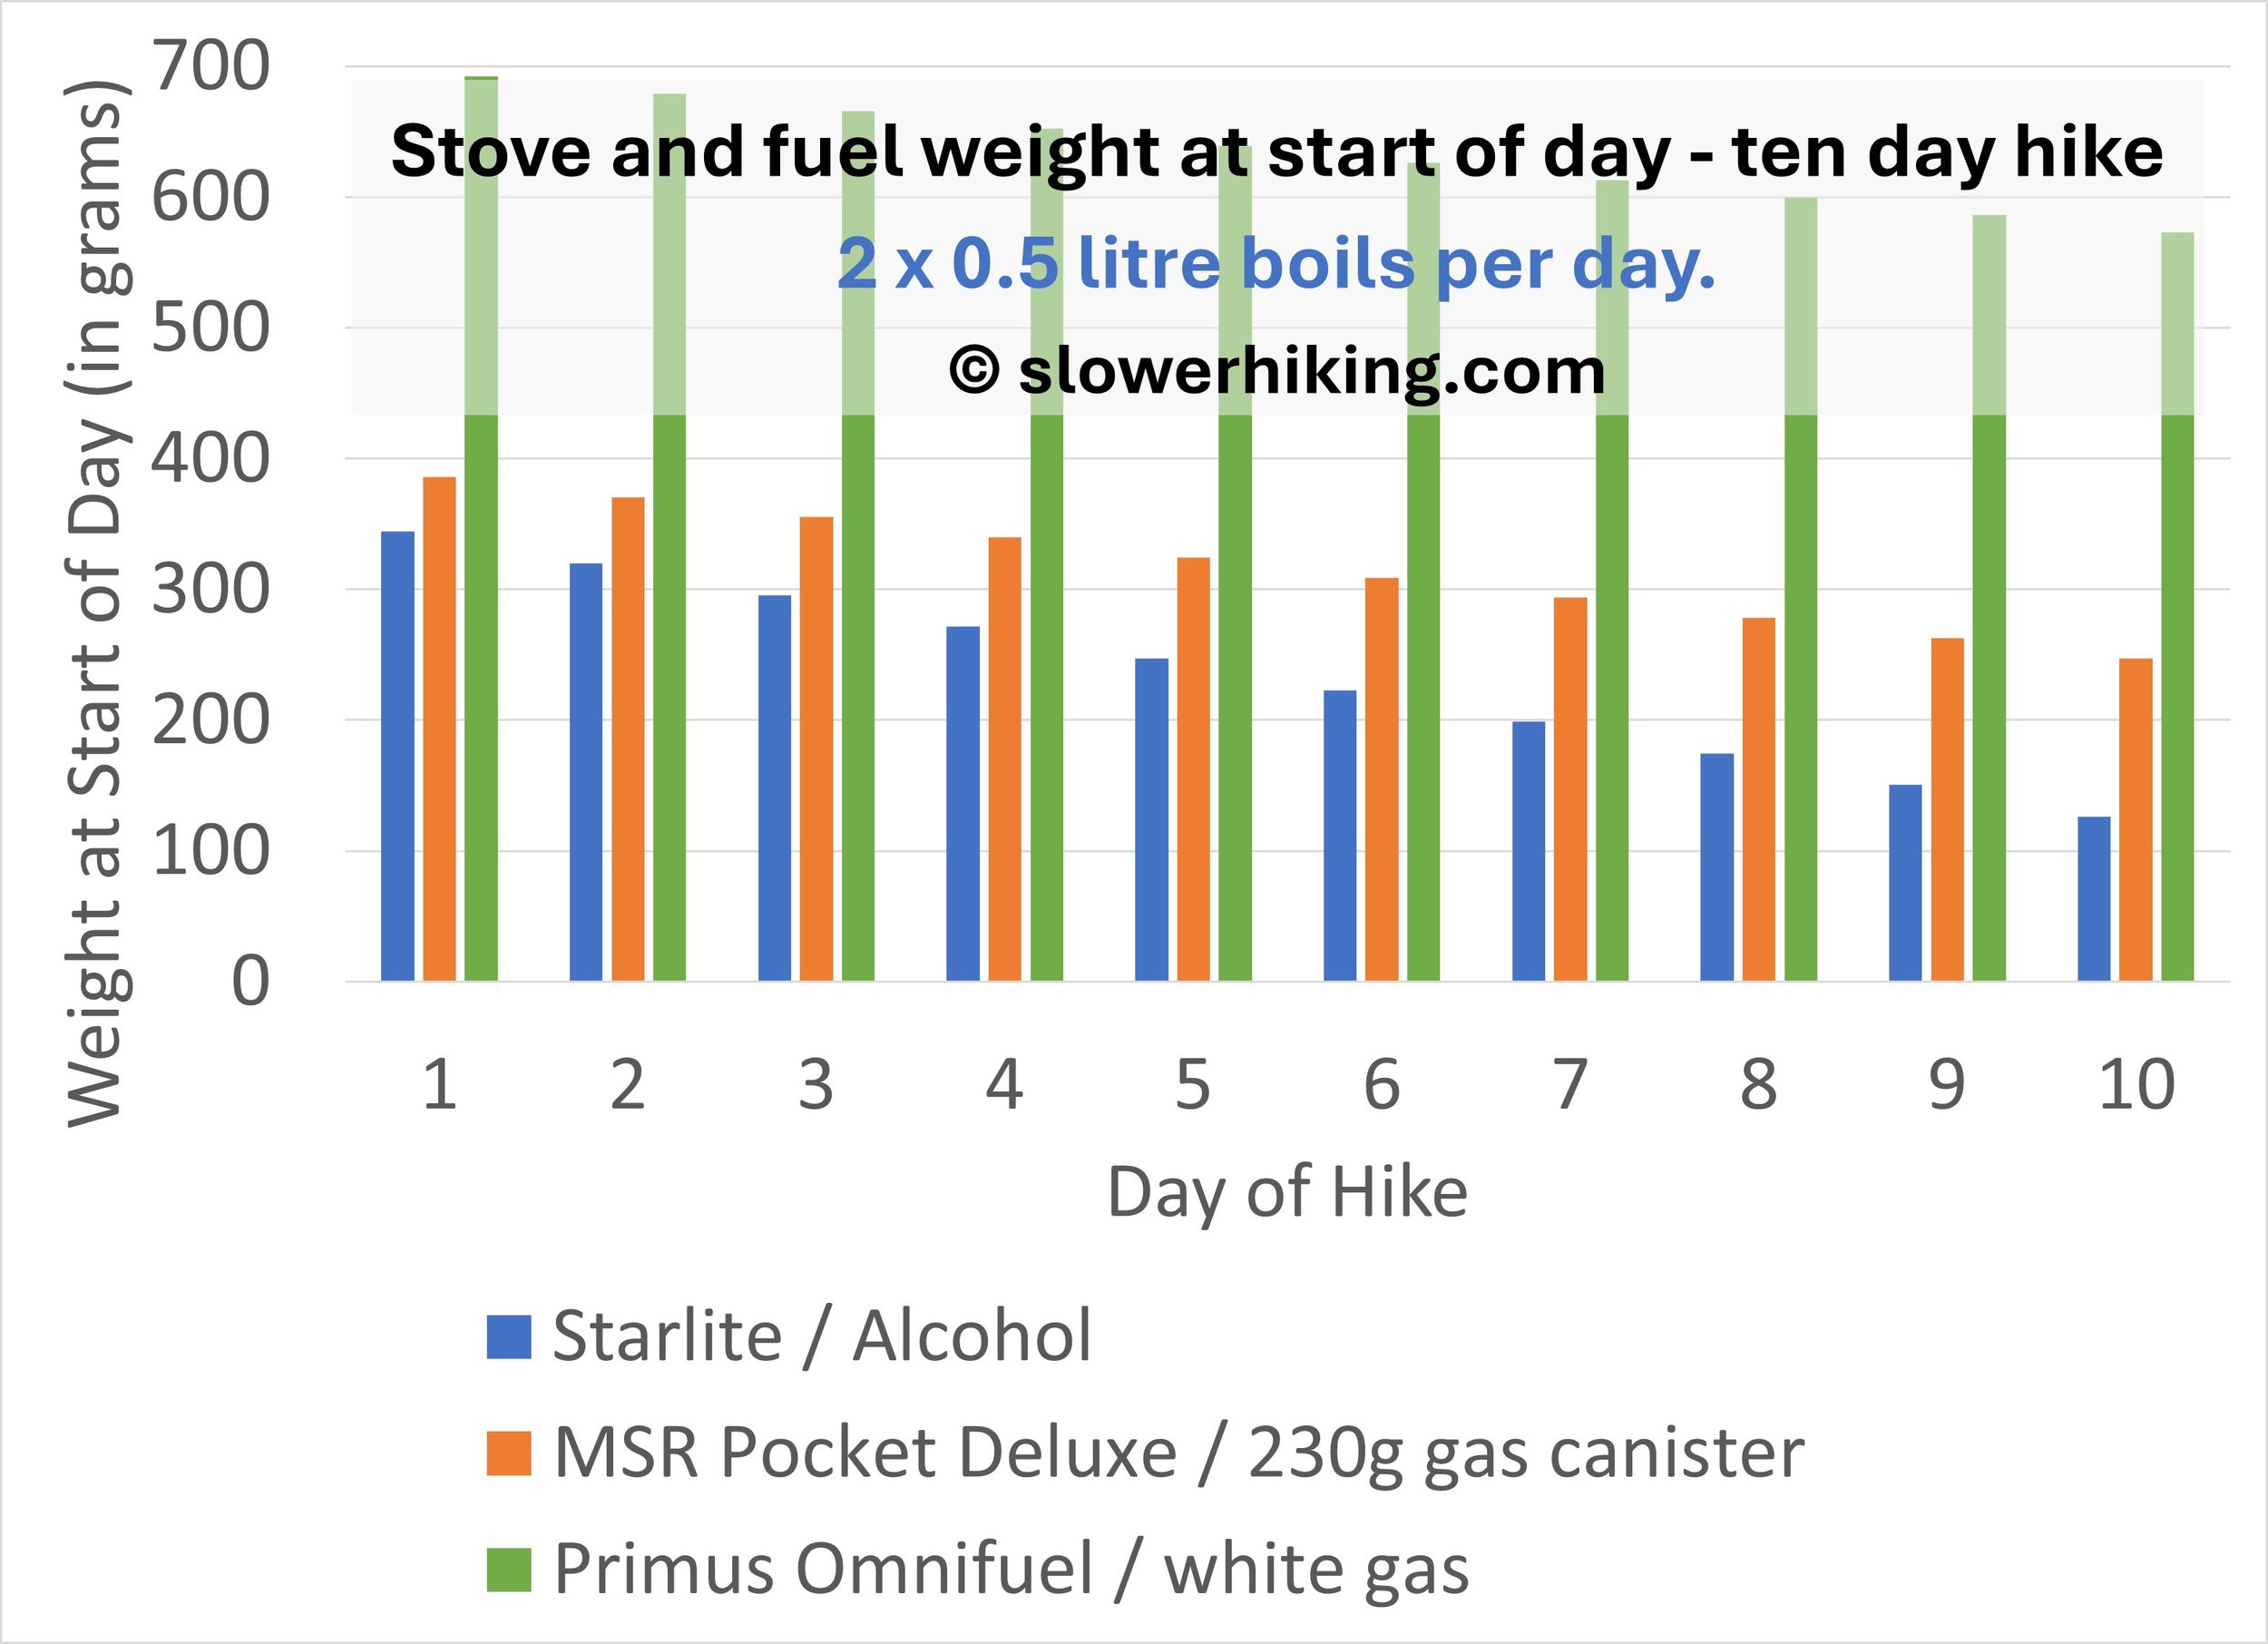
In all the graphs presented above we have assumed that you would take the right amount of fuel plus a 10% allowance for wastage or for the odd inefficient cook (eg due to a windy exposed site). That is easy for liquid fuel and alcohol but for gas that means starting with a partially full canister that exactly matches that hike’s needs. Most people don’t do that, so real-world comparisons are more favourable again for alcohol than gas.
But many people will still prefer gas for a variety of good reasons so matching your fuel load at the start of the hike with what you will need is useful. Certainly, most people seem to start each hike with a full canister, but it is rare for us to see someone with a 450g or 100g canister. So we’ll explore the benefits from optimising your canister selection for each hike in Part Three of this series.
For us the graphs all stop at 10 days (technically 11 days because we always carry one extra day of food and fuel) – that is when we reach our total pack weight limit once we allow for food and water. And we normally resupply more frequently than every 10 days where possible.
So would a more efficient stove mean we could carry less fuel and therefore more food to hike more days? No, at least not for us. With a total daily food weight (nearly all dehydrated) of 800g between two of us, the efficiency increases in fuel required to compensate for even just one day’s food, plus the additional weight of a liquid or gas system, just aren’t possible over such a short timeframe. Less greedy solo hikers may fare differently!
However, you’ll see some benefits at the margins from more efficient stoves. For example, we save 16g per day by using our Starlyte rather than Toaks burner. But for gas the savings are more significant and can result in avoiding a second fuel container, depending on your hike duration. This is illustrated in the following graphs, which are all for three, one litre boils per day.
We’ve included the pot weight in these graphs for consistency across all three stoves.
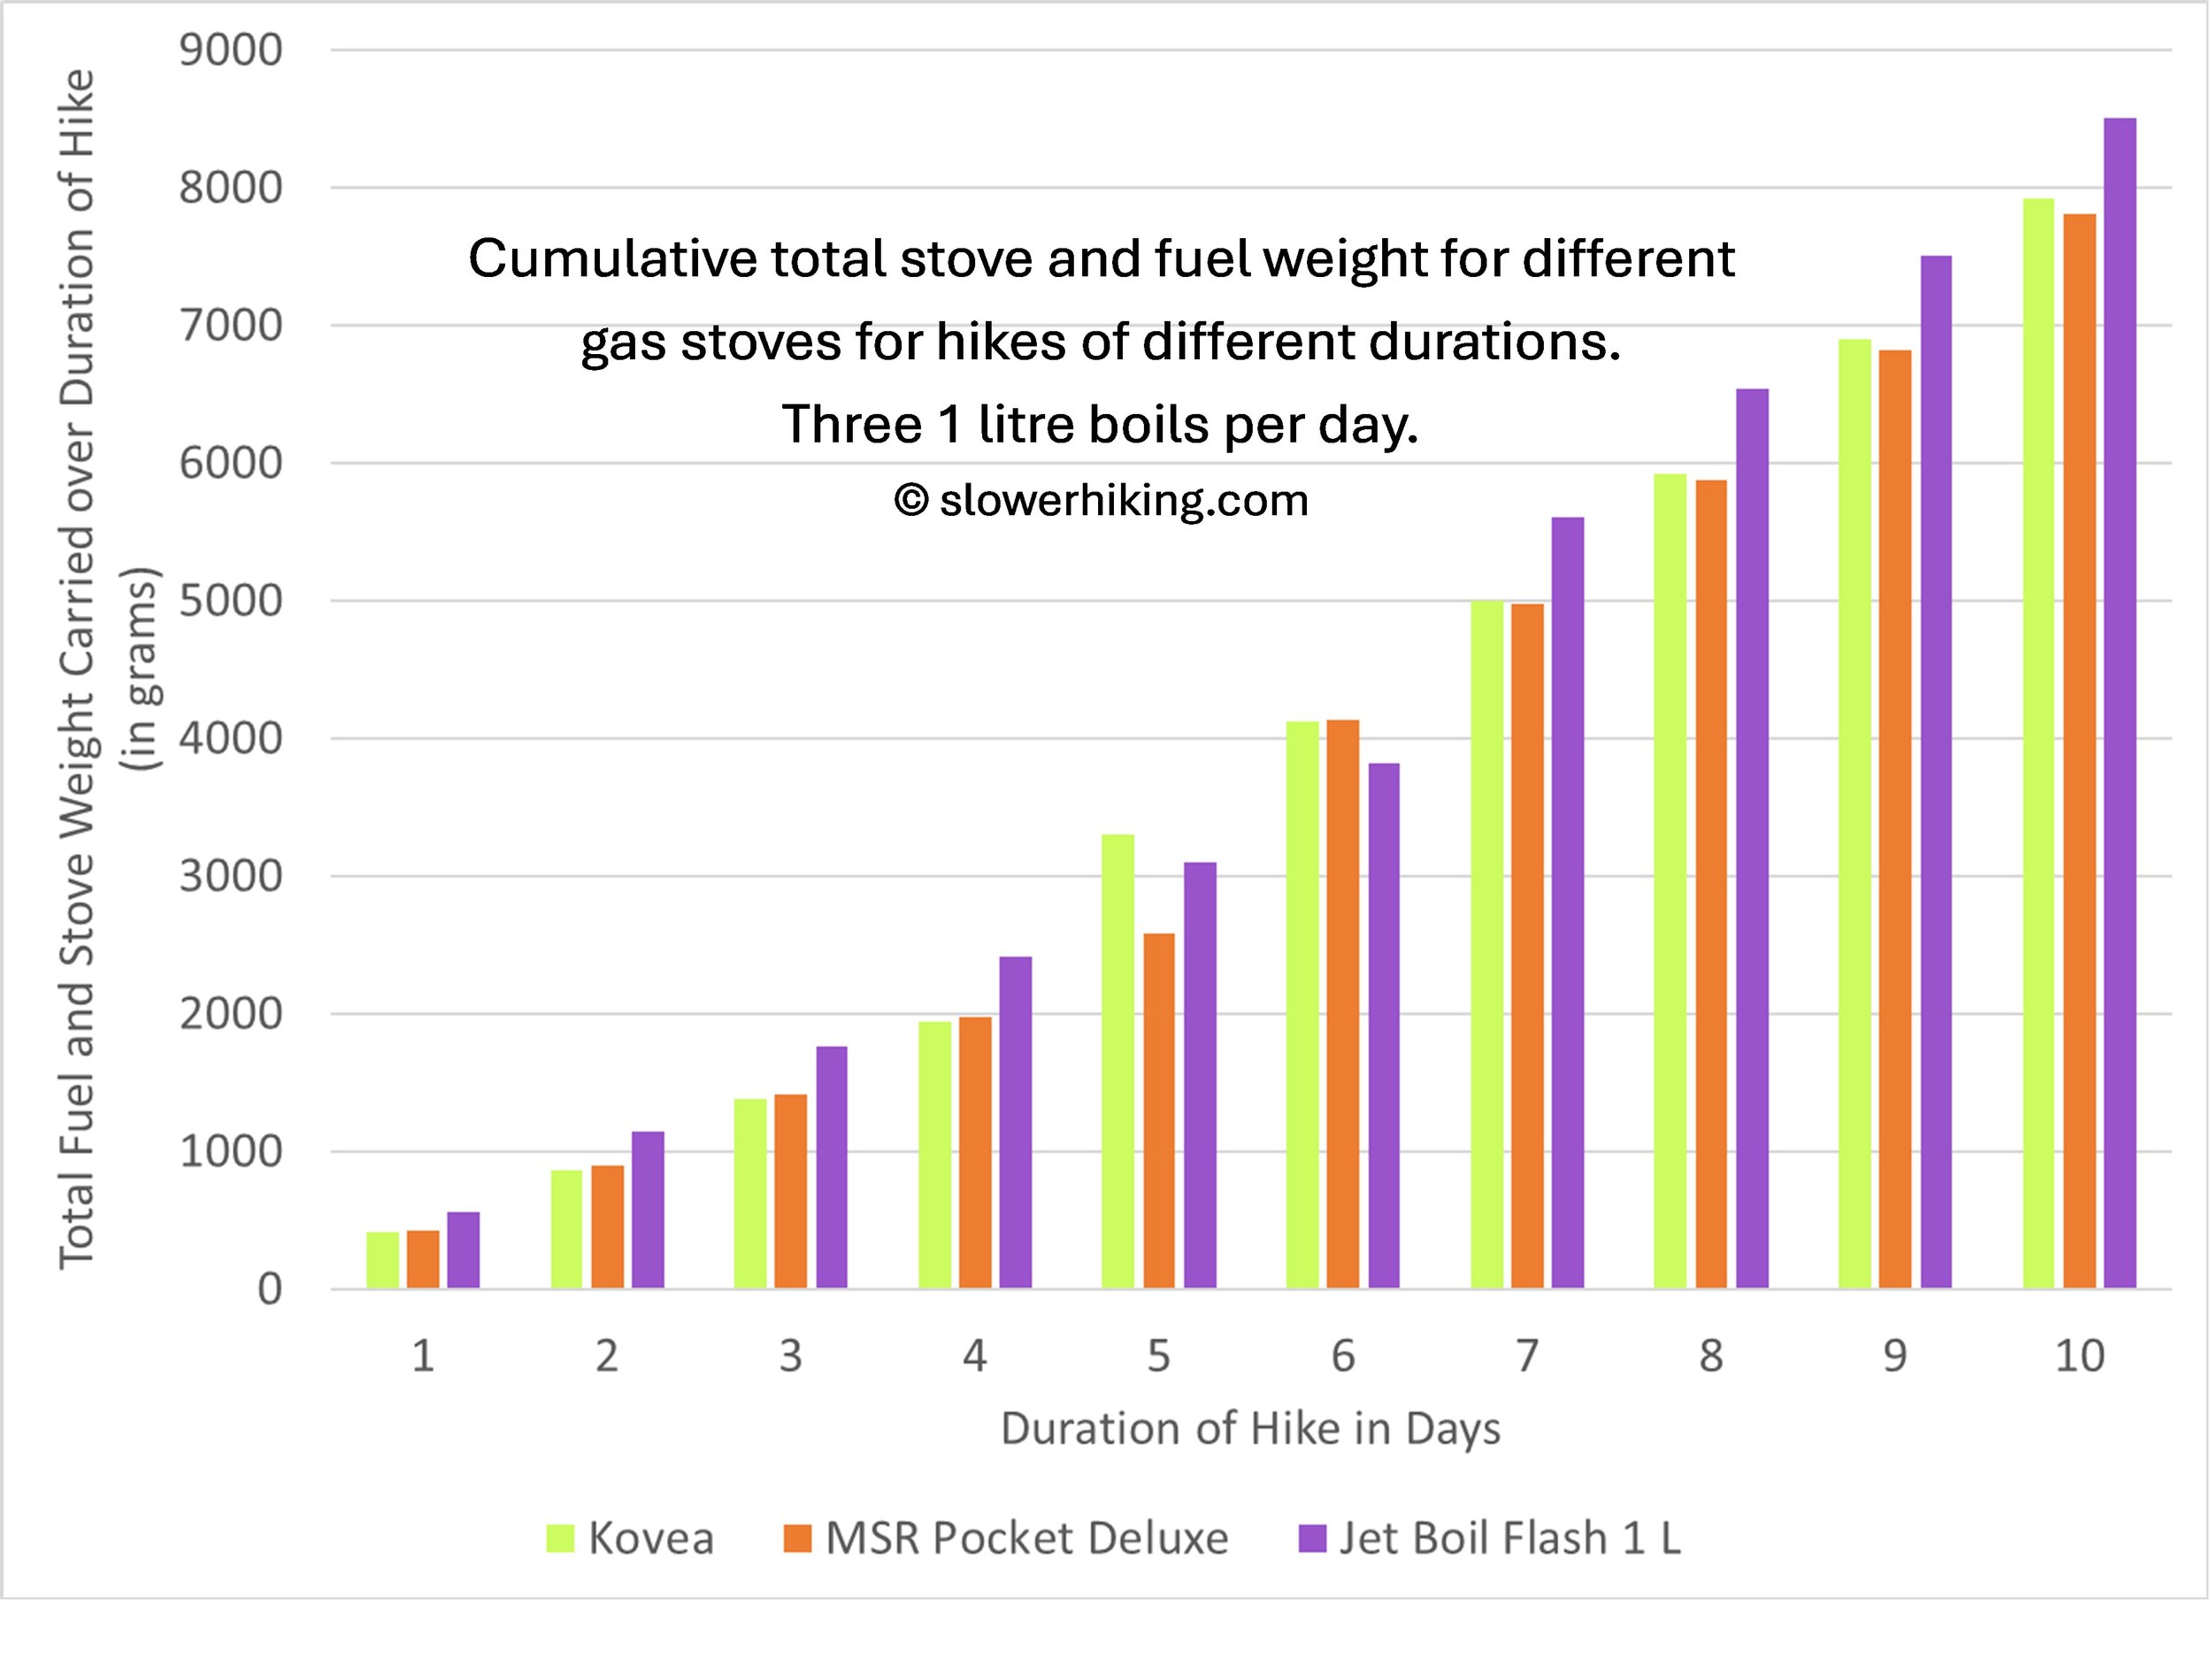
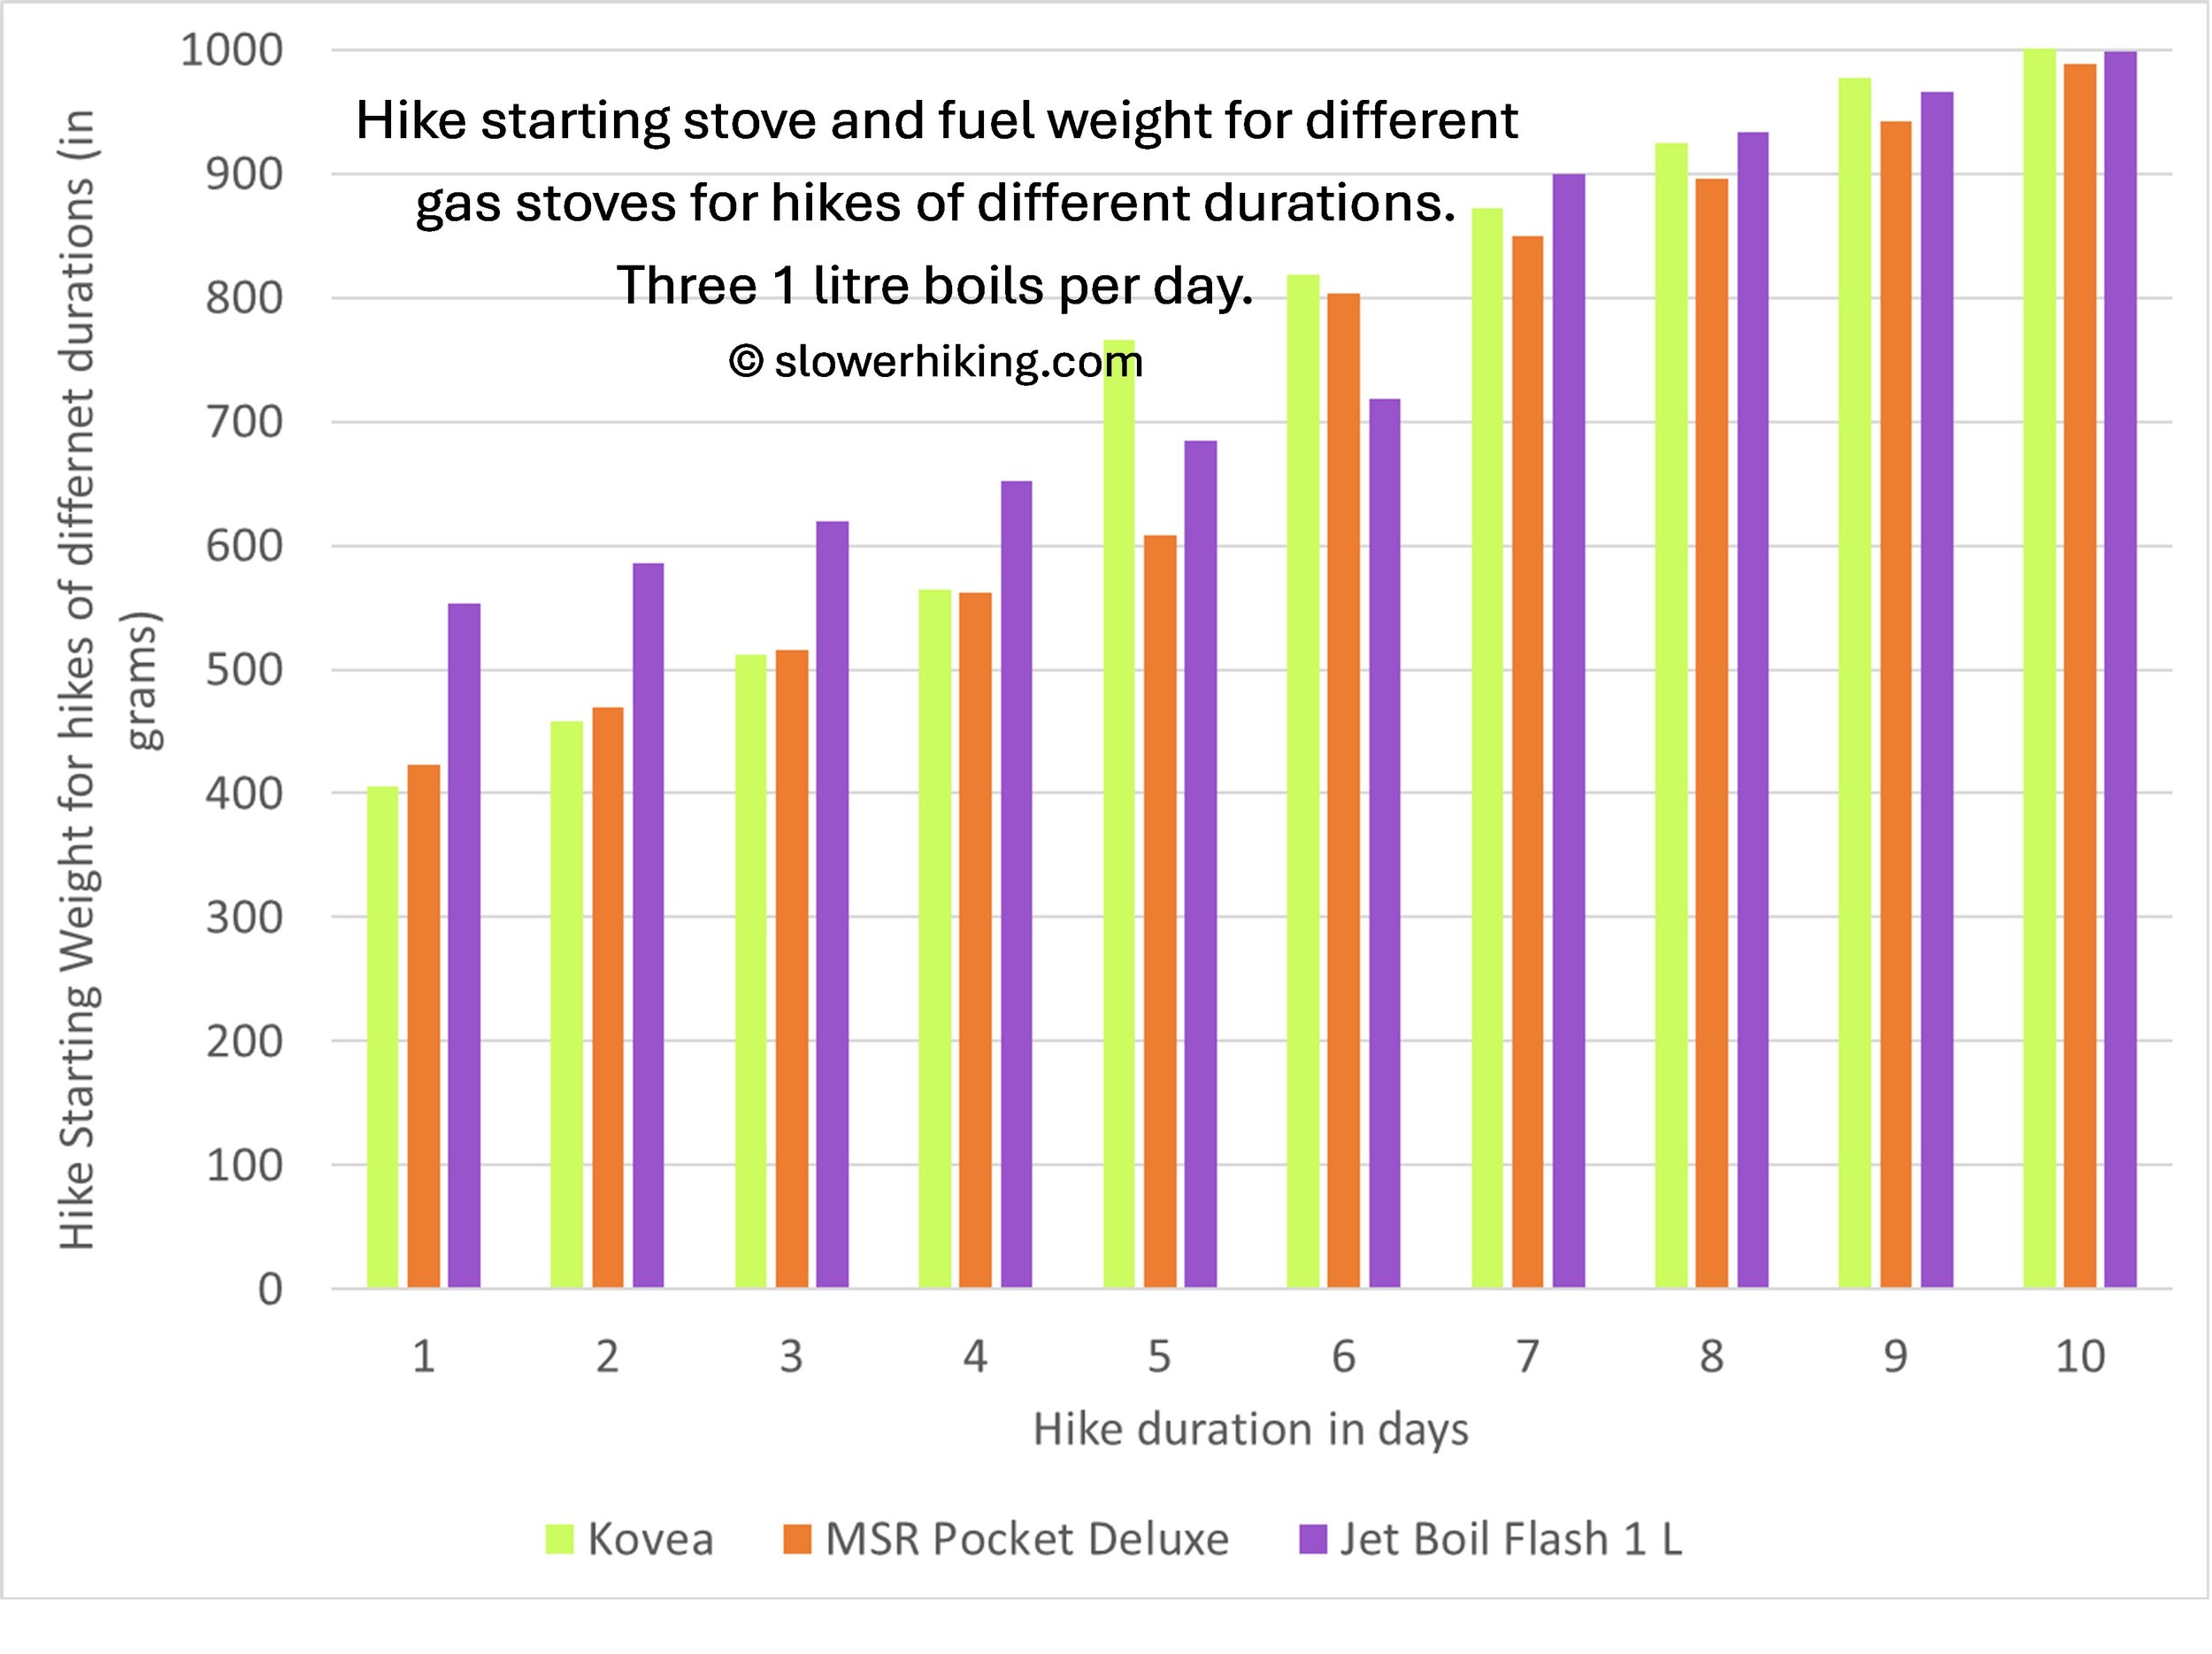
The Kovea outperforms the other stoves on short hikes up to 4 days because the burner itself is lighter, albeit less efficient. It all depends on when a new or larger canister is needed. You can see that on day five, when our Kovea Supalight stove needs a larger canister, whereas the Pocket Rocket does not. Similarly for day 6: the most efficient Jet Boil Flash doesn’t need a larger canister until day 7, whereas the other two do (under our specific hiking conditions).
You might like to test out your cook system to see if you get similar or vastly different results: let us know in the comments! In Part 3, we’ll also look at much longer hikes, where more efficient fuels come into their own.
The key data we used for the above analysis was as follows:

We chose these simply because, with the exception of the Jetboil, they are some of the stoves we have in the shed. We added the Jetboil because it is the integrated canister brand that we see many hikers using in Australia. The Goshawk Pioneer* has extraordinarily fast boil time at 7:15 for 1L, faster than the Kovea gas stove, due to its secondary gasification burn. It is by far the fastest of all the alcohol stoves we’ve tested, using a little more fuel that the Toaks siphon and also burns wood. The flame splash is very wide, travelling upp the sides of our 1300ml pot, so a wider pot would almost certainly yield better fuel efficiency. However, the stove is quite heavy, so you will need to do your own tests to see whether it will be more efficient with your system.
*Disclaimer: Slowerhiking were sent the Goshawk Pioneer Eddy 200 for testing.
And the gas canister weights we used were:

Gas canister weights
So, for us at least, our alcohol stove cooking system wins the weight contest, so you might like to explore that option, or simply fine tune your gas canister selection to save some weight... sometimes a lot of weight! We’ll explore that in Part 3: How to Use your Backpacking Stove.
3. Speed/Boil Time
Geoff and I and slowerhiking.com are all about hikers who are not in a hurry, but we recognise that many of you want to get onto the track or into the sleeping bag ASAP!
However, when considering the 1L/33.8oz boil times below, it’s important to remember that many are achieved under perfect windless conditions with the fuel on maximum, consuming more fuel and therefore requiring you to carry more weight: it’s swings and roundabouts. Most solo hikers boil less than half the amount of water in half the amount of time, so differences between and within stove types shrink to minutes or even seconds. Is that amount of time important to you? Perhaps, if your priority is maximising mileage and minimising time spent in the kitchen. Or, if you’re like us, perhaps not.

Geoff in no hurry with brekky noodles on the muddy South Coast Track, Tasmania
From manufacturer websites, here are approximate times for different fuel stoves to boil 1L/33.8oz of water from fastest to slowest (remember, solo hikers, you’ll likely be boiling half this amount in about half the time):
2.8-3.5mins (depending on fuel used) for a ‘roarer’ liquid fuel stove like the MSR XGK Ex, 3.5 minutes for the MSR Whisperlite International. This is a great comparison chart for Liquid Fuel stove boil times, weights and fuel useage. 10 points
3.5 - 4 minutes for Integrated Canister stoves such as the MSR Reactor and Jetboil respectively (their heat exchanger pots also reduce fuel useage) 9 points
3.5 - 4.5 minutes upright canister stove such as MSR Pocket Rocket (many are around 4 minutes, others are slower) and remote gas stoves 8 points
7:15 minutes for gasification alcohol stoves like the Goshawk Pioneer, extremely fast and rivalling slower upright canister stoves 7 points
9 mins Trangia alcohol, 13 mins for our Starlyte alcohol stove with Caldera cone and a little less fuel but more time with the Speedster Gold; boil times vary enormously between the countless alcohol stove/pot combinations. Many are around 16 minutes, which is too slow even for relaxed couples; 8 minutes may be acceptable for solo hikers. Some alcohol stoves take a long time to bloom. Conversely, the gasification alcohol stoves can be extremely fast, we were astonished by the 7:15 boil time for the Goshawk Pioneer. 5 points

Significant differences between just these four alcohol stoves in boil speed and fuel use when we tested them at home.
14-16 minutes for Esbit solid fuel and some twig stoves... and remember you have to collect fuel and bring twig stoves up to temperature. However, some twig stoves that promote gasification (including the dual fuel Eddy Pioneer) burn hotter and faster; we have been unable to find accurate times and welcome input from readers for 1L quantities. And 4:20mins for this hybrid system combining solid fuel with an electric fan at the base, but it is an exception that requires power and is much heavier. Overall, 2 points.
If you don’t care about weight, those who really want to speed boil times of any non-integrated stove should consider pairing a heat-exchanger pot with whatever system they have, be it gas, alcohol, liquid or solid fuel. An effective windscreen is also crucial in speeding boil times; we’ll cover this in Part Three, How to Use Your Backpacking Stove.
4. Packed Size

Silicone XPot, bowl and mug. Check parameters before buying these: they may save neither weight nor significant space!
If space in your pack is at a premium, you’ll want the most compact system possible. Being able to nest your stove and even fuel inside your pot saves the most space but this requires planning before purchase.
Solid fuel stoves are the tiniest. As we saw in Part 1, twig stoves disassemble and pack flat; the esbit [3] gram cracker stove is half the size of a credit card. And no fuel to pack for twig stoves, just a mini firesteel or matches. 10 points
The Trangia system is amongst the bulkiest, but other alcohol stoves can be remarkably tiny. We fit all our kitchen including not one but 3 cups, windscreen, burner, matches, dishcloth and fuel bottles (as well as purification tabs, olive oil, and various bits and pieces) into our 1.3L pot though much of it protrudes above the rim! Clearly, space isn’t a high priority for us! Contrast ours with Erdei Maholey’s minimalistic acohol kitchen pictured earlier and you begin to realise just how wide the range can be. Solo hikers easily fit their entire kitchen into a 450ml pot. 8 points

We love our food on so it’s no surprise our alcohol kitchen is bigger (but not necessarily heavier!) than most. In here is everything for 10-11 days on the track. It fits neatly into an ultrasil bag. This kitchen for two (fuel bottles, stove, cosy, windbreak/potstand, sporks, 3 cups, 1.3L pot and lid, pot cosy, matches, mini firesteel, dishcloth) total 560g/19.8oz without consumables. On shorter trips with a single fuel bottle and without the larger mug the weight drops to 467g/16.5oz, or 233.5g/8.24oz per person. Solo hikers with smaller pots can have extremely light alcohol kitchens.
Although silicone pots are collapsible, in our opinion they save little space when using gas because the canister won’t be nesting inside the pot when it’s collapsed. However, a silicone pot could potentially save space when paired with a solid fuel stove or an alcohol stove. 8 points
For upright canister stoves, solo hikers should choose a pot that fits your gas canister, burner and firesteel, matches, folding spoon or spork and dishcloth. 7 points
Remote canister stoves with their hoses are slightly bulkier: 6 points. Larger integrated canister pots for two all fit a canister inside and more, including a remote canister hose. 5 points
Liquid fuel stoves tend to be bulky too. The burners are larger, there is a metal hose to pack, and a metal fuel bottle. Windshields are usually large. However, those with larger pots will be able to nest everything inside except the fuel bottle. The classic Optimus Svea 123 is relatively compact. 4 points
5. Ability to Cook Food vs Boiling Water

A grand brekky fry-up on the Gold Coast Hinterland. Image Credit: Dave Rees
Upright canister, remote inverted and remote upright canister stoves and liquid fuel stoves all have regulators that allow you to increase or decrease the size of the flame reaching the pot, and all of them are good for cooking food as well as boiling water. 10 points
Some alcohol stoves have simmer rings that either fit around the air intake in an outer ring, or reduce the surface area of open stoves, but we’d argue that more skill is required than for gas and liquid fuel stoves. However, people have successfully cooked on Trangias for decades, whether they are paired with alcohol stoves or remote canister stoves. 8 points
Twig stoves are trickier but experienced hikers easily cook on them: 6 points
It is possible to cook on integrated canister stoves but, in our opinion, they’re really more suited to boiling water. Their tall shape means it’s almost impossible to prevent food from burning on the narrow bottom of the pot, unless it’s very quick-cooking meals like soupy ramen or instant mac’n’cheese. 4 points

Another impressive fry-up. Image Credit: Palle Nielsen
6. Price
Well, this is apples and oranges covering an overlapping range of stoves, and you may disagree with our ordering and rearrange the points, but here are our thoughts.
DIY alcohol stoves can be made for the price of a soft drink or cat food can (see Part One): basically, free. You won’t find anything cheaper than that. If you want to buy an alcohol stove, you can find them at the cottage companies mentioned in Part One. Fuel is also cheap. 10 points
You’ll find cheap knockoff upright gas burner stoves on Amazon but again, beware: they are often much less efficient and reliable so you spend more on fuel. However, some brands, such as BRS (AUD27 at time of writing) are much cheaper than ones like MSR and Soto. Ones without piezo ignition are often cheaper as well as lighter. Gas canisters are, however expensive. 8 points

The budget-friendly KMart CampMaster. Image Credit: KMart
You can buy or assemble cheaper versions of integrated canister stoves as described here or try ones such as the Kmart Campmaster (AUD60 vs Jetboil AUD170 at time of writing). 6 points
Twig stoves need to be of expensive titanium rather than aluminium to manage heat, but at time of writing Temu had one for AUD $17.62 … caveat emptor! It is an exception, so we won’t include it here. But the fuel is free: 5 points. Esbit fuel is expensive: 3 points.
Most liquid pump/fuel bottles and stoves are expensive because of the margins required to ensure they are safe when storing and burning these fuels, and we have been unable to find any under AUD100. For remote stoves, you also need to buy a dedicated fuel/pump bottle. Coleman is one of the cheapest liquid fuel stoves, but chunky and heavy (1225g/2.7lbs including the fuel reserve). 2 points

Coleman Liquid Fuel Stove (Image Credit: Coleman)
7. Noise
Some stoves are quiet, whereas others are loud, sometimes very loud, though this description is highly subjective. Alcohol and esbit stoves are silent and for many users it is one of their most beloved features. 10 points
After millennia of ancestors crouching around warm and protective campfires, it’s no surprise that most of us also love the soothing crackle of twig stoves. 8 points
The noise of canister stoves varies with brand, model, and whether they are being used at full throttle or wound down: most aren’t too bad on the latter setting. Geoff and I find them obtrusively loud at full throttle, but of course they are relatively fast at boiling water too, so you’re not subjected to the racket for long. 5 points
Liquid fuel stoves are all noisy; the MSR ‘Whisperlite’ is quieter, but that’s relative to other liquid fuel stoves, as is the little Svea 123. Roarer stoves create a vortex to mix extra air into the fuel mix at the burner for a hotter flame; they have notoriously been compared to 737s taking off. However, if you are considering one of these stoves, it’s likely because there are far more important things in its favour, such as the ability to reliably melt large quantities of snow quickly at very low temperatures, or fuel availability. 0 points
8. Odour and Fumes

Esbit stove, Dartmoor UK. Image Credit: Dave Salter
Many people are sensitive to odours and fumes. Again, this is subjective, but we would rate alcohol and gas stoves as least intrusive. 10 points
Liquid fuel stoves give off a relatively strong smell – think burning petrol, jet fuel, kerosene – but this is likely to be low on your priority list if you need to use one. 5 points
Twig stoves are potentially smoky, although of course it depends what you are burning in the latter. 4 points
Esbit (hexamine) fuel has what Geoff and I consider to be a strong and offensive odour – so offensive that we have permanently struck it from our list despite its light weight and convenience. The fumes are toxic and these stoves should not be used in closed tent vestibules. 0 points
Actually, all stoves can give off toxic fumes, and carbon monoxide buildup inside closed tents is a risk especially when they are burning inefficiently; we’ll cover this in more detail in Part Three.
9. Reliability

The famous Soto Amicus in North Wales: fast and reliable provided you know where to use it and with what fuel blend so it operates within its design parameters! Image Credit: Ally Anderson
This is another somewhat tricky category because reliability depends not only on the quality of the product, but also on how well it has been maintained and, importantly, how well you understand its use. So here we will assume you know your stove and its operating parameters well.
Twig stoves and alcohol stoves are generally reliable because they have no moving parts to fail. Small holes can become blocked over time but can be opened with a pricker. 10 points
Similarly, when you understand liquid fuel stoves well, there are also few parts to fail and a tool and minimal spare parts mean they can be repaired in the field. 8 points
Gas stoves from reputable companies are reliable: it’s those cheap unbranded knockoffs that are most likely to fail. When gas stoves fail they are usually impossible to repair in the field. Fuel canisters containing fine impurities or a poor fuel blend can be problematic too. 7 points
The stove is only one half of the reliability equation: the operator is the other. Learning how to get the best out of your stove and understanding its fuel and operation will do more to ensure reliability than your choice of stove per se.
10. Environmental Sustainability

Twig Stove. Image Credit: Daina Byrne
This is of increasing importance to many of us. Twig stoves are arguably most sustainable (10 points), although the titanium sheeting is energy intensive in its manufacture. Liquid fuel stoves run on fossil fuels (6 points); alcohol is more sustainable (9 points). Gas canisters are energy and resource intensive and they create a lot of waste: 5 points.
Of course, you can do more impactful things. For those who regularly hike in overseas destinations, you have far more effect by reducing your number of plane journeys: consider holidaying in your own country more often. Or take public transport to trailheads instead of your vehicle. Either way, by now hopefully all of us are making small improvements in our everyday lives that eclipse what we might do when cooking a few meals outdoors.
The Best Stove for YOU:
Now add up the numbers from your top three criteria. Is there a clear winner with the most points? If so, great! This is the stove that suits you best in the environment in which you plan to hike. Of course, if your next hike is in a different country or season, you may need to revisit your criteria!
If there’s no clear winner, take your fourth and fifth most important criteria and add those points in. You can give them a smaller weighting if you like. Or, if your first criteria is by far the most important, give it a 20% or even 50% positive weighting. Have we missed something? Please let us know your thoughts in the comments and, where appropriate, we will edit in additions: we always welcome constructive feedback!
As we’ve seen, the stove itself is only half of the equation. To get the most from your stove, whether it be a gas, liquid, solid or alcohol one, understanding how to use it in the field with rain, wind and snow makes all the difference between an enjoyable delicious mealtime and a disappointing cold one. Stay tuned for Part Three: How to Use Your Backpacking Stove, that covers safety, snow, rain, windscreens, LNT, fuel efficiency/ calculating fuel requirements and fuel decanting, lighting, troubleshooting and more!

Last morning in Lake Vera Hut, Frenchman’s Cap hike, Tasmania. Whatever your criteria, don’t be afraid to vary them for different hikes. And also accept that it may take time to arrive at your favourite system, and then more time to get get the most from it. On every hike of 5 days or less, we carry several kilos less food than on 10 day hikes, so there is capacity for a little flask of tipple or, as here, Geoff’s espresso press. Or both!