
Planning and Tips: 11 Day Circuit Hike, Walls of Jerusalem National Park
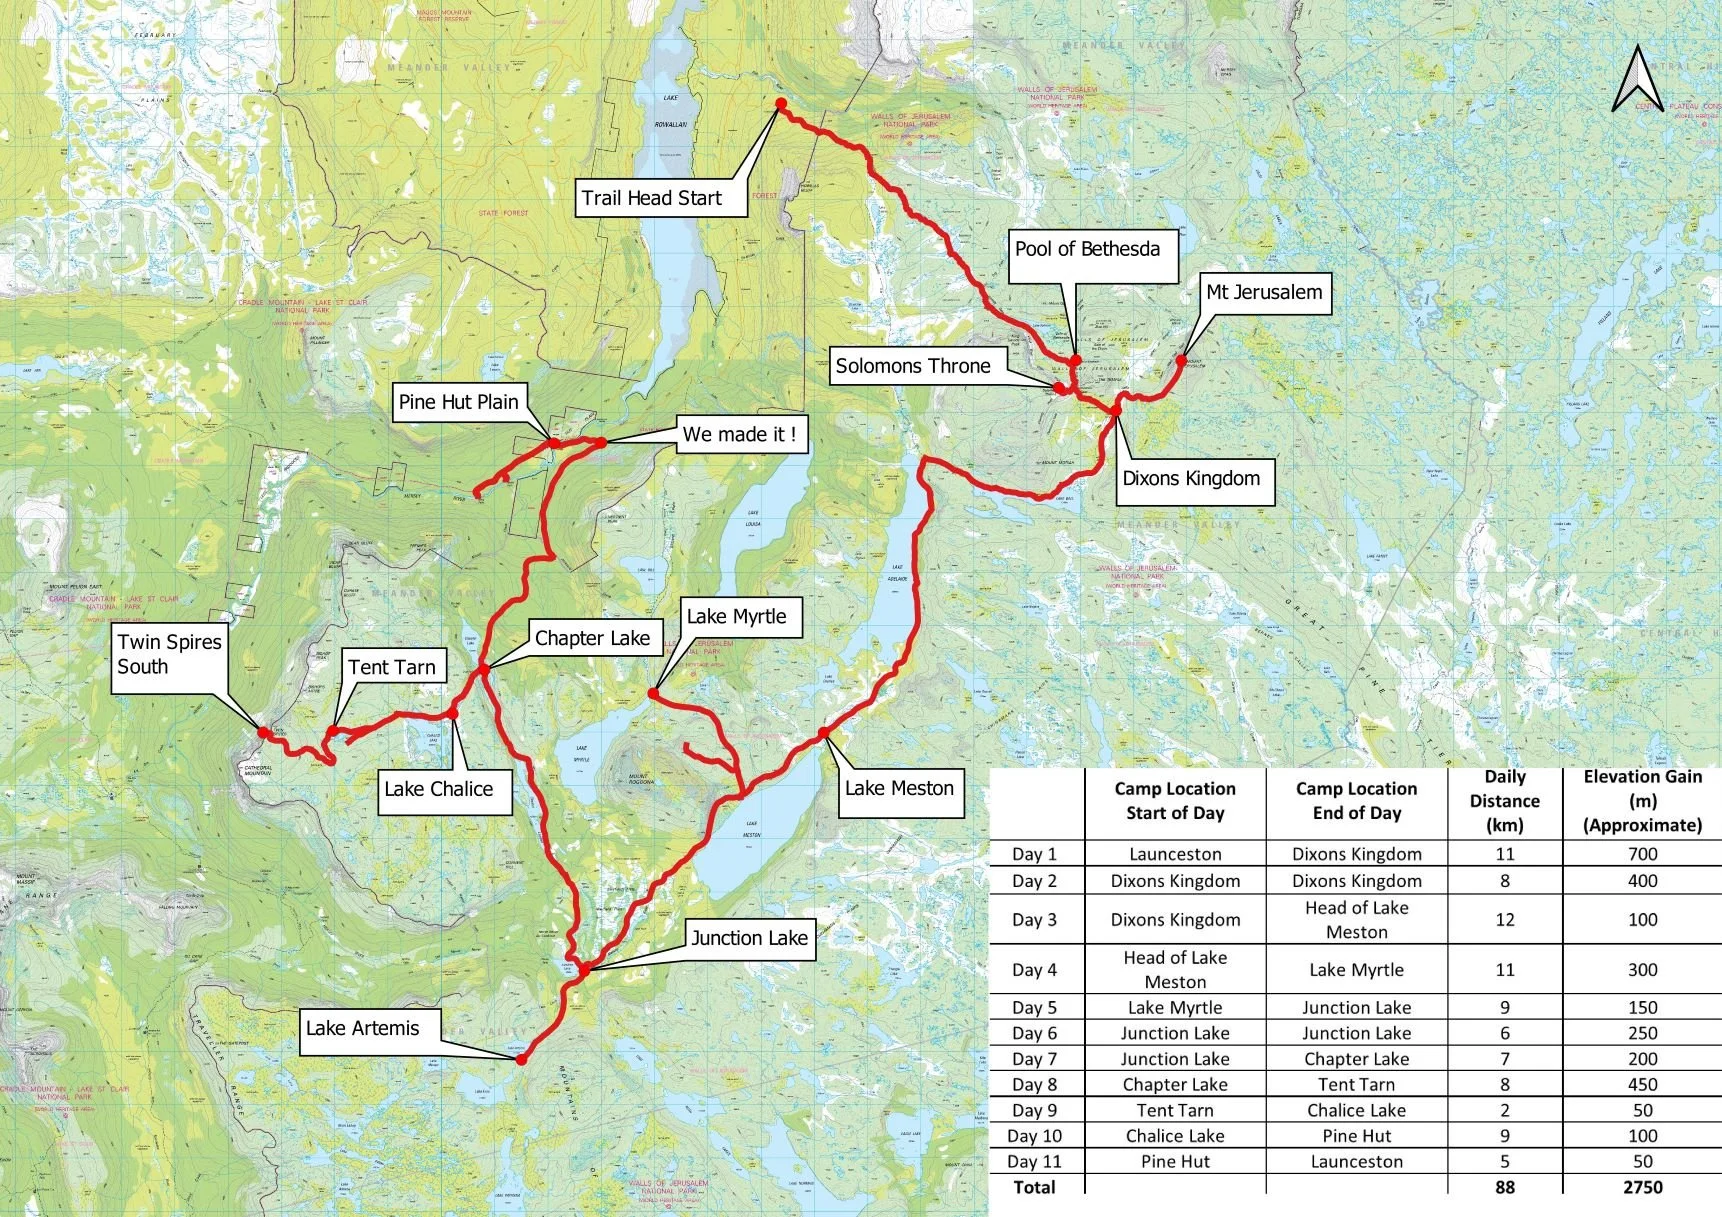
Map of our 88km circuit hike in Walls of Jerusalem National Park. See our daily blogs for highlights, maps and pics!
Why Walls of Jerusalem?
Finding great hikes in summer is tough because hot weather knocks us about on the track, so we avoid mainland routes at that time of year. Tasmania seemed logical with its cool alpine options.
We had previously walked the Overland Track, and heard about the adjacent Walls of Jerusalem then. Several people said WoJ was their favourite part of Tassie, or their favourite walk ever. It sounded amazing. There is a cap on numbers, so register early.
Most of the main 3 day circuit or out and return is well marked, but you’ll need solid navigation skills for the expanded route: it is not like the Overland Track!
View of Lakes Thor and Sidon from Mt Jerusalem
Getting There and Back
We flew to Launceston, ensuring flights allowed free rescheduling and were as direct as possible.
Once in Launceston, we used local bus company Cradle Mountain Coaches, (there are others as well) to get to and from our hike. This meant we didn’t have to return to our starting point to reach a hire car, improving flexibility. They offer an on- demand service and will pick you up from pretty much anywhere they can drive to. It was expensive for two, but per person price drops the more of you there are, and it was a lot cheaper than leaving a hire car in the main carpark for 11 days. If you have your own car, park at the main WoJ carpark, and complete this circuit by walking 10km back down Mersey Forest Rd on your last day instead of the Day Walk along Lees Paddock Track.
Communications
For some time now we’ve used a Garmin Inreach Mini for communications. This lets our family or emergency services know where we are should we need assistance. Being able to send and receive text messages when you are out of phone range is reassuring. We also used it to confirm pick up point/time with our bus driver on the last day, which was nice but not essential. In addition to sending location to family daily, we used the Inreach Mini to check weather forecasts.
First Look
To get a sense of terrain and options, we perused hiking blogs, vlogs and facebook groups including:
Main Walls Area
https://www.youtube.com/watch?v=qMavK2e-bEE
https://lotsafreshair.com/2017/12/16/hiking-walls-jerusalem-circuit/
Greater Walls Area
https://www.youtube.com/watch?v=5nECqoW6xdw
https://www.youtube.com/watch?v=lE1DABX59Eg
FaceBook Pages
Hiking in Australia & New Zealand
Overland Track, Cradle Mountain & Walls Of Jerusalem NP - Hiking Tasmania
and of course …

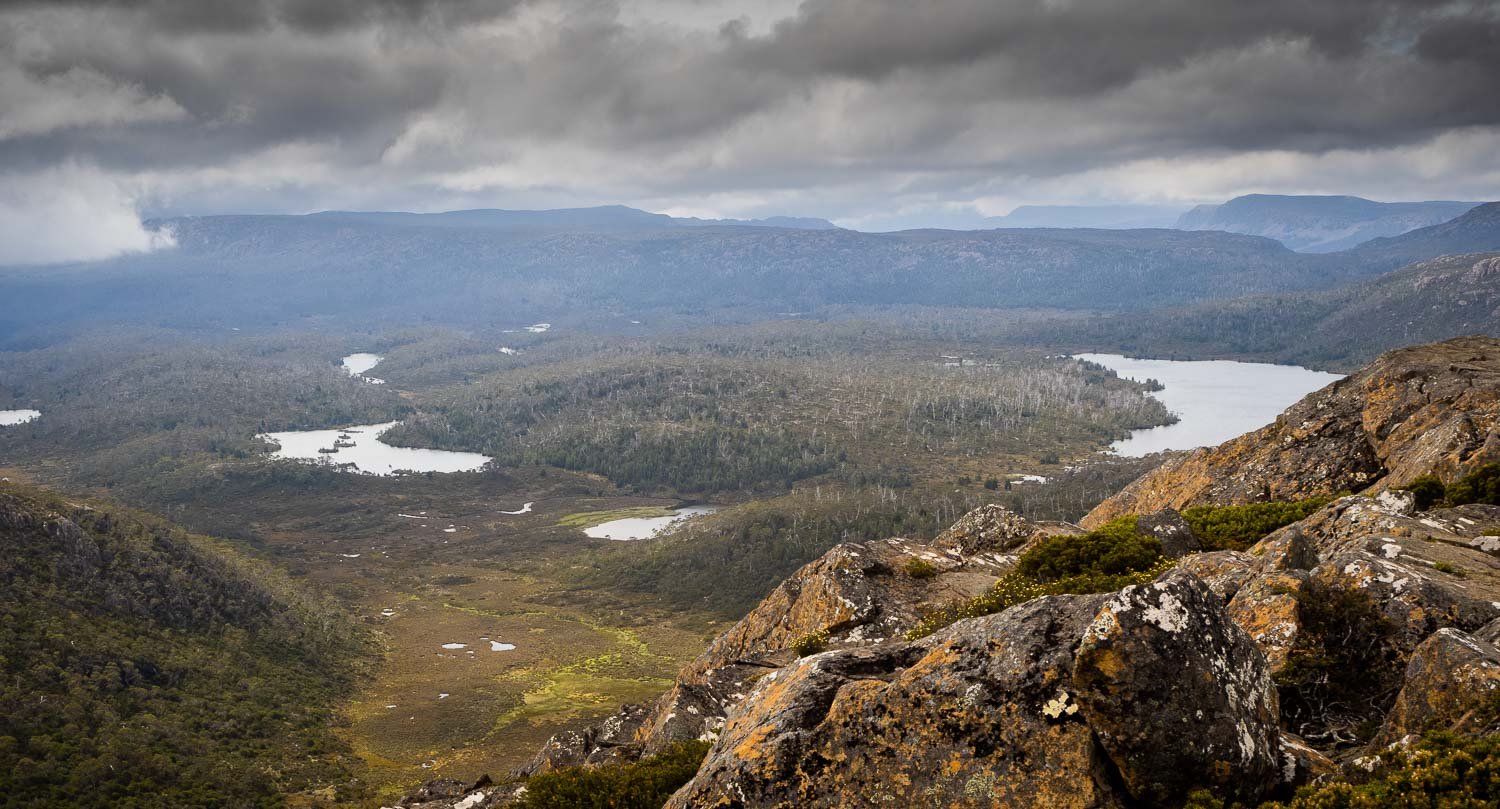
The stunningly beautiful Pool of Bethesda accessible by a short side trip from the main track on day 1
The Big Picture
Most people hike a three day circuit in WoJ – doable for us although a bit rushed – and a long way to go for a three day walk!
We love wilderness and the journey through different country, rather than the destination. For us, this means taking time to appreciate the wider landscape, so we investigated extended loop options and alternatives beyond the main circuit.
I used electronic 1:50,000 topo maps (G4436, G4235, G4236 and G4237), free google satellite imagery and smaller scale topo details for a whole-of-hike perspective.
There were so many highlights! Cathedral Mountain, Tent Tarn, Lake Myrtle, Lake Artemis, Mountains of Jupiter, and Mt Rogoona were top of our list.
For details on how we go about estimating weights and distances, see our blog on how to plan a slower hike.

Sunset over Lake Meston - alone worth going further than the normal three route.
Leave No Trace
The Walls park has only three campsites with tent platforms (Wild Dog Creek and, as we understand, the new Dixon’s Kingdom and Lake Elizabeth campsites) and no huts, so the infrastructure isn’t available to support the same number of hikers as the Overland Track. Don’t expect the same level of waymarking or facilities for this extended hike: you will need solid navigational skills. The old huts are for emergencies only. It’s therefore especially important to tread lightly in this environment: the cap on hiker numbers in the park is there for good reason.
Before leaving home, clean your tent footprint/ floor, pegs, boots and hiking pole tips of soil, and shake out your tent and pack to ensure there are no seeds trapped in them. This helps prevent the introduction of weeds and devastating diseases such as phytophthera.
Use fuel stoves (and spread/camouflage other hiker’s campfires to discourage people from lighting more), tread lightly by camping on rock or already used sites, and carry out all rubbish, including pee paper (or use a Kula Cloth). Bury your poo 200m or as far as practicable from watercourses and 20 cm deep, using a stick to mix it with soil before covering.
Walk straight through the middle of muddy tracks rather than diverting around them, which causes braiding and widening. On unmarked routes when in a group, spread out widely to avoid creating tracks.
Since we hiked, new camping platforms and boardwalks have been built to the northwest of the original area, plus loos with views. Please use the official campsite: pitching directly underneath the pencil pines or within the pencil pine forest at Dixon’s Kingdom compacts and damages roots and will eventually kill these ancient trees.
Water, Food and Trip Length
Water availability is good so you’ll only need to carry one day’s supply or less. With simple route planning, you’ll have water at the end (and therefore also start) of each day. We allowed 4 litres of water per day between us; half that would have been plenty on all but the first day. This meant we could carry 7 kg of fuel and dehydrated food, which gave us eleven days plus a spare main meal in case of delays.
Track conditions, Terrain and Daily Distances
Various blogs suggested track conditions beyond the main circuit are overgrown, often with a lot of fallen timber. Some hikers lost tracks in poorly marked or unmarked sections and took time scrub bashing to rejoin them. Therefore, even though elevation gains are modest (after the first day), navigating trackless or poorly marked routes means you can expect delays. I set a target average daily distance of 10 km.
Rest Days and Contingencies
We could carry eleven days of food, but Helen would need a rest mid-way. We also had an extra day at the end so we weren’t hurrying for the bus, or could absorb a lost day or an even slower pace. We chose a pickup point near day walk options. If we stayed on schedule then we could do an out and return along Lees Paddock Track.
For us this meant a travel distance of around 90 km, +/- 5 km.
Potential Routes, Daily and Total Distances
I used QGIS to map known or potential campsites, routes and tracks. I also imported various tracks (from gpx files available through the above web sites and open source tracks available through Wikiloc and Alltrails and digitised tracks from our topo maps) to estimate distances for different routes. See also how to plan a slower hike.
Bailout Options
We prepared for rain, wind and even modest snow, but had bail outs for severe storms. The first bail out was at Lake Adelaide, the second from Lake Meston via Lake Myrtle, another from Junction Lake via Chapter Lake. We would be no more than one and a half days’ walk from getting down from the plateau.

Our camp site at Lake Myrtle with Mt Rogoona in the background - this camp site whilst beautiful, also provided us with a bail out option should we need it.
Finalising Our Preferred Route
Given favourable weather, an 11-day, 95 km route starting at the main WoJ car park and finishing near the southern end of Mersey Forest Road would let us see Tent Tarn, Lake Myrtle, Mt Rogoona, Mountains of Jupiter, Lake Artemis, and Cathedral Mountain, plus the main Walls area. Our last camp on the floodplain near (but not at) Pine Hut along Lees Paddock Track, allowed a day hike before the bus arrived.
Our timetable and route suits slow hikers and those who like don’t like to be put under time pressure. Helen and I normally hike these same daily distances in two to three hours when training in the Adelaide Hills. The main Walls area is open and easy walking, but elsewhere the uneven, narrow, overgrown tracks will slow anyone down. Also expect to lose the track, to backtrack, to scrub bash to find tracks, to look for creek crossings, and to search for cairns and bunting. A few sections comprise uncairned routes so you’ll need solid navigational skills: it is NOT like the Overland Track in this respect. Many hikers could complete the circuit in two to four fewer days than we did. If you have your own car, park at the main WoJ carpark, and complete the circuit by walking 10km back down Mersey Forest Rd.

Having planned the capacity to get to Tent Tarn we came across Lake Chalice and possibly the most beautiful campsite of them all.
Fine tuning Packs
Once the plan was finalised, we tweaked pack weights through fine-tuning food and gear. Our lightweight jackets would shred in dense vegetation, so we took our 750g goretex jackets. It was the right decision, but meant we had about 1.5 kg extra weight.
All our dinners are hearty but they weigh between 280g and 360g (for two), so we set aside the heaviest ones completely, and scheduled the next heaviest towards the first half of the walk, whilst retaining variety between days.
Neither of us are big porridge fans but it is great fuel, more weight efficient than our favoured noodles and vegetables. So we alternated. Similarly, we selected daily snacks to minimise weight - lightweight crackers and bickies, alternating with heavier lollies, nuts, and dried fruit. Lunches were carb rich seeded crackers and dehydrated dips with a splash of olive oil – much lighter than tuna sachets, bread, salami, or cheese.
These menu tweaks meant we could comfortably carry our heavier rain gear whilst remaining within our pack weight limits. Plus we had capacity for an extra camera battery and the essential Secret Stash of Chocolate!
We started Day 1 with 11 kg for Helen and 18 kg for me. I was carrying the bulk of the food and all the fuel.
See my general blog on sharing the load to see how we share the starting pack load, and during the hike.
The Route
We modified the journey several times in response to weather, track conditions, and how fresh we were. Our plans were just that – and could be altered to fit whatever conditions arose.
Knowing options beforehand provided flexibility, so that we were always within our capabilities. In the end we tweaked most days whilst retaining the essence of our original plan, and achieved almost all of our primary objectives.
See our daily blogs for the highlights of our hike.