
Day 19: Standley Chasm to Tangentyere Junction [Miller’s Flat*], Sect. 3 Part
A demanding section with fun scrambles in gorges, plus high vast views from ridges
*Although we hiked to Tangentyere Junction, we recommend that slower hikers stop at designated Miller’s Flat

Gobsmacking views on the high route, here looking west.

Nearly there!
Today’s Hike
Slower hikers will love this spectacularly rugged section, especially if you’re not under time pressure during the scrambly bits! After a steep climb out of Standley Chasm, you’ll descend steeply… and climb, and descend again through beautiful valleys and rocky gorges, encountering some of the most challenging scrambling — almost climbing — on the trail. You pass semi-permanent Fig Waterhole from which you can collect extra water if it’s present, before the valley widens and you reach Miller’s Flat Campground. Miller’s Flat has no water, toilet or facilities of any kind. From there, you take either the high route along the top of the Chewings Range with grand views, or the rocky route through the valley to Jay Creek. We recommend the high route unless it is very windy.
However, slower hikers are highly unlikely to reach Jay Creek in one day, especially if you plan to take the high route, so you should definitely carry sufficient water for a dry camp at Miller’s Flat.
If you’ve been following our itinerary and comparing your hike times to ours each day (or checking against the table in Itinerary or below), or comparing your times to official Parks estimates, you’ll know by now whether you will be faster or slower than us or Parks on these more demanding days, and whether you need more time, or less. Adjust accordingly. If you are MUCH slower than us, consider how you might adjust by starting earlier, stopping at Miller’s Flat, or perhaps even skipping this section entirely. Study our many trail images to compare the terrain, and factor in your own strength and agility.
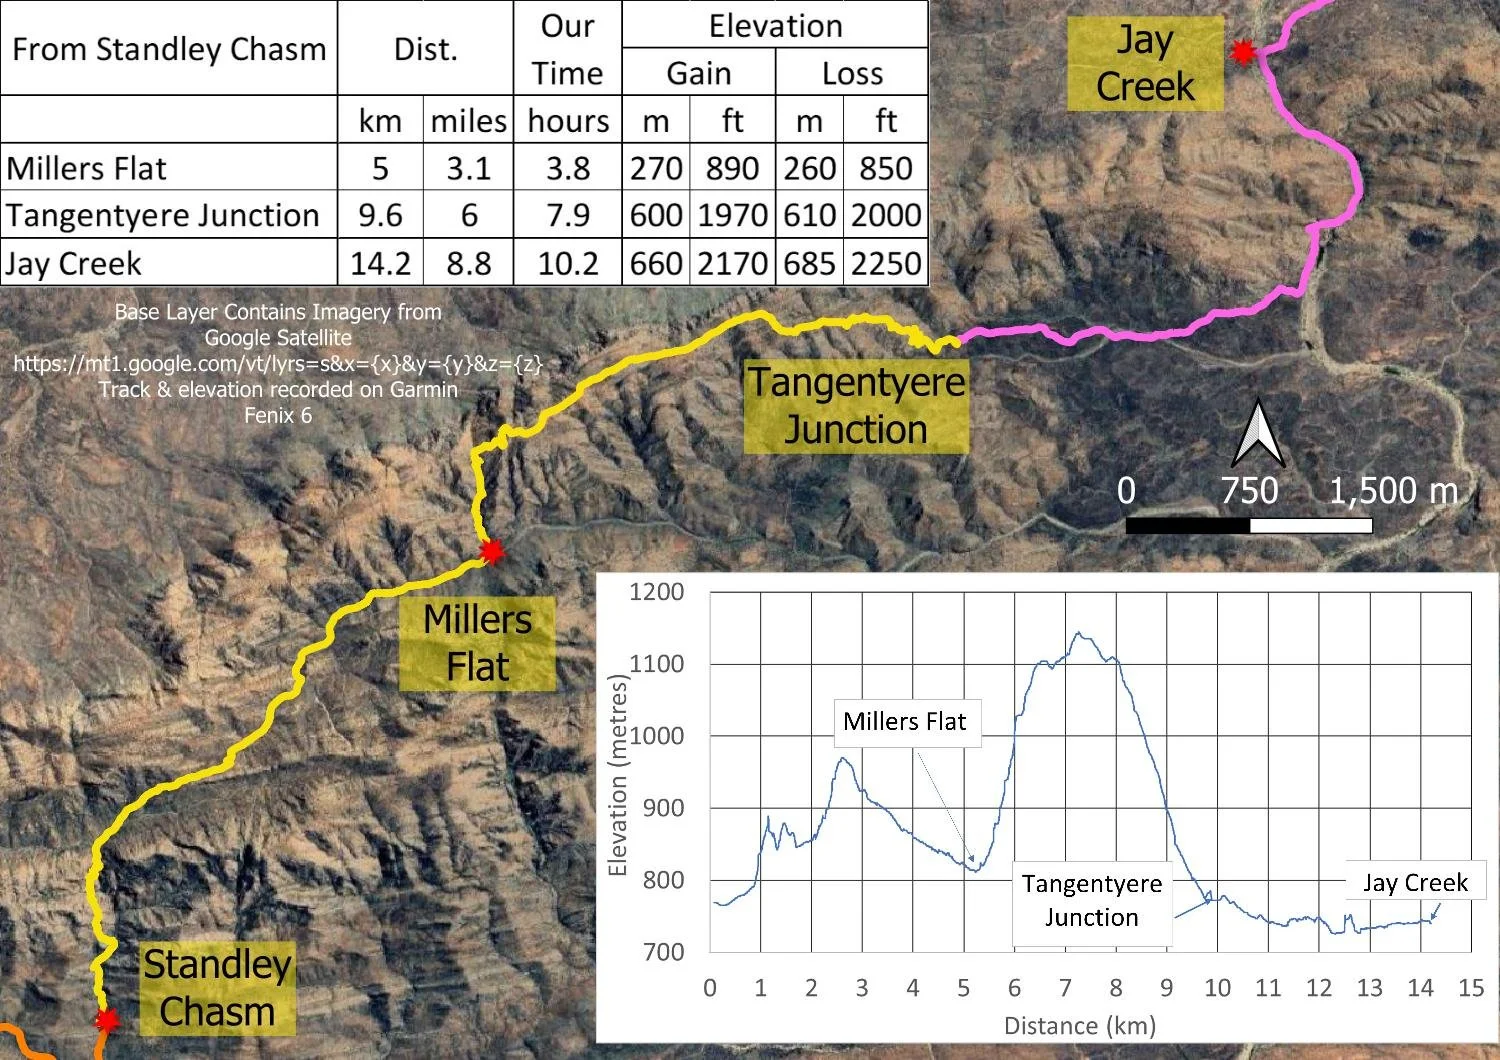
The elevation map tells the story, whether you hike to Miller’s flat (as we recommend) or continue to Jay Creek. Noting of course that we took the high route, very obvious on the elevation graph!
How to Make Today Easier
As for Hugh Gorge to Section 4/5 Junction, Section 3’s official 13.6km/8.5mi, 5.5 hour distance/time from Standley Chasm to Jay Creek via the low route (high route is 14.2 km/8.8mi 6.5 hours) misleads countless hikers, not just slower ones! On our rest day in Standley, we met many E2W hikers who literally limped in after coming all the way from Jay Creek, expecting the terrain to be similarly straightforward to that of Sections 1 and 2 between Alice Springs and Jay Creek. Many of these injured and/or exhausted hikers bailed at Standley because they did not split the Section and stop at an Intermediate Campsite. Be assured: the terrain is doable even for slower hikers, provided you split the Section!
Graded Moderate to Difficult with mostly Difficult terrain between Standley and Miller’s Flat, it’s officially 5.5 hours, or 6.5 hours for the High Route to Jay Creek. However, we took 10.2 hours over one and a bit days, using the rest of the second day to continue to Mulga Camp. This made both days a little more demanding than ideal for me.
The section immediately east of Standley has the trickiest scrambling of the entire trail and, if you wish to enjoy the high route alternative as we recommend, you have significantly more elevation gain and loss with yet more scrambling. We were told that the low route with all its rocks and boulders is somewhat overgrown too, and not as much faster or easier than you’d expect. However, you are coming off a rest day, with a well-placed intermediate campsite between Standley Chasm and Jay Creek, so you have flexibility as long as you carry enough water for a dry overnight camp.
*We recommend that, unless it’s early in the day and you have plenty of gas left in the tank, slower hikers stop at designated Miller’s Flat when they arrive, then the following day tackle the High Route all the way to Jay Creek (9.2km/5.7mi).

A few exposed emergency campsites along the High Route
If you take the high route along the Chewings Range, you pass small emergency campsites scattered along the ridge should you need them, but they are exposed so unsuitable for windy weather. If you are forced to stop on the top — it’s a big descent and still a long way to Jay Creek today — you’ll probably stop at Jay Creek tomorrow.

Emergency wild campsite at Pravda Spur
You pass a few more emergency wild campsites on shelves lower down and on Pravda Spur. We continued past them as we still had juice in the tank, and descended all the way to Tangentyere Junction with its wild but well-established campsites: there was no way we could make Jay Creek. For us then, this makes tomorrow’s hike to Jay Creek or, more likely, Mulga Camp.
We’ve described these options in detail because it’s all too easy for newer hikers to get locked into a rigid itinerary. We had not planned to take the High Route but, after a rest day at Standley and a relaxed early lunch in the shade at the start of the climb, I felt up to it.
Consider the flow-on effects for subsequent days/distances that might become stupidly short or long, water carries etc, but don’t hesitate to adapt your itinerary on the day. All of this flexibility is only possible because you have extra food, water, plus contingency days at the end.
Walk with Us:

An early start initially through the Chasm for about 500m/0.3mi, before you branch off and immediately begin a steep, rocky climb out. Up, up and up…

…With a few equally steep descents.

You join the creek bed for about 200m/220yds before branching eastwards at Angkale Junction.

Next, a steady and more gentle climb and descent to and from Gastrolobium Saddle, the trail snaking delightfully around rocky outcrops and over small spurs.

You’ll pass one small emergency campsite that is likely there for east to west hikers who cannot make Standley Chasm. But you are hiking in the opposite direction, only a short distance out and with plenty of pep left in fresh legs.
However, you are about to hit the most demanding — and fun! — scrambling of the entire trail! Don’t be daunted by the following images. I dislike exposure but didn’t find the rocky descent scary, though it would be more demanding were the rock wet. Take the time to plan your line: it’s a little more difficult to see the route when descending than climbing, but you’ll spot those markers guiding the way. Remember, you do have plenty of time because you’re carrying (or will top up with) water for a dry camp at Miller’s Flat.
It’s only along a stretch of about 1km/0.6miles through which there is scrambling interspersed with easy bits. If you complete this, you are home and hosed: you’ll have nothing close to this after Miller’s Flat, especially if you take the Low Route; there’s a tiny bit of much easier scrambling near the base of the High Route. If the worst comes to the worst and you reach a spot you can’t bring yourself to descend, west to east hikers can always backtrack to Standley Chasm.

Rather than the scrambly bits, this loose rock is, in our opinion, more likely to cause accidents, but not if you take your time!
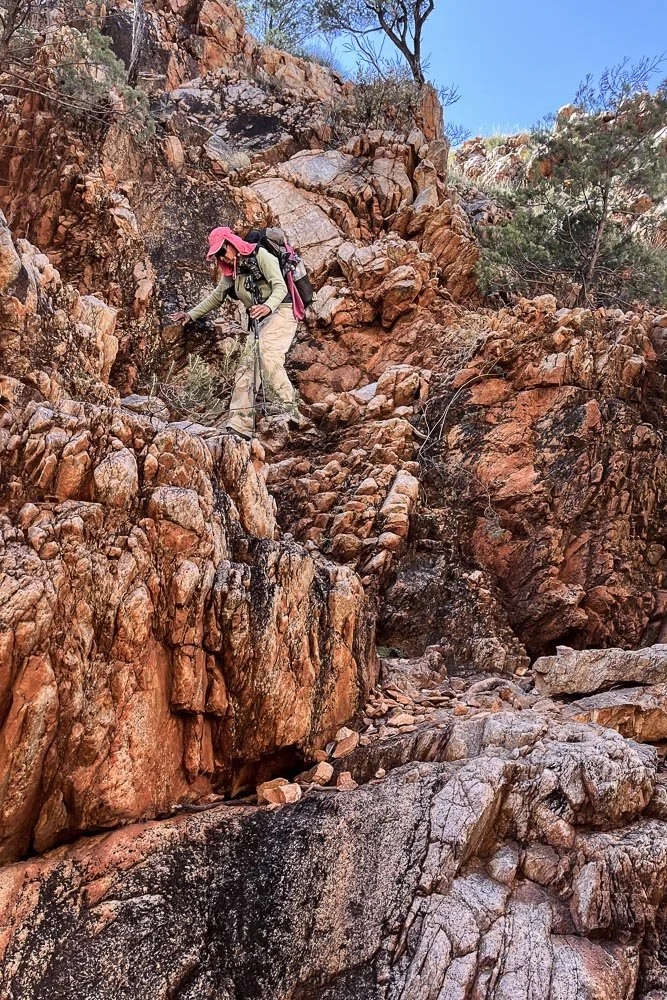
I haven’t stashed my poles yet, which is my marker for difficulty! You can see how the rock has natural steps.

A little steep scrambling. If you look closely, though, it’s again almost a natural staircase. And to the right, you can see that hikers have gone around the official trail to bypass the rock. Unfortunately, that can create erosion issues so should be avoided if practicable.

Again, don’t be daunted; stash your poles. You don’t descend straight down but instead zig along a ledge to the right in this image (note the marker near the top) before you step down and zag the other way to the bottom. There are big hand and footholds/steps.

Straightforward when dry, trickier when wet.

You continue to descend steeply and, as you reach the lower reaches, pass scattered waterholes including semi-permanent Fig Spring. If you want to collect from the spring rather than carrying water from Standley Chasm, check before leaving that there is in fact water present, especially if you’re hiking near the end of the dry season. If possible, always collect water from where it flows the fastest, and from just below the surface to avoid disturbing sediments.

You’ll follow the gully downstream, crossing from side to side.

It’s fun!

Native mint (Coleus intraterraneus).

And then, rather suddenly, the gully widens and you’re into easier territory with lush native grasses.

Miller’s Flat is an unspectacular but pleasant campsite sheltered from wind. However, be warned: not only is there no toilet, water or tables, nor is there any significant shade. In warm weather, it would be somewhat stifling.
The track branches left for the high route via the saddle visible top right in the above image, or right for the low route through the gully.
We are here much earlier than expected: it has taken us just 3.8 hours to cover the 5km/3mi from Standley Chasm. What to do? You too will have a decision to make.

We find a tiny patch of soon-to-disappear morning shade near the start of the high route and decide to have an early lunch to see how we — well, I — feel after a rest and refuel. It’s amazing what carbs, protein, fat and sugar can do!
The weather is mild and calm — the high route would be nightmarish in strong winds, so weather could make the decision for you. However, today conditions are perfect.

So it’s upwards! Initially you go through some dense vegetation; we had to backtrack ten metres because we missed the spot that the trail leaves the creekline. There were a few boulders to traverse, too.

Some interesting signage in this section!

It’s obvious that this is the less travelled route with some overgrown areas. It’s steep too!

After about 400 metres (440 yards) you reach the saddle with your first marvellous views to the north, before your last push up onto the ridge.

Almost at the top, with amazing views to the west. Wow! It’s already worth the climb!

Once on the ridge, you’ll pass a few scattered emergency campsites. Anywhere else is covered in rocks.

An unusual leucistic form of Poison Pea (Gastrolobium brevipes).

Equally fantastic views to the east, some of the best on the entire trail!

Plenty of wildflowers to enjoy.

At last you begin descending on the southern face of the Chewings Range. You’ll pass Pravda Spur with its small emergency campsite enroute.

And, even this far into the walk, plant enthusiats will spot new species, here Goodenia triodiophylla.

You’ll see Tangentyere Junction for miles. Here it’s visible in the centre as a small clearing with a dark shrub in its centre. It is the point where the low route rejoins your alternative route.

Tangentyere Junction. Those hike times are wildly optimistic for slower hikers. We took 3.5 hours after our lunch break to get from Miller’s Flat to here. Jay Creek is out of the question!

Another marvellous day, another spectacular sunset: how good is the Larapinta!
We respectfully acknowledge the Arrernte People as the traditional custodians of the land on which we walk and pay our respects to Elders past and present and to the Aboriginal people present today.