
Tent Stakes for Backpacking: What You Need to Know
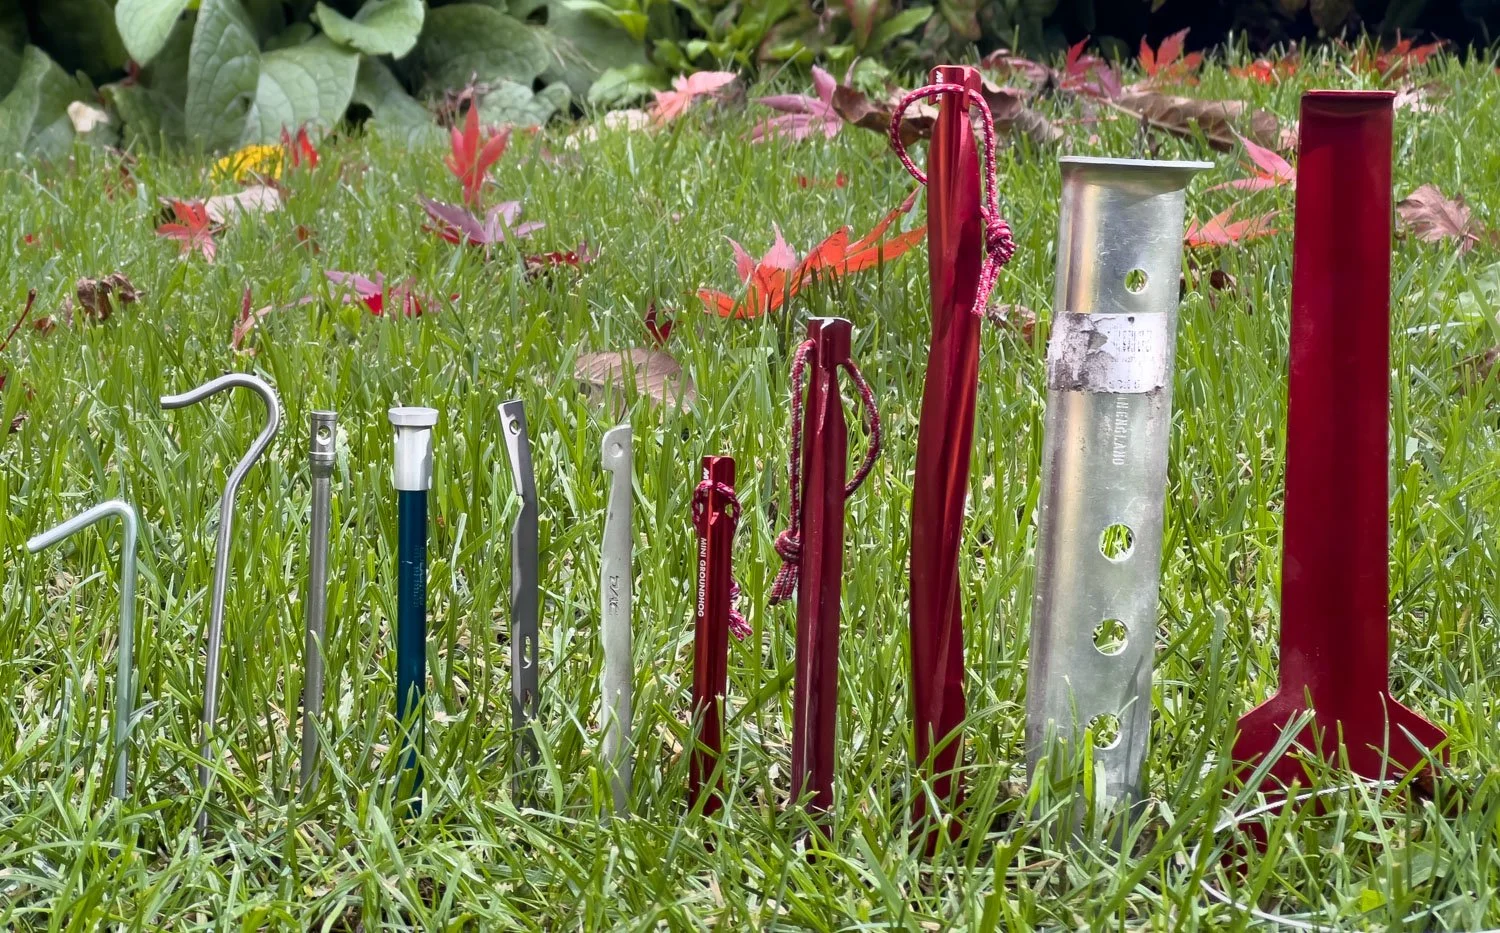
A selection of stakes - the longer you’ve camped, the more you’ll have!
Sand, snow, soil, rock, gravel, tundra, tent platform… so many substrates, so many stakes, so many choices!
Of all backpacking gear, tent stakes are one of the most important… and fraught! They make the difference between a secure night’s sleep in wild weather and a miserable one spent in and out of the tent as it collapses around you. Battling a flapping tent in pouring rain is not fun. We’ve all been there, haven’t we?
When it’s windy, stakes pulling out of the ground is the most common cause of tent failure. Such failures are 100% user error but, unfortunately, there is no one best tent stake. Rain, wind and varying substrates pose different challenges, so it’s essential to understand which stakes to choose, and why.

Substrates in this image include silt, clay with embedded stones, sand, gravel and even old lava, all with different anchoring requirements; some areas are wetter or more compacted than others.
This article is aimed at backpackers with weight and space limitations in their packs, rather than car campers who can carry heavy steel anchors in their 4WDs.
This article, Part One, covers
How stakes work – basic physics of surface area, friction, cohesion, force and implications for tents, because, when making gear choices, understanding how and why is always better than knowing only the what.
Different types of stake (materials, shapes, weights and holding power)
Part Two covers
Different substrates (sand, rock, stony, snow, sod, etc.) and which stakes to use
Deadman anchors and other special techniques such as double staking and tent platform tips
Guylines – material and connection tips
Specific Pitching Considerations (number of stakes, mix of stakes and more)
How Stakes Work
When anchoring our tent, we have three considerations: soil properties, stake properties, and the forces imposed by our tent (a combination of tent size and shape, wind speed, and number of anchoring points). This is applied physics 101, simplified by Geoff with a little help from Geotechnical Engineer Frank F, so my arts brain can follow. If I can, so can you! Grab a coffee and settle in! (Or, if you want to skip the why and how, jump down to Different Types of Stakes!).
Soil properties
Different soils have different properties but, for clarity, we’ve simplified soil types into coarse-grained and fine-grained to describe their primary physical characteristics. In reality, soils are usually a mix of the two but, once you understand the principles, you can extrapolate to successfully adapt your anchoring. In the second article, we’ll describe staking in substrates that reflect what we often encounter: those with plentiful stones or tree roots, or covered in dense scrub or grasses, or snowy or frozen or patchy ones. But for now, let’s consider just those coarse- and fine-grained substrates.
Coarse-Grained Soils

Iceland’s ‘ash’ plains.
In soils like sands and gravels, soil particles hold together by physical interlocking of the grains. The soil fails if the physical interlocking breaks, allowing soil particles to slide across each other. Interlocking strength increases if you apply a force perpendicular to it, effectively pushing down on the grains so that they butt up against each other more firmly. If you apply too much force, you crush the soil but, before that happens, the grains’ resistance to sliding across each other increases.
-
Place your phone face down on the table. Use one hand to slide it a short distance across the table – note how easy it is to push. Now with the other hand push down on the top of the phone and try to slide it at the same time. The friction between the table and phone has increased and the phone is harder to move. That’s the same process with coarse-grained soil.
Why is this important? In the field, gravity applies a natural force perpendicular to the soil particles ie the weight of the soil itself. Therefore,
in homogenous sandy or coarse-grained soil, the deeper you go the stronger it gets… but that doesn’t apply to all soil types.
Fine- Grained Soils
In fine-grained soils like clays, the particles are tiny and are held together by water surface tension and ionic attraction between the clay particles, rather than by physical interlocking - they are adhering to each other rather than being pushed together. This bond (called cohesion) must be broken for the soil to fail. Applying a perpIendicular force does not increase bond strength between soil particles, because the bond not physical. That means soil strength doesn’t increase with load (nor depth).
Soil Strength
Strength of interlocking and/or cohesion is referred to as the shear strength of soil.
For coarse-grained soils, the soil’s angle of friction is a measure of soil particle interlocking – the higher the angle, the stronger the interlocking. Picture a pile of sand. The natural slope of the pile is a measure of the angle of friction and interlocking – the steeper the slope the better for campers! The angle of friction also describes the rate at which interlocking, or shear strength, increases when a perpendicular load is applied. In our case the perpendicular load is the weight of the soil itself so the force we can apply to the soil by our tent stake increases with depth.

Illustration of coarse-grained soil shear strength relationship
For pure clays, the undrained soil shear strength is equivalent to soil cohesion and is a constant with the angle of friction being zero:

Illustration of undrained shear strength of clay soil relationship
Of course, soil at most campsites is a mixture of sand and clay, so shear strength is a combination of both, although cohesion improvement from a bit of clay in sandy soil is usually minor:

Illustration of shear strength relationship of a mixed soil
Progressively more cohesive soils have progressively lower angles of friction so, as shear strength from physical interlocking reduces, the soil cohesion and moisture content becomes increasingly important.
With our camping mix of fine- and coarse-grained substrates and soil strength depending on the combination, cohesive forces provide initial shear strength. Shear strength through physical interlocking increases, albeit at a slower rate, with depth.
So why is this important for us multiday hikers?
Friction is what keeps your tent stake in the ground!
There are two friction forces involved:
1. Friction between the tent stake and the soil
2. Friction (or cohesion) between the soil particles themselves
The friction between the tent stake and the soil is what resists the stake being pulled out by forces that act along the axis of the stake:
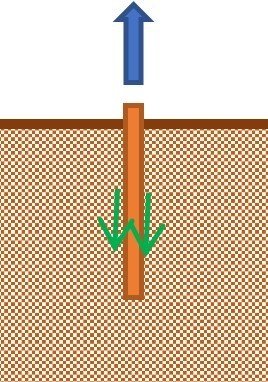
Friction (green arrows) acts along the length of either side of the stake at the interface of the stake and the soil to prevent it being pulled out.
The friction is created by the soil pushing against the stake. The harder it pushes against the stake the greater the friction force.
The friction between the stake and the soil is initially created by inserting the stake. The stake pushes sideways against the soil as it is inserted, and the soil itself pushes back (Newtons third law): a perpendicular force is being applied to the side of the stake. The soil is disturbed in this process, so the stake is easier to pull out than insert… but the harder it is to push in, the harder it is to pull out! This also explains why repeatedly reinserting a stake into the same hole in compacted or cohesive soil results in it being held less tightly. Of course, in loose soils such as sand dunes without any cohesive effects, and where particle interlocking is poor, this doesn’t apply.
The friction (or in clays adhesion) between the soil particles is what resists the stake being pulled out by forces perpendicular to the stake:

Friction acts along the interface of soil particles to stop them moving and thereby prevents the stake being “pulled” though the soil.
The green triangle in the diagram is the force distribution along the stake because the guyline is pulling from the top. If the perpendicular force were applied uniformly along the length of the stake, the green triangle would become a green rectangle. If we applied the perpendicular force at the bottom of the stake, the green triangle would invert.
A couple of things to note, particularly in sandy or gravelly soils:
By connecting our guyline to the top of the stake, we are applying the largest load to the stake at the weakest part of the soil.
Applying the force at the bottom of the stake increases holding power because the shear strength of the soil is greatest there. That’s why deadman anchoring works so well, even with relatively small stakes. It’s also the principle used by the stake below, as well as several snow anchoring techniques.
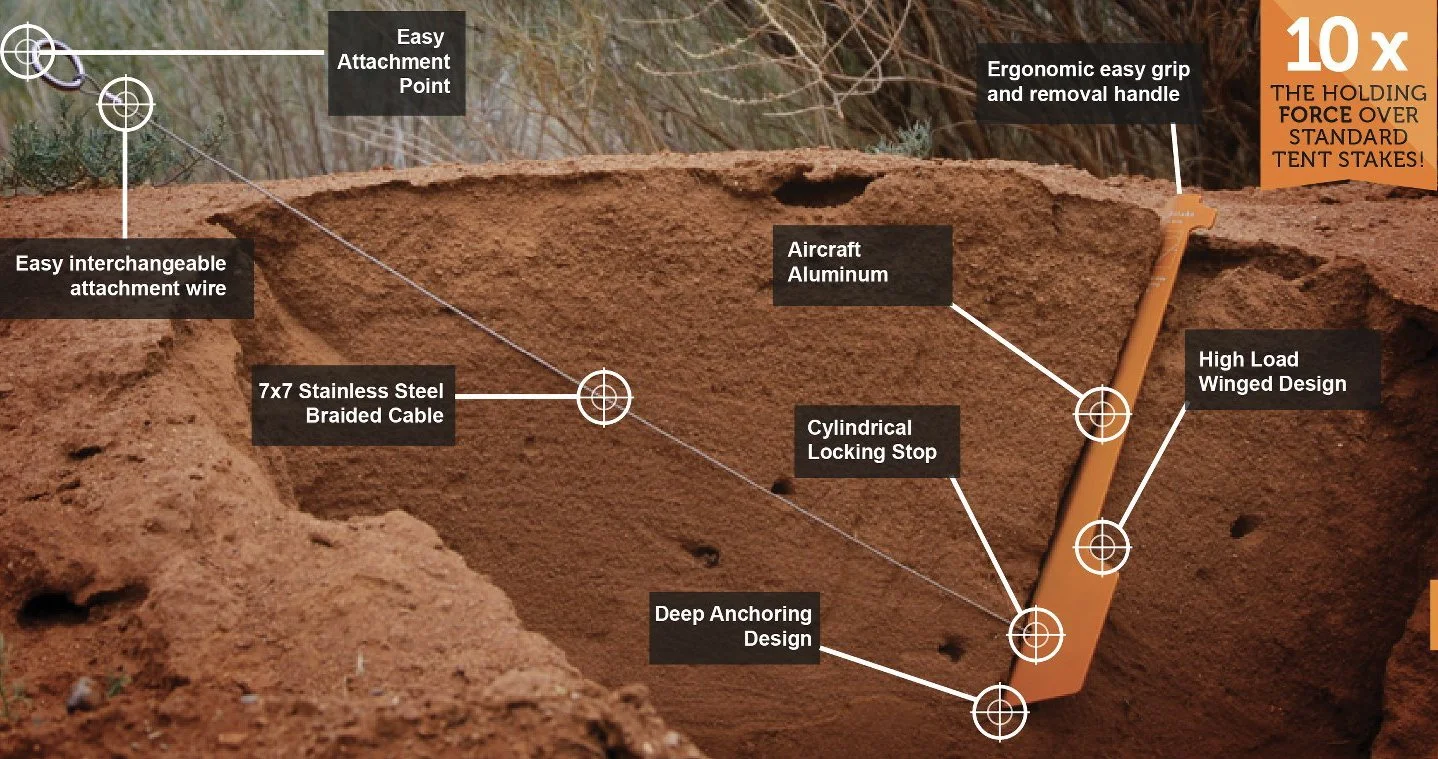
You can see how the load is on the wide bottom part of this Toughstake (Image Credit Toughstake)
Implications for Staking your Tent:
Your stake can support forces on your tent by:
1. transferring loads along its axis to the soil and also
2. transferring loads sideways to the soil.
The larger the stake’s surface area, the larger the area of soil that the force is spread across ie, the more surface area, the better in soils with low shear strength.
You can increase surface area by choosing either a (1) wider or (2) longer stake. For most soils (for practical purposes, everything other than pure clay) soil strength increases with depth so there is an additional benefit from having a longer stake. It is therefore usually better to increase our surface area by choosing a longer rather than wider stake, up to a point. Stakes that are too thin lack robustness, and many soils are shallow, so practical limits apply.
Stake Pull-out Strength or Holding Power
The following graphs illustrate the change in stake holding power for a round stake in sandy soil.

You can see that the friction resistance (ie holding power) increases with stake embedment depth and that the strength increases in a non-linear way.

If we keep embedment depth the same but increase stake diameter, strength increases but only linearly – ie less effective than increasing depth.
For purely cohesive soils like clays, stake pull-out strength increases linearly in relation to depth and also stake diameter. That is because the shear strength of purely cohesive soil doesn’t increase with depth as it does for coarse-grained soils.
Purely cohesive? Well, that’s uncommon. Soils are often a mixture of sand, loam, clay and gravel so they have some cohesive properties. Now you understand why most reputable stake articles recommend longer stakes over shorter ones if you’re looking for holding power.
Longer thinner stakes also have more holding power than shorter fatter stakes of similar shape. For example: a 175mm long, 5mm diameter round stake, has a similar holding power to an 150mm long, 8 mm diameter round stake, but is much lighter. So, for holding power per gram, it’s better to go with the longer stake, even though it has a smaller diameter. The same logic applies to other uniform shapes – but again you reach a point when the cross section becomes too small to be practical!
In the examples above, a round stake simplified concepts. However, in addition to embedment depth, the stake’s surface area and perimeter contacting soil are important too. That’s easy for a round stake because diameter is a useful measure of both. Other stake shapes may have larger perimeters or surface areas, but that doesn’t necessarily mean all of the stake is in effective contact with the soil. Stakes with clean uniform shapes such as round, Y, Vs and even square stakes are easy to insert without significantly disturbing the soil. This means all the stake’s surface area is utilised, maximising friction forces between soil and stake. A more complex-shaped stake does not always lead to a higher pull-out strength.
Just Add Water

Wet silty sand
Water has complex interactions with soil, from increasing cohesion in sand — imagine building a castle with completely dry sand! — to decreasing it in some clays (hard baked pans you can barely get a stake into versus soft, sticky mud). A detailed explanation is beyond the scope of this article but, if you expect rain in any but sandy soils, err on the side of caution as soil strength is more likely to decrease than increase.
Importance of Stake Angle:
We’ve all read different recommendations from vertical to 45 degrees, but there is rarely an explanation as to why, other than “has more holding power”.
The balance between the axial and perpendicular forces being transferred by the stake to the ground is influenced by:
1. the angle of the guyline or tent stakeout point to the ground, and also
2. the angle of the stake to the ground (and hence angle of stake to guyline).
Consider the following stake-to-guyline configurations, each with the same tension force along the guy line:
Guyline extends from tent at an angle of 45 degrees to the ground, stake is inserted parallel to the guyline.

It’s easy to see that all the force is placed along the axis of the stake, and we are only utilising the friction between the stake and the soil, and none of the soil-to-soil friction benefits.
2. Guyline extends from tent at an angle of 45 degrees to the ground, stake is inserted at an angle of 45 degrees to the ground (perpendicular to guyline).
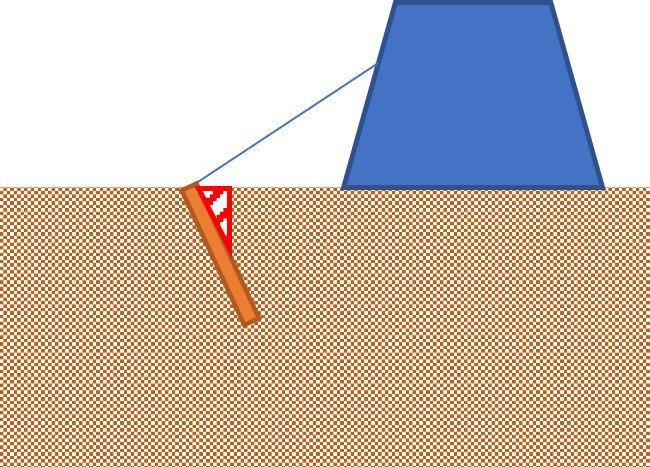
This configuration is widely promoted but it results in the all the load from the guyline being transferred by the stake to the soil-to-soil friction resistance and doesn’t utilise any of the soil-to-stake friction.
You create an angle of 45 degrees when the tent guyout is 1 metre above the ground and your stake is 1 metre away.
This configuration creates a small wedge of soil (red triangle in above diagram) that has little strength because there is very little pushing down on it to hold it in place. Once it fails, the effective area of the stake that can transfer load to the soil decreases, making failure more likely.
3. Guyline extends from tent at an angle of 45 degrees to the ground, stake is inserted vertically at an angle of 90 degrees to the ground.

This configuration is more recently promoted because it is recommended by the US based Advanced Textiles Association for large tents (marquees). It results in the load from the guy line being transferred equally between the stake-to-soil friction and the soil-to-soil friction. And the geometry results in each one having the same force applied.
At first this might seem best – but what if the friction resistances are not equal? Note that this configuration is the simplest to reliably install, that marquees use much longer stakes, and that the Association advises installers to pull test each stake to ensure it meets the design loading without failure. So for their applications this makes sense. Unfortunately, we hikers aren’t in the same position!
4. Conversely, most hiking tent manufacturers recommend making guylines as long as practicable. So let’s do this and extend the guyline at an angle of 30 degrees to the ground, inserting the stake vertically at an angle of 90 degrees to the ground.

If your guyout on the tent is 1 metre off the ground and you place your stake a horizontal distance of 1.75 metres away, you’ll get an angle of approximately 30 degrees.
In this configuration we have less force transferred along the stake (25% ) than perpendicular to it (75%).
Let’s keep the guyline angle at 30 degrees but now angle the stake by 15 degrees rather than having it vertical.
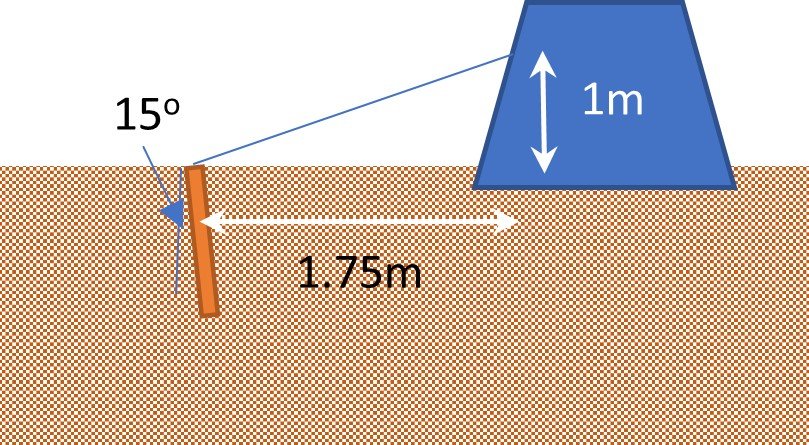
This configuration transfers even more perpendicular force (and relies more on soil-to-soil friction) to the stake (90%) and less along the axis of the stake (soil to stake friction), 10%.
In summary:
The flatter the angle of the guyline to the ground, the more force is being transferred to soil-to-soil friction.
The larger the angle of the stake into the ground from 90 degrees, the more force is being transferred to soil-to-soil friction, and the smaller the depth into the ground.
We recognise that many big assumptions are being made. Some of the bigger ones include:
Graphs and relationships are based on homogenous material which soil is not. How many times have you moved your stake a few centimetres to find better soil?
Issues of scale: much of this is based on structural piles and even the Advanced Textiles Association references much larger stakes of at least 25mm (1”) diameter and over 600 mm (2’) long.
From a geotechnical engineering perspective, the bearing capacity of top soils is normally ignored, because they are mostly loose with organic matter. Yet this is the material we secure tents into! It is less cohesive than subsoil, with less shear strength in clays and the effectiveness of friction and cohesion can vary significantly from the general principles outlined above.
Stake manufacturers seem reluctant to publish any testing information on their stakes. It’s mainly bloggers who have done their own backyard tests (we did too) but they are not comprehensive, nor are they standardised; this excellent paywall article by Will Rietveldt is an exception.
So, this article presents useful principles for you to consider when selecting stakes, watching those stake test videos, and assessing your site and tent/staking setup. And it is worth brushing aside very loose material from the surface immediately around where you are going to place your stake to maximise the embedment of the stake into better soil.
What Angle is Best?
If the answer were simple, we’d all deploy stakes in the same way!
Some facts:
To ensure your stake doesn’t fail, first use sufficient stakes to spread the load over the greatest possible surface area, but then by angling the stake such that neither the axial (utilising soil to stake friction) or perpendicular loads (utilising soil-to-soil friction) exceed the frictional resistance capacity of either.
Your maximum tent stake load carrying capacity is reached when you apply the load so that each of the two friction forces are at their capacity.
The best orientation of your stake and guyline depends on the relative friction resistances available to resist the forces being transferred down the guyline.
The flatter the angle of the guyline to the ground the more force is being transferred to soil-to-soil friction. This is more critical in sands with lower soil to stake friction forces. Consider how much easier it is to push a stake into sand than clay – that is your best guide to the amount of stake to soil friction you have at your campsite and how much vertical force along the stake it will take before being pulled out.
Soil has no tensile strength – you can easily pull it apart.
The larger the angle of the stake into the ground from 90 degrees the more force is being transferred to soil-to-soil friction, but the shallower the stake, the more likely you are to fracture the soil near the surface, which then reduces the stake’s effective length and area transferring load to the soil.
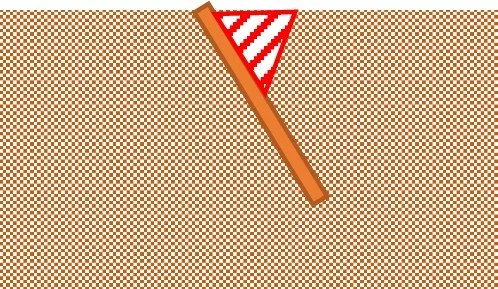
This wedge of soil (red triangle) is prone to failure because it has nothing above it holding it down. Therefore the shear strength is small and, if the stake pivots, it introduces tensile forces into the soil so it fails. The greater the angle, the more likely this is to happen – a lesser angle is better.
It would be useful to know if and how soil to stake friction compares with soil-to-soil friction before we set up out tent and decide what angle we install the guy rope and what angle to insert the stake! Whilst we can’t do any field strength testing before we set up our tent, we can observe the soil on which we are pitching.
If we extrapolate data from circular piles, we can conclude that:
For coarse-grained soils with no cohesive resistance, soil-to-soil friction resistance will be significantly greater that the soil to stake resistance, possible by a factor of three or more.
For cohesive soils such as clays the soil-to-soil friction resistance will be higher, but only by between 20 to 50%.
So, when we insert stakes, we are most likely to be best off if we bias stake loading to utilise soil-to-soil frictional resistance, but not by too much.
In practical terms this means:
Guylines should be as flat an angle to the ground as practicable (ie longer is better, with limitations for non-freestanding tents), and
Stakes should be placed at a slight (between 5 and 20 degrees) angle off vertical.

A range of angles on these single and split guylines.
Several factors influence this conclusion regarding stake angle, and why we don’t recommend the oft-touted 45-degrees.
The larger the angle, the less the effective embedment depth, so you can’t utilise the stake’s full length to get to a depth where soil is stronger. A 45-degree angle reduces vertical depth of insertion by 30%, so your 200mm stake is only 140mm deep. In sand, that results in a 40% reduction in soil shear stress capacity.
Soils have no tensile strength. The sharper the angle of insertion the bigger the wedge of soil above the stake near the surface. This wedge has very little strength and is prone to tensile forces and failure, which then reduces the effective area of the stake able to transfer the tent load to soil.
A configuration with a guyline at 30 degrees and your stake at 15 degrees biases the loading towards soil-to-soil resistance by a factor of 3.5 which, in sand, is all you can do to maximise holding power.
If a stake is inserted vertically, there is a possibility that it could be accidently inserted slightly off vertical with the alignment towards the tent – hence biasing load along the axis of the stake rather than perpendicular to it. A small angle provides a factor of safety for the operator or for unhelpful rocks and tree roots!
If a stake is inserted vertically but then moves slightly due to wind gusts, it is again aligned towards the tent. Slightly off vertical allows for some movement during the night without major reductions in holding power.
Even with stakes on fly perimeters, forces are not applied 100% horizontally - there is still a vertical component. An off-vertical stake provides greater protection against excessive loads being applied along the axis of the stake that might otherwise arise from upward vertical loads from the tent.
In good sound (cohesive) clay soils it doesn’t matter a great deal what you do. Provided you avoid the stake pointing towards the tent, the pull-out resistance should be sufficient from either soil to stake or soil-to-soil resistance. So go with what is most practicable.
Still not convinced about stake angle? We ran a series of simple pullout tests using a luggage scale to measure force. We tested various stake and guyline angles with three repetitions for each configuration.
Stake at 45 degrees: Guyline at 30 degrees - progressively increasing force applied until failure.
Stake at 15 degrees: Guyline at 30 degrees - progressively increasing force applied until failure.
With the 45 degree stake, the soil very quickly fractures near the surface and the rotation process doesn’t slow or pause: total failure occurs in one continuous process at around the 8 kilogram mark. The failures held true for all repetitions for both configurations.
Notice that the 15 degree stake holds firm after an initial small movement as the stake mobilises the shear strength of soil near its base as it begins to pivot. The stake stayed at this point from around the 8 to 10kg mark and the stake continued to hold as increasing load was applied until it finally fails at 16 kilograms. That process was consistent for all the tests.
The Importance of a Taut Pitch
Pull tests like those above with continuous increasing pressure illustrate an important principle but ignore the fact that this is generally not how wind and tents transfer force to guylines and stakes. Instead, wind gusts cause a tugging motion that is amplified by acceleration forces of a loose pitch. These repeated tugs loosen soil around the stake, decreasing the soil to stake friction and therefore also holding power: we all do this ourselves when trying to remove a stuck stake. A taut pitch decreases those tugging forces and the chance of your stake loosening in the soil.
Am I better off using a longer stake or a second stake?
There’s no single answer!
In cohesive soil such as a clean clay, two 150mm long stakes have more holding power than one 200mm stake (see Part Two, Double Staking). But then you are unlikely to need an extra stake in cohesive soils.
In coarse-grained or sandy soil, a 200mm long stake is likely to be just as effective as two 150mm stakes. However, using either stake as a deadman anchor provides the best overall pull-out strength outcome in this soil.

These two tents were almost side by side but the Stratospire Li’s stakes on the left were mostly in deep sand, whereas the Duplex was on shallower, compacted silt and limestone.
How Far should I drive in the Stake?
For maximum holding power, the head of the stake where the guyline connects should be at or even slightly below soil level. If the stake is not completely embedded and the guyline connects some distance above the soil surface, there is less soil-to-stake friction AND less soil-to-soil friction. Not only that, but guyline forces are magnified through leverage, because you have created a pivot point or fulcrum at soil level, in the same way as a long handled spade has more leverage than a standard spade.
Backpacking Stake Options
Now that you understand how stakes work, let’s look at the material, shape and size options available because, whether you call them tent stakes, anchors or pegs, each has its own advantages and disadvantages.
Stake Materials
Most backpacking stakes nowadays are of aluminium but, as always, it’s not that simple!
1. Aluminium
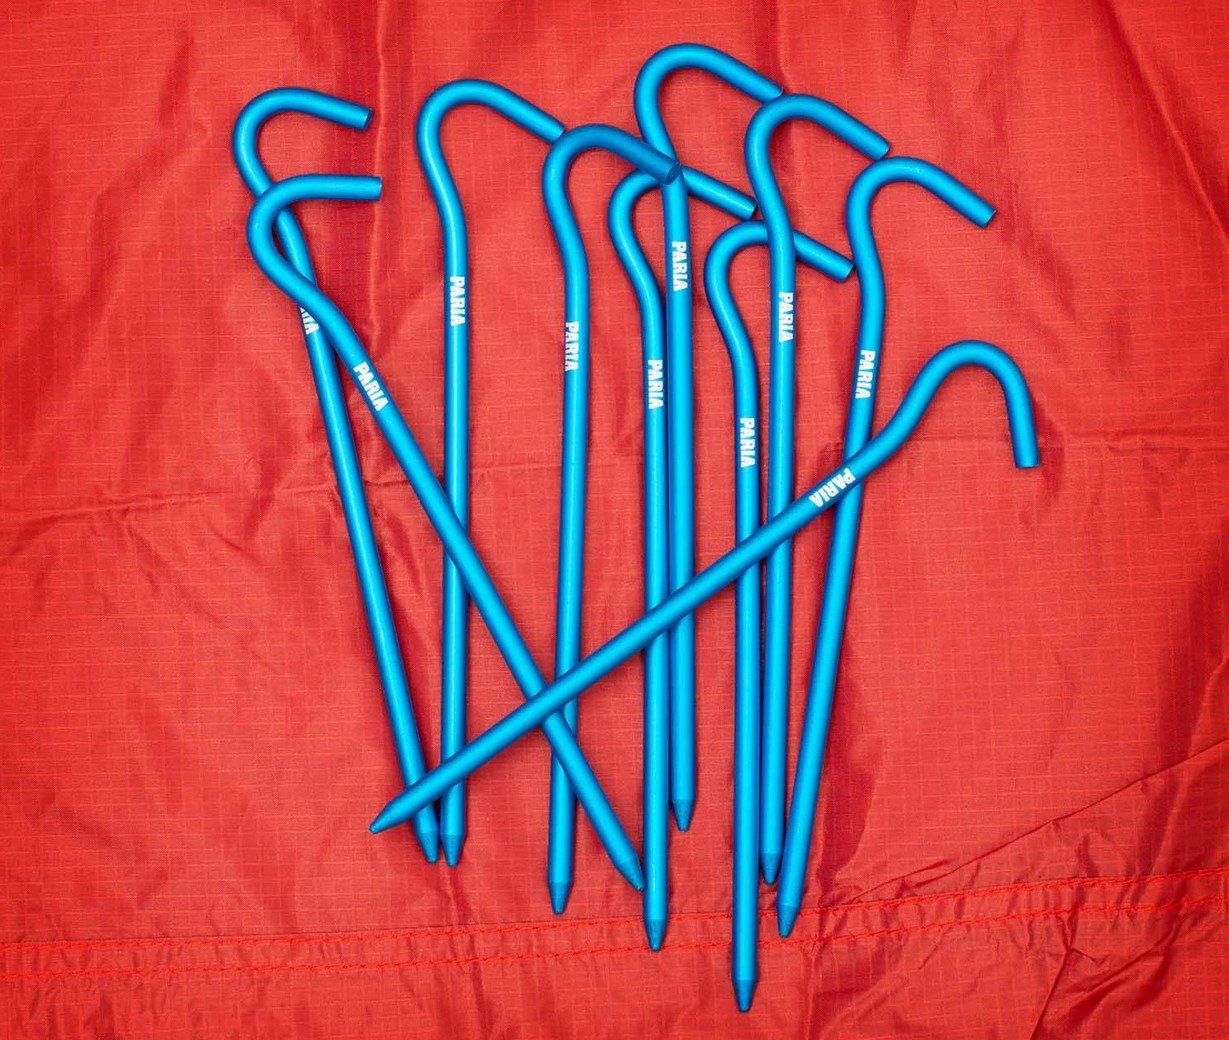
Aluminium shepherd’s crook stakes (Image Credit: Paria)
Most backpackers choose aluminium stakes because they are cheap and light. However, aluminium quality varies, with significant differences between expensive stakes and cheap ones that bend on first use. Industry leaders such as DAC produce specific alloys that maximise stiffness and strength, so these stakes last much longer than knockoffs that look identical but are not. It also depends on how you treat your stakes. In the places Geoff and I hike, we often use rocks to bash stakes into hard ground; only quality aluminium takes this abuse.
2. Steel/Stainless Steel
Huge old-school steel pegs are now rarely used by backpackers, but thin steel shepherd’s hooks in particular are still practical for certain situations: cheap, not too heavy, and stronger than aluminium. If you don’t mind carrying a few extra grams, especially on short trips or overnighters, and you expect substrates that suit thin stakes, steel is better than cheap aluminium.
3. Titanium

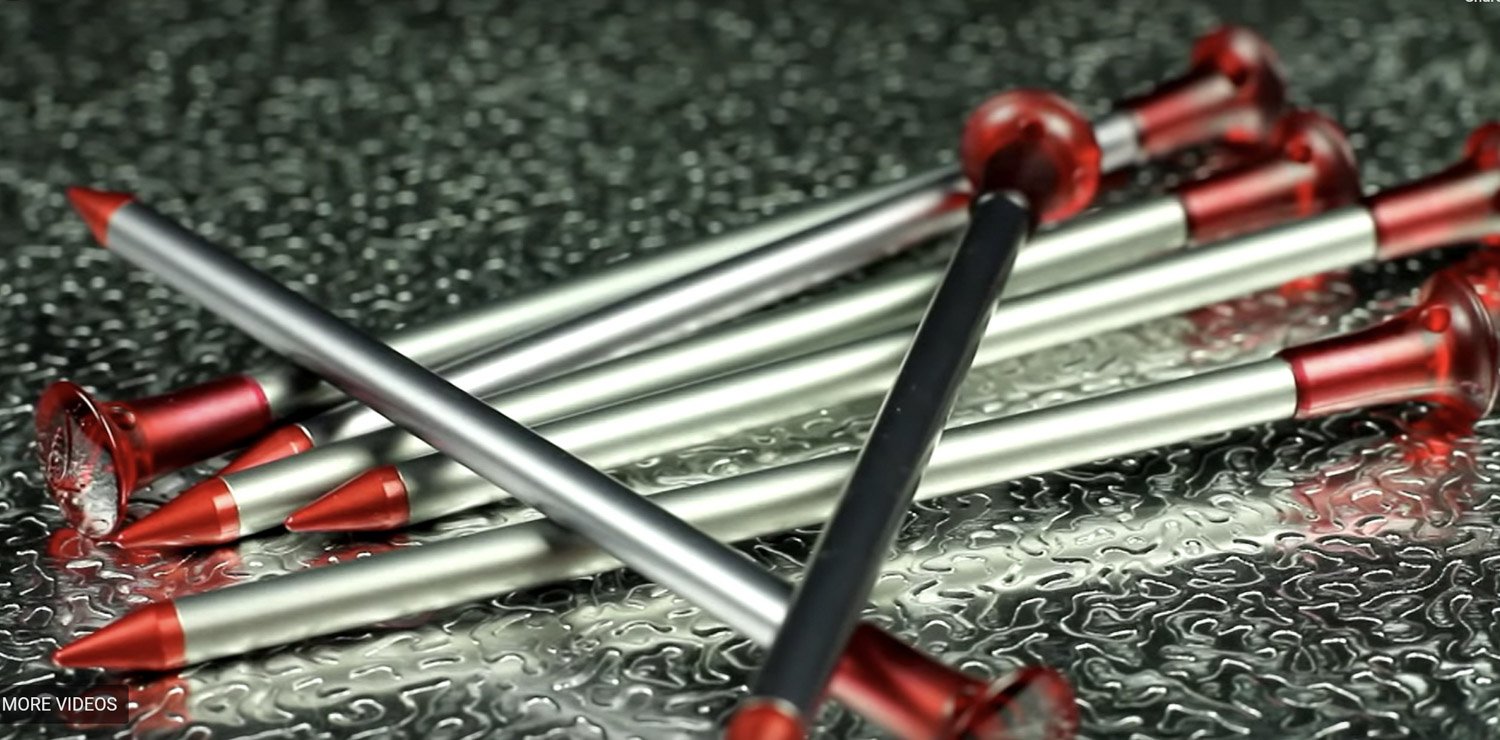
This titanium nail is very strong and very light
These are expensive, strong and light. However, some are stupid light, so thin so as to bend when pushed into anything but the most perfect of soils (looking at you, titanium v-stakes with holes in them!). However, titanium stakes excel as either nails for hard soil, or as snow anchors, where the substrate is soft and the nature of the metal means big weight savings when a large surface area is required for holding power. Some snow hikers also prefer titanium because it bonds less tightly to frozen snow than aluminium, so stakes are easier to remove. The very strong 3D-printed Pioneer Titanium Y stake (Disclaimer: slowerhiking was sent one for testing) suits a wider range of substrates than other titanium stakes.
4. Carbon and Carbon core
Light carbon stakes are expensive and practical for limited substrates. We don’t recommend them for much of Australia’s hard, rocky soils: carbon is strong but prone to shattering, as when hammered in with a rock. If you regularly camp in places where you can push stakes in with your hand, they save lots of weight. Weight weenies can DIY carbon stakes at 2.4g each but wear a respirator: like asbestos, carbon dust fibres stay in lungs.
The best carbon core or hybrid stakes with aluminium sheathing, head and tips combine the best features of both these materials, are very light, and are worth considering in areas with soft-firm soil; the heads don’t lend themselves to hammering and you still need to baby these stakes a little. Some people use a thin needle or nail stake to make a pilot hole in hard soils before inserting the carbon core one.
MSR Carbon Core Stakes (Image Credit: MSR)
5. Plastic
Cheap plastic tent stakes can be very strong and ideal for sand, but they are too bulky and heavy for backpackers who will generally prefer deadman anchors (see Part Two) in such substrates. Delta anchors are an exception (Part Two).
6. Wood
Of course we no longer buy wooden tent stakes, but most hikers have them at our disposal! Use a forked branch, break or whittle it so the fork is upside down to form the hook at the top, and sharpen the opposite end. Sticks also make excellent deadman anchors as you don’t need to disinter them! Wooden options are worth remembering if one of your stakes breaks or is lost.

Stake Shapes
Stakes have different shapes to suit different substrates and forces. Some are better for specific things whereas others are jack of all trades, master of none. All have their place.
To summarise:
Longer, wider stakes have more surface area
Holding power increases with surface area
More surface area is required in loose and soft substrates
Less surface area is required in firm and hard substrates
Longer is better than wider in most substrates
1. Shepherd’s crook/shepherd’s hook/wire stakes
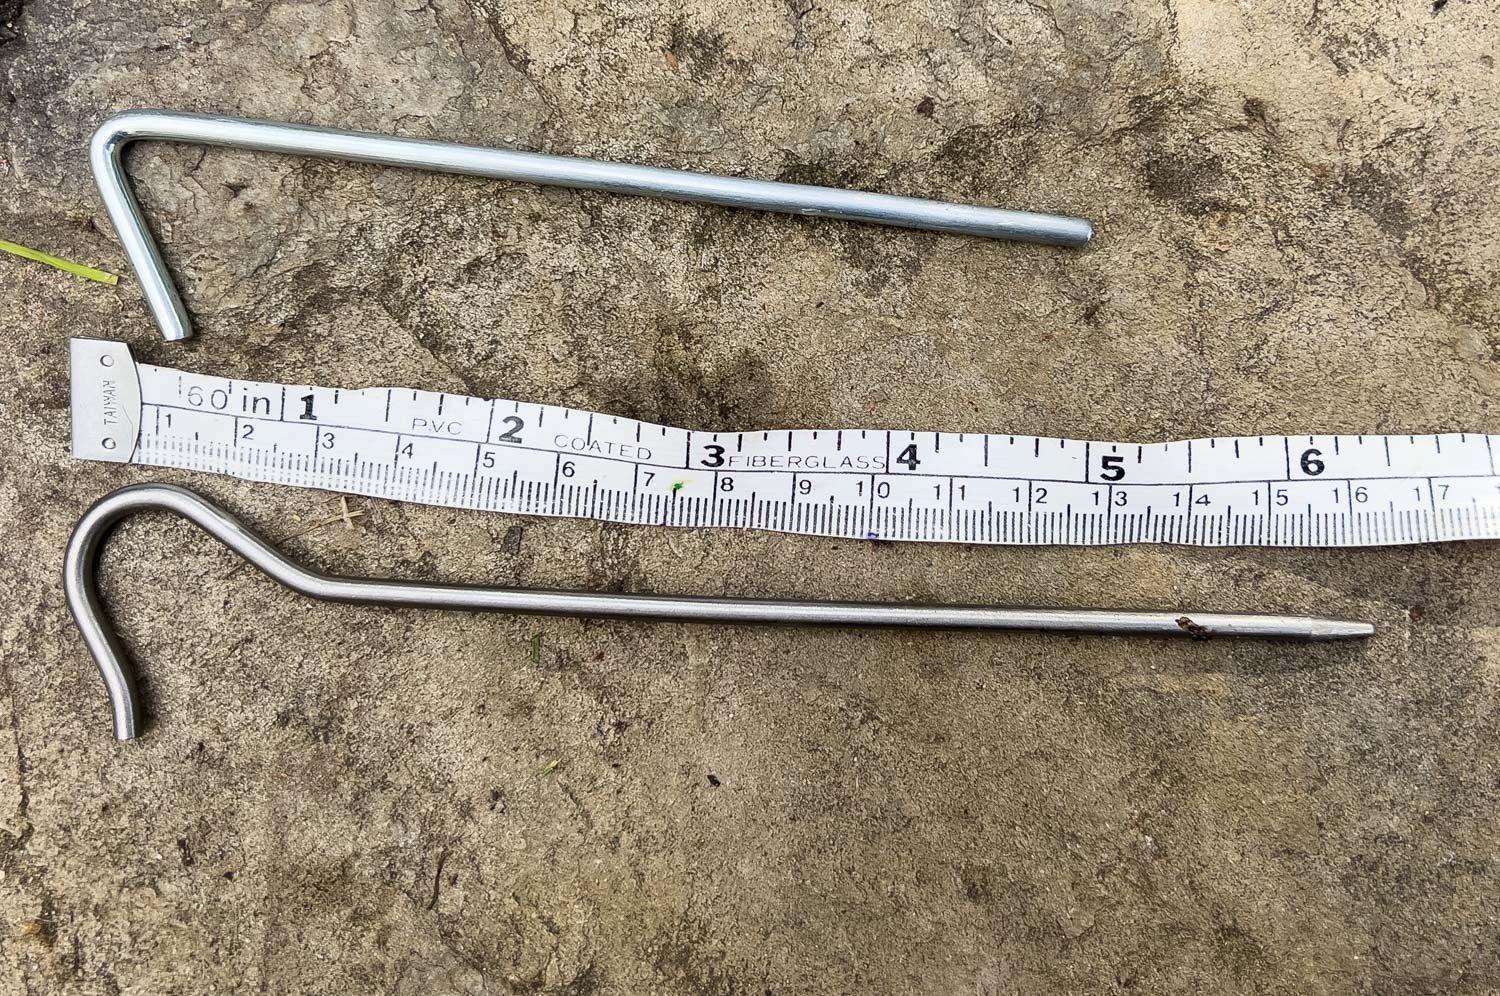
Steel shepherd’s hook, top, titanium shepherd’s crook bottom.
Most budget tents come with this traditional thin tent stake with a hook or crook at the top, and they are also the first thing backpackers swap out after their first trip. This is because shepherd’s crook stakes have limited application and because the quality of supplied stakes is usually poor.
These stakes suit only hard or firm substrates as they have too little surface area to create sufficient friction and holding power in looser ones. Because they are used in hard soils, their quality is even more important than for more generalist stakes because, especially in Australia with our baked and rocky substrates, you are more likely to need to hammer them in, rather than just pushing with your hand or sole of your boot. Cheap shepherd’s crooks instantly bend in this situation. Titanium wire stakes can be very strong, very light (about 5g), and thicker ones can be hammered in.
Shepherd’s crooks sometimes spin 180 degrees in insufficiently cohesive soils, allowing guylines to slip off. Inserting the stake deep enough to embed the tip of the hook helps prevent the stake from spinning.
2. Nail or Needle stakes

Top: Nail stake, bottom: needle stake, slightly bent after years of being hammered into hard soil.
These stakes are for harder substrates; if you need them, and as the name suggests, you often need to hammer them in with a rock. Both tend to be very strong, particularly titanium ones which many hikers consider almost indestructible; our square profile 8g (0.28oz) aluminium Mont needle stakes (discontinued) don’t spin and have been with us for many years. Both are relatively short compared to some other stakes but they don’t need length in such hard substrates. The aluminium 10g (0.4oz), 15cm (6”) Nemo Airpin is an interesting take on the needle stake.
Nails bite through sandstone, some rock and even wood; they can be difficult to remove and although gram weenies discard pull cords from stakes, they are worth leaving on these! They are particularly good in frozen ground and very stony ground where the thin diameter finds its way through the substrate; they are great in our local calcrete. Some people use them to make pilot holes in stony soil for larger stakes. They are almost impossible to bend; you may do it by pushing with your boot at the wrong angle rather than hammering.
Because many nail stakes have only a small lip at the top, care must be taken to angle them sufficiently so that the guyline doesn’t slip off, or to loop the guyline twice. However, there is unlikely to be any stake movement in the kinds of substrates they are used.
3. Tube Stakes aka Easton Stakes

Easton stake
Tube stakes are made of aluminium with a flattened head cap and a pointed tip. The 20.3cm (8”) ones weigh about 12g (0.4oz), 15cm (6”) ones about 10g (.35oz). At just 2g heavier, longer Eastons have significantly more holding power than shorter ones.
Others are made of carbon, with an aluminium tip and head, weighing just 6.6g (0.22 oz) whereas hybrid ones are comprised of carbon within an aluminium sheath (15cm/6”) weighing just 5.5g/0.19oz). All are light, strong and stiff, with the aluminium ones reportedly the most durable.
At 8-9mm thick, these are all designed for soft to firm rather than hard ground. The aluminium ones handle being hammered in occasionally – the tops break off if you do it too often – and many hikers swear by them. Straight carbon versions need much softer substrates and collapse when hammered into hard ground.
In our experience, Eastons are versatile, handling tougher soils than aluminium shepherd’s hooks and even some titanium v stakes, with similar holding power to the latter with comparable length.
4. Snow/Sand/Blizzard stake

Sand/snow stake
As you expect just by looking at them, these stakes are for loose substrates such as scree, gravel, snow and sand at the opposite end of the spectrum than for shepherd’s hooks and nails. Snow and sand stakes are long and wide with a large concave surface area; some have holes to reduce weight. You can guy to these holes instead of the top of the stake so the guyline attaches below the soil surface to increase the holding power of the stake. In soft snow or very loose sand, completely bury these stakes deadman style to exponentially increase their holding power (see Deadman Anchors in Part Two). Deadman anchoring also works with much lighter stakes and objects, and is preferable if you want to carry less weight.
Because these stakes are only pushed or buried, never hammered in, forces are widely spread rather than concentrated, so cheap aluminium sand stakes may be a little heavier than expensive ones, but every bit as durable.
Sand stakes are excellent for digging cat holes in dirt to bury your poo! We have a set of the discontinued (but still available) small Toughstakes, which even resemble small spades. However, they are heavy at 39g (1.38oz), though the weight is less significant if you carry one instead of a poo trowel such as the Deuce of Spades (17g/.6oz).
Snow pickets made of channel aluminium are too long and heavy for hikers, who will adapt their skis, snow shoes or hiking poles instead.
5. Y-stakes or Groundhogs

Top: Mini Groundhog, bottom: full-size Groundhog
Unlike shepherd’s hooks and snow stakes designed for specific substrates, aluminium Y stakes (Y shaped in cross section) are all-rounders and hugely popular for this reason: you can get by in much of Australia using them. At a pinch, they can be bashed into hard ground, or pushed deep into softer ground. However, aluminium ones are not designed to be repeatedly hammered in with rocks, and doing this too often results in the head breaking off. They can also be very difficult to get into the kinds of rocky soils we have in Australia, as they are too thick to find their way between the stones.
The most famous of these stakes, the 19cm (7.48”), 13g (.46oz) MSR groundhog, has a barely noticeable curvature on the bottom of each of the three flanges, causing the stake to twist slightly as it is pushed into the soil, increasing its holding power. Cheaper ones often lack this feature. The Groundhog’s flanges are also tapered, so overall the stakes are thicker, stiffer and stronger; they are also made of strong aluminium alloy. If you expect to occasionally hammer in your Y stakes, it is worth buying quality ones rather than cheap knockoffs.
Groundhogs come in two sizes; at 10g the 15cm (6”) Minis are lighter than the full-sized ones, suit firm ground (firmer than the 19cm ones) and are a good option for ultralight hikers. With a significantly thinner diameter, they penetrate rocky soil better than full-sized ones.

The Pioneer stake by Teragon Gear is an exceptionally light 3D printed titanium Y stake (Image Credit Teragon Gear).
Teragon Gear manufacture the Pioneer, a 150mm (5.9”)n 3D printed titanium Y-stake (Disclaimer: slowerhiking was sent one for testing). It is the equivalent of a mini Groundhog but weighs only 5.1g (0.18 oz), half the weight of a mini Groundhog. The Pioneer has a ‘limited lifetime warrantee’ and after 18 months of use the head with its flat top and Y-beam construction at the neck has held up extremely well to hammering with rocks and the tip has not blunted: it has the highest strength-to-weight ratio of any metal tent stake on the market. At USD$20 per stake at time of writing these are expensive but if you are cashed up and weight and strength are the most important criteria for you, these stakes are the lightest all-rounder stake choice for ultralight tarps and DCF shelters. There is now a full sized one (181mm/7.1 in) which is better value for the amount of weight saved: it’s just 7.5g/0.24oz, around half the weight of a standard MSR Groundhog.
The 20cm (7.9”) STS Ground Control Tent stake (14g/0.5oz) has three guy attachment cutouts so you can utilise lower ones to reduce leverage in soils where you can’t push the stake all the way in; it’s also clear that the cutouts decrease the strength of the stake and you would want to be extremely careful hammering them in. However, with just one cut out at the head rather than three — one on each flange — the head is likely to be stronger than that of the Groundhog.
6. X stakes
These are an X shape in profile, and they have similar characteristics to Y stakes, but are shorter and lighter. Many mid-range knockoff tents such as Naturehike come with these stakes. However, it’s likely that the complex perimeter disturbs and fractures soil more on insertion than do less complex shapes, potentially reducing the X stake’s holding power.
7. V-stake (aka J-stake, named after the founder of DAC)

The famous Dac J stake
V-stakes are popular for soft to firm substrates, but not so much rocky ones. V-stakes have a large surface area but little weight, so the material these stakes are made of, and their construction, makes a big difference to their strength. High quality ones, such as DAC aluminium stakes (12g, 16cm), are thicker in the centre of the V, making for a significantly stronger stake than one the same thickness throughout. DAC aluminium alloy is also high quality; cheap V-stakes are not a great choice because they are not used only in the softest substrates and need to be strong. DAC J stakes can be hammered into most soil and even wood. They also have a tiny notch partway down the shank for the guy loop if you can’t get the stake all the way in.
Marginally lighter at 11g (.39oz) for 16.5cm (1.97”) are these titanium V stakes:

Although titanium is a stronger metal, these are so thin and with so many holes that the end result is a significantly weaker stake than the aluminium DAC J. Pushing these in with the ball of your boot is almost certain to bend them at the head, as you can see we have done – you want good loam, definitely without rocks, and where you can push the titanium stakes in with your hand. Conversely, these 16.4cm (6.45”) famously strong titanium V stakes can be hammered into wood, but they are also relatively heavy at 19g (.67oz): size and shape play a part and titanium is not automatically the lightest option.

We bought these but never use them for backpacking as other anchoring techniques are lighter in substrates deep and soft enough to fully deploy them.
These long helical stakes have excellent holding power in looser substrates. However, at 30g each they are heavy, more suited to car camping and, once backpackers get to these weights, they will begin asking themselves whether two or even three lighter, smaller stakes are preferable or at least more versatile (probably). If the ground is soft enough for these stakes to penetrate fully, it will likely also be soft enough for a zero weight deadman wooden stick.
However, Teragon Gear now make the equivalent stake, the Pioneer Torque, in titanium. It is 19.6mm/7.7in long, but weighs only 8.5g/0.27oz: less than a standard aluminium Groundhog and less than two Mini Groundhogs: excellent specs, but not cheap.
9. Delta anchors

Delta ground anchors. Near the surface the T-shape helps to keep the soil between the stake and the tent intact, and should rotation of the stake upwards occur at the guyline connection, this is resisted by the back of the stake pushing down on the surface of the soil behind the stake.(Image Credit: Delta Ground Anchors).
Delta anchors use an interesting principle where forces are transferred so that they act in a similar way to a deadman. The ones most commonly used by backpackers, primarily in the UK, are a whopping 49g each. Titan ground anchors are aluminium deltas that work on the same principle but with a large flat surface area like snow anchors; the smallest weighs 22g (0.78oz).
Why carry such stakes? Because delta anchors are excellent in just one particular kind of substrate – spongey, soft, shallow sod over rock. You need long stakes for holding power in the spongey turf, but long stakes can’t be pushed all the way in, and the substrate is too shallow for burying deadman anchors, which would in any case be precluded by LNT principles with this kind of vegetation. Nor are rocks lying on the surface for modified deadman anchoring. Here is the cheap Australian version (bulky and even heavier at 60g each). In our opinion, these aren’t useful for Australian backpackers with our substrates.
10. Other stakes
Interesting alternative designs come and go on the market (can you deduce a potential issue with these stakes?); whenever trying new tent stakes, consider the principles from part 1 of this article to determine where they will work best, and how best to deploy them.
Table 2: Tent Stakes, Weights and Substrates
Use this table only as a rough guide: as we have seen, not all stakes are equal, even when they are nominally the same. We’ve used examples from our stake bag and from online suppliers. Substrate gradations of Loose, Soft, Medium, Firm and Hard are subjective and are to indicate stake suitability relative to each other. Stake length and the presence of gravel, fibrous roots or rocks within the substrate also greatly impacts stake suitability. The following selections are for windy rather than still conditions: in the latter many of the stakes will hold in soft and even loose substrates.

*we own the discontinued Mont Needle stake which we have not managed to break in many years; this is the nearest equivalent we could find online but cannot vouch for the product.
**We found the Vargos with multiple holes and a narrow neck too weak for Australian baked substrates, but other brands with the same design may be stronger if made of higher quality titanium alloy.
Now that we understand how stakes work and what kinds are available to us, read Part Two, How to Stake and Guy your Tent for different substrates, stake selection, anchoring techniques (deadman, modified deadman, tent platforms, double staking) as well as guyline considerations and deployment tips for different tents.