
How to Secure Your Tent for Strong Winds and Storms
Now that we understand how wind and force interact with different tents and how to choose the right pitch in different terrain, it’s time to head out and pitch our tents securely. Stakes, guylines, tent orientation, set up technique, rain and snow plus one other essential human factor all come into play when we are fighting our tent in a storm!

The spectacular but infamous tent-eating Alftavatyn campground in the central highlands of Iceland on the Laugavegur Trail. After our terrain article, you’ll understand why it’s so bad!
But… Before You Leave Home
This series of articles on Tents in Strong Winds provide tips for hikers facing unexpectedly strong winds in whatever tent they happen to be using, rather than for those who consciously venture into extreme conditions, when you should already know exactly what to bring and how to use it. This article is ideally read with Part One and Part Two in the series.
Also helpful is a solid understanding of what wind forecasts really mean. Is the Australian Bureau of Meteorolgy wind forecast an average? Mean? Gust? Why is the Beaufort Scale so useful? What is wind chill? Is it relevant in Australia? Why do weather apps give different forecasts? Which is best? Where and Why?
If you’re not sure, read our Understanding Weather Forecasts and Apps for Camping in Strong Wind and Storms companion article.

Understanding the wind and weather forecast is essential if you’re hiking in remote alpine areas of Australia. Image Credit: Bureau of Meteorology
Tent Selection
Some vloggers – those UK men again – head into storms for fun, with riveting, ridiculous or hilarious footage for us to enjoy. However, most of us prefer more benign conditions, and are not camped a few hours from the trail head and car should our tent fail. Ultralight tents are fantastic and surprisingly strong, but few are specifically designed for high winds: as we saw in Part 1, with the exception of pyramid tents, genuinely stormproof tents are heavier. Some tents are significantly easier to pitch solo in strong wind, and this might influence your decision if hiking alone.
“Selecting a tent or shelter simply because it has the lightest weight is rarely a good idea. [Some of our shelters] are super light solutions, and many people use them successfully, but there is a decided sacrifice in strength, durability and comfort. Riding out truly bad weather with such minimalist protection can be miserable, if not downright dangerous.
“You have to determine the lowest level of strength you are willing to accept. A good approach is to think about what ‘light weight’ is for what you will be doing: that metric is different for someone who spends a majority of time in big mountains, above tree line, in all seasons and in all weather conditions, than it is for someone who stays in forested, rolling terrain in the summer. In general, the lighter the tent, the less features it will have and so, consequently, the less comfort it will offer – and possibly the less security it will give you in adverse conditions. Extra strength and security ‘costs’ weight, and if you need it, then you need it.”

Hilleberg tent - heavy but bombproof (Image Credit: Will Copestake via Hilleberg)
Hence, although many of the tent examples on this website are ultralight, this is because they are what Geoff and I have used most often recently and suit the kinds of relatively benign environments in which we most often hike.
Anchoring and Pitching
Guylines and Wind
Hilleberg Soulo Red Label with all upper guylines deployed, Tassie highlands (Image Credit: Nicole Anderson)
Perhaps the greatest misconception about freestanding tents is that they need no guylines. Ever. Of course, just because your tent can stand up on its own, doesn’t mean it will in wind: even light breezes can flatten a freestanding tent when it is unguyed.
Upper guylines hugely increase the stability and strength of freestanding tents. Guylines should be long enough to provide sufficient bracing: a short one following the fabric straight down to the ground does little. Stakeouts around the bottom edge of the tent also provide little structural support to the upper part of freestanding tents other than as anchoring for poles.
The main cause of failure we saw in tents during the storm in Landmannalauger was due to too few, too short or completely absent guylines: many people had not brought any with them.
42.8 kt winds (22m/s, 79kph, 49mph) were measured in the campground by Icelandic emergency volunteers who were being filmed for a documentary.

Tent manufacturers, look away: the poor little MSR may have survived if it had guylines deployed, like the lime green geodesic tent behind it. Rocks on tent flies do nothing to stabilise the tent and only promote tears (both kinds).
Tents without guy lines all failed - those that didn’t break still had major rain ingress, which we class as a potentially lethal failure (hypothermia). Many other tents had torn flies and snapped poles: we’ve never seen such an astonishing number of damaged tents! The only ones that kept those inside dry were well-guyed (and well-anchored) tents. Some very strong tents failed without guylines. I seem to recall that some large communal tents were laid flat in preparation for the storm and re-erected the next morning. Many people whose tents failed couldn’t start their hike because all their gear was drenched.
In strong wind, firmly-anchored, non-stretch guy lines are a crucial structural component of every tent, freestanding or not.
Tim Hunt (in consultation with Martin Zemitis) of SlingFin writes,
“The goal of guylines on a pole-supported tent is to distribute stress to prevent the poles from flexing past their yield point, since that is the most likely cause of a catastrophic failure in freestanding tents. The equivalent on a trekking pole tent would be distributing stress to avoid point loading that exceeds the fabric’s tensile strength, leading to a fabric failure.
“The tent is only as strong as you make it! When people enquire about tent choice, I often ask them how much time they’re willing to spend setting up their tent. If someone wants a fast setup, they’ll need to compensate with a heavier tent with beefier/more poles that provide more strength with less input from the user.
“Perhaps there’s a disconnect between the intent (no pun intended!) of tent designers and the assumptions made by users. Just as a car manufacturer expects you to put fuel into your car to make it go, a tent designer designs under the assumption that adequate stakes and guylines will be used in inclement conditions. In our view, in these conditions tent setup is incomplete until the guylines are installed.”
Omitting guylines to save a few grams will likely ruin any hike where you encounter strong wind. Any freestanding tent without upper guyline attachments will fail in strong winds – avoid such designs if you expect to camp in these conditions. Check your tent for upper attachment points: there may be 2-10, or more. More is better!

Mont Epoch 4-season expedition tent in the Tassie highlands (Image Credit: Geoff Murray)
The location and design of those attachments is also crucial. You’ll see that 4-season tents often use split guylines, or guylines attached to wide anchor points, or attachments that loop around the pole, all aiming to spread their support over a longer section of pole. Others provide additional strength by attaching to the pole at the same place the inner is clipped, or attaching where poles cross.
Slingfin tents utilise internal guylines that provide cross-bracing and enormous additional strength, illustrated below.

Image Credit: SlingFin
Certain guy attachments, such as the apices of trekking pole tents, provide more structural support than other locations. However, even those tie-outs in the centre of panels reduce deformation and cupping that would otherwise greatly increase loading on the fly.
Tim of SlingFin adds,
“Regarding guy out positioning, take note of where the guy out loops are. This is especially relevant if, for some reason, you are not using all the guy outs on your tent.
“Many people’s impulse is to only use the highest guy points on the tent if they have multiple options. However, this can have the opposite of the desired effect. The windward surface area of the tent below the guyouts closest to the ground needs to be less than half the total surface area of the wind profile. If you have too much surface area below the guylines, that part of the tent will become concave and collect wind as seen in [Part One of this series], turning your tent into a sail.
“The guylines need to be high enough to hold poles in place, but low enough to allow wind to flow over the top of the tent. For this reason, if you have multiple guy options and can’t use all of them (which should always be plan A!) then it’s usually preferable to use the lower set of guy outs. Some pole-supported backpacking tents have only one guy out on each corner of the tent. In our experience, those are often positioned too high.”

In addition to perimeter and mid panel tie outs as seen deployed here on the MLD Duomid XL, MLD Mids have external peak tieout points for extreme wind. Image Credit: Justin Lichtner
Very thin ultralight lines, including spectra ones, can fail under sudden dynamic loading, or abrade to failure in gusting winds. Your guylines should be only just weaker than your tent material at the attachment points, because you want them to fail before the tent itself! Many manufacturers of alpine and mountaineering tents use relatively heavy, non-stretch 3mm lines, paired with higher denier tent materials. We replaced the original thin lines on our Duplex (they now come standard with a thicker gauge).
It’s essential that linelocs fit your line thickness as they can loosen under sudden and repeated dynamic load or slip on smaller than ideal cordage. If this happens, you can put a slipped clove hitch or similar directly under the loc.
Clam cleats and other tensioners are preferred by most who regularly camp in windy conditions, or knots of various kinds on their own that, unlike pieces of plastic, are less prone to breakage. However, unless you’re experienced, it can also be difficult to knot cord in extreme wind when everything is flapping wildly.

Clam Cleats are used by manufacturers like Hilleberg as they are reliable and easy to operate.(Image Credit: Clamcleat)
Freezing conditions and snow may coat guylines and cause other problems such as fretting, or handling with numb fingers, but this is another area where we lack expertise: see veteran hiker Roger Caffin’s tips here.
Tent Stakes and Wind
A firmly anchored tent is crucial to its ability to withstand wind, and stakes pulling out of the ground is another common cause of catastrophic tent failures in wind. This is because, when one anchor point is removed, the tent’s structural integrity is immediately compromised, with sudden and unbalanced loading on tent poles, fly and all remaining anchor points. These in turn, are more likely to pull out, creating a cascade of tent failure that in strong wind can happen in seconds.
A tent failure due to a stake pulling out is 100% user error, though some designs require stronger staking in certain places. Anchoring your tent is a huge topic that has its own article How to Stake and Guy your Tent: Snow, Rock, Sand Platforms and more, but we can summarise for windy conditions here:
Choose the right kind of stake for your substrate: soft substrates can be as tricky as rocky ones. The right stake almost always means swapping out the ones that come standard with your tent. MSR Groundhogs are widely accepted as an excellent jack-of-all-trades; consider full-length ones rather than minis for wind, especially for non-freestanding tents. Lightweight titanium v-stakes bend or break within a pitch or two on our local limestone but suit other substrates. Other choices include snow/sand stakes, nails, spikes, cyclone, deadman bags and even delta anchors. Cheap knockoff stakes can be almost as good as branded ones initially, but the lower grade aluminium used is less durable than quality stakes and they will bend or break sooner. The key is to choose a stake to suit the substrate: see our article on Tent Stakes for Backpacking: What You Need to Know, for detailed information on different stakes and how they work.

With their deep, loose gravel, Iceland’s ash plains make anchoring tents a challenge.
Take the right number of stakes for your tent, plus extras. We usually carry a few nails for particularly hard substrates, plus two extra groundhogs for double pegging (see below) and, on long trips, extra stakes for breakage – using rocks to bash in stakes isn’t kind to them. We took even more extras for Iceland, notorious for its windy pitches, and used them.
Learn pegging techniques such as deadman/big-rock-little rock, double and even triple pegging (linear is usually more effective than placing two crossing stakes in one place)

Two stakes placed in a line usually hold better than two crossing stakes in the one point, a technique that has more potential to loosen soil.

Rocks on top of stakes need to be very heavy. If you need still more holding strength, two stakes joined with a line extension weighted with a rock (top), a stake joined to a deadman (little rock or stick) with a line extension weighted with a rock (centre), and a rock on a line extension joined to the guyline all require lower weights for the same holding power as as rock placed directly on a stake. In no instance is the rock touching the guyline.

Using line extensions with rock prevents guylines abrading - it’s much easier to swap out an extension than a guyline.

Use a line extension to place 2 stakes at the end of a guyline instead of just one stake. This is also useful when there is a rock right where you need your stake to go.

Or, add two extra stakes to windward points experiencing the highest load.
Add line extensions when using rocks to weight stakes so you don’t abrade guylines themselves, to reach soft spots in hard ground, or vice versa. Never place rocks against or on tent flies, or directly on guylines.
Insert guyline stakes at a slight angle, not vertically
Learn the stake out or guy out points on your tent where forces are concentrated and where stakes are most likely to pull out (eg, in our experience, it is the upwind apex guy on the Duplex, and upwind strut corner of the Stratospire Li). Reinforce these points before the storm so you’re not struggling with a tent trying to take flight in freezing rain in the middle of the night (don’t ask how we know this!). Lengthening guylines on struts reduces leverage on the stake and the chance of it pulling out, but lines that are too long are less effective at holding the struts down to the ground.

A quick and dirty fix on the strut corner of the Stratospire Li using the first things that came to hand, done in the middle of the night in bucketing rain.
Adapt and be flexible: utilise rocks, logs and structures, borrow stakes from downwind sides, turn stuff sacks, spoons or water bottles into deadmen, utilise paddles, trekking poles, backpacks and skis
Take a last glance around the empty tent pitch just before you leave to ensure you’ve collected all stakes.
This video beautifully demonstrates many of the above techniques and adaptations for strong winds.
For additional detailed staking and anchoring techniques for snow, sand, tent platforms and more, see How To Stake and Guy Your Tent.
Pitching in Strong Winds
Regardless of your tent, one key concept is essential for success when pitching for and during strong winds. Tent manufacturer Ron Bell, of Mountain Laurel Designs says,
“Practise in similar conditions at home before a trip. Ninety-five percent of all problems we see from users of any outdoor gear is due to not practising before they get into a challenging situation. Any expectation - from hyped marketing or misperceived ability - that any gear will be easy in tough conditions is not realistic.”

The low profile pentagonal Mountain Laurel Design Trailstar is exceptional in wind when well pitched. Image Credit: John Malley
In other words, it’s all very well that your tent withstands strong winds, but you also have to be able to set it up in the first place. It’s horribly easy to break poles or send them through flies while setting up a flapping tent, especially in tip-up trekking pole tent configurations (Geoff and I prefer tip down for this reason, and place a finger over the tip when inserting the pole into the Stratospire Li, or you can buy a handle-up conversion kit).
Bags or even the whole tent can blow away before it’s anchored. A tent that is easy to set up in light winds can be impossible to erect intact in strong wind. Those of us who use unattached polycro, tyvek or lightweight groundsheets can pretty much forget about them in such conditions.
Next, watch this video from 23:34 to see difficulties the highly experienced Ryan Jordan of Backpacking Light has with a successful pitch in measured 25-35mph winds, gusting to about 45mph; Ryan has a wind meter attached to a stump about 60cm above the ground near the tent. Bear in mind that Ryan is testing the tent and knows exactly what he is doing; many of us, including Geoff and me, could not have pitched the tent solo at all in these windspeeds and substrate. Later, winds increase to 65mph. It is likely that even Ryan would not have been able to pitch successfully in a speed that generates four times the force.
Some mountaineering and alpine tents, particularly tunnel tents, are designed so you can stake out the tent before inserting the poles, and this aspect can be crucial for solo hikers or those with less experience; the non-freestanding Duplex, XMid and most pyramid tents also allow this.

Ultamid 2, Image Credit: Huw Oliver (Hyperlite Mountain Gear website)
This video illustrates the Ultamid setup.
Some Hilleberg tents cleverly let you erect the lower half and add guy lines before completing the upper half, as illustrated here. Again, consider these aspects particularly if you’re solo because otherwise it may be impossible for you to set up your tent when you need it most.
Regardless of which tent you own, expect everything to take longer - MUCH longer - in strong winds. Plan for this: pitching in wind plus rain or snow by torchlight just adds a whole new unwelcome level of complexity!
Dan Durston of Durston Gear writes,
“The X-Mid and pyramid tents share the advantage of being easy to pitch during high winds (relatively speaking) because
they can be fully staked down before the poles are erected
the base shape is a simple rectangle so there are fewer stakes and less guesswork, and
the tent is immediately stable when the pole(s) are added. With some trekking pole tents, the poles must be added before the base is fully staked and/or the poles are fully anchored, so the tent is vulnerable to collapse during one or more steps.

XMids pitch lower to the ground than many other non-freestanding tents. This is an advantage in cold, windy weather. Image Credit: Dan Durston
“With the X-Mid we recommend the following process:
Replace any shockcord present at stake points with static cord of 2.0 - 2.5mm to anchor the tent more solidly. Longer guylines such as the peak guylines can be replaced with Dyneema core cord which has less stretch and holds the tent more solidly. Regular cord can stretch 10% under load which allows the tent to deflect more. This benefit is trivial on short lines.
After selecting a campsite that minimizes wind exposure, orient the X-Mid so that the two steeper corner seams (off the ends of the ridgeline) are facing into the wind. This minimises wind drag by making the ridgeline and largest panels of the tent in line with the wind instead of broadside to it.
Shorten the guylines to the minimum possible length. The guylines act as extensions of the fly, so shorter cords will pitch the tent lower. For the shortest cords and lowest pitch you can add a small loop of cord directly to the corner guyouts and stake to that to bypass the tensioners. This will pitch the tent almost right to the ground, but be careful because abrasion along the bottom of the fly can occur and lead to failure if the bottom edge is flapping against rocks.
Stake out the rectangular base while working from upwind to downwind.
Ensure that
1. The base is adjusted tight before the poles are added. With any pyramid style shelter, adding the poles applies an inward pull on the corners that will create loose sides if the base is not firmly snugged up. Loose corners also allow the poles to over extend which can prevent tightening the base later.
2. The base of the tent is staked in an accurate rectangle. Tents that are pitched by staking down the perimeter as the first step are simpler to erect in high winds, but inaccuracy affects the outcome. With the X-Mid and pyramid tents, a skewed base makes the tent overly tight on one diagonal but loose on the other. You’ll see this in the X-Mid as either a loose ridgeline with tight sides (skewed left) or a tight ridgeline but loose sides (skewed right). The diagram below shows how to diagnose and fix this issue: simply loosen the two corners on the tight axis so that you can tighten the two corners on the loose axis.
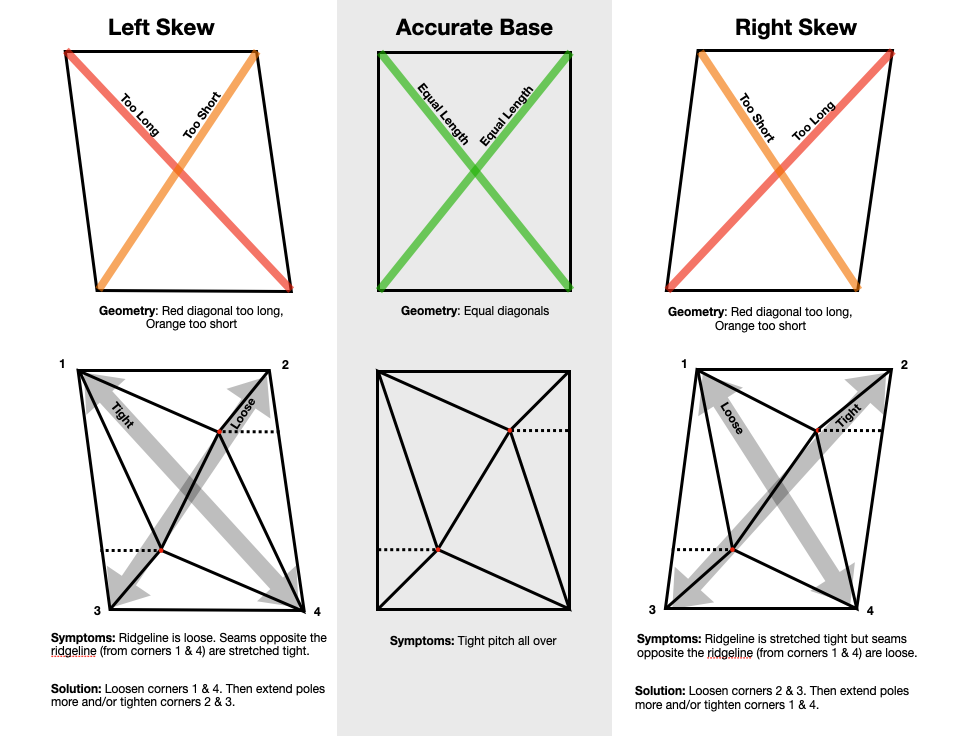
Image Credit: Dan Durston, Durston Gear
Add the upwind pole and extend until taut, followed by the downwind pole. The poles can be added in either order as the poles will always be stable, but adding the upwind pole first minimises flapping fabric. In severe winds you may wish to add a peak guyline to the first pole before adding the second pole.
Add supplementary stakes and adjust pitch as desired
With the core pitch established and tight, deploy the peak guylines. For best performance, the peak guylines should be angled slightly towards to the door side.
Deploy the side panel guyouts. Staking them further away is better except that you also want them to pull off a fixed point on the tent and for that you need to slope them at the same angle as the roof panels so they are pulling in line with them. If the side panel guyline is staked out too far from the tent it will pull horizontally, rather than against a fixed point: you can't tighten the line to be truly taut.”

Image Credit: Dan Durston, Durston Gear.
Joe Valesko of Zpacks writes,
“The Duplex has labels on the upwind corners. Pitching that end upwind ensures that the overlapping doors are aimed with the wind rather than against it.
“I always start by staking the upwind labelled corners, then the downwind corners. Then I put in the trekking poles, and last I stake the wall guy lines and adjust the corners if necessary. If you are using small stakes in loose ground, find rocks to weigh them down ahead of time.”
“I generally leave poles at the usual 48" height, and only stake the upwind end tighter to the ground. The tent pitches fine like this, and you don't lose your headroom at the downwind end. Usually condensation isn't an issue on windy nights due to all the airflow, so that is convenient.
“I rarely stake my tent lower because I can almost always find some obstacles like shrubs or rocks to get behind, but this video explains quite well how to do it. If you do lower the tent poles, shorten the inner lines to lift the bucket floor.”
Geoff and I have found that, regardless of pole height, ensuring the angle of the mesh gutter still slopes downwards from the bucket floor, and ensuring the top of the bucket floor is not touching the inside of the fly, guarantees no water ingress when the tent is pitched low for wind plus rain.

Our Duplex pitched lower for the storm in Landmannalauger, Iceland.
The low rock wall is to help deflect wind up and over the tent, not to weight or hold the fly down as many other campers sadly did (there is a rock touching the fly in the picture but we moved it when we checked the pitch). You can just see the pack laid sideways inside the vestibule with pack cover facing outwards; there’s one at the other end too. Even with the tent pitched lower, the doors are still relatively high and prone to catching the wind.
The forecast wind direction is from the top left corner of the picture and yes, our tent is pitched overlapping corner into the wind (it has a manufacturing error with the doors mirrored. Zpacks offered to resew it even though the warrantee had expired; we didn’t bother because it has only been an issue once).
We also attached lines to the windward door tieouts to reduce deformation, and would love to see these reinforced and with stout loops as formal guyout attachments.
Henry Shires of Tarptent writes,
“For the Stratospire Li, unless terrain prohibits it, I recommend facing one vestibule edge into the wind. Stake that edge down, perpendicular to the wind, and then, as you insert the pole in through the apex vent, the wind will want to push the fabric in the direction you want it to go anyway.
“With the wind direction aligned with the SS Li ridgeline you won’t be fighting the wind to insert the second pole and then stake down the opposing vestibule edge. Also, aiming it that way presents the least surface area to the wind which is ultimately the best way to minimize overall wind stress. The SS Li is not a tunnel tent but the Hilleberg video clearly shows the same recommended orientation so as to minimize surface area and not have to fight the wind forces during setup (and takedown).”
See here for how to pitch a classic design such as the MSR Hubba-Hubba in strong winds, and here for pitching the Slingfin Portal in strong wind. It may be possible to jerry rig trekking poles to tents such as the Hubba Hubba using Velcro in the same way as does the Slingfin tent for significant increases in wind resistance.
Hence, the main principles of pitching in strong wind are:
Practise at home and learn hacks and tips specific to your tent
Bring pole sleeve repair tubes for freestanding tents plus dcf patches or tenacious tape for fly repairs
Secure clips or fastenings at the end of door zips to prevent them blowing open during setup, and fasten them during the night to prevent zips working their way open
If your tent doesn’t have fastenings at the end of zipped doors, ensure both sides of the door are attached to a stake to help prevent the zip busting apart or working open
For freestanding tents, assemble the poles before getting the tent out of the bag.
Always anchor a line of your tent to your pack before it is out of its bag; some people pack specifically so an upwind line is handy at the tent bag opening
Place stakes in your pocket so they’re easy to reach; gather and place rocks for weighting handily near where you plan to use them before you begin pitching
Stake the upwind side first
Work low to the ground, kneeling if necessary
Depending on the tent, loosely stake down a few guylines to reduce tent flapping;
Use every stake and guyout point
Double stake or use additional stakes and guylines if necessary
Insert poles in optimal order for your tent. When packing up, always push poles from sleeves, rather than pulling them so they don’t separate inside the sleeve
Place a heavy item such as your pack inside freestanding tents as soon as you’ve connected the inner to the poles to help prevent them blowing away
Check guyline tension and anchor points regularly, especially on nylon tents
Consider waiting for winds to decrease before pitching: this may happen after fronts pass, or late in the day as thermal mixing of air decreases
Pitch non-freestanding tents as low as possible to reduce or eliminate the gap between the fly and the ground by lowering poles and shortening guylines
Block remaining gaps with logs or a line of rocks beside (not on!) the tent to help prevent wind catching underneath the fly, and to help deflect it up and over;
Place packs, cover facing out and aligned with the fly, inside vestibules to reduce wind entry
Reinforce trekking pole tents or pyramids by taping or bungeeing a second pole alongside
Double pole in tents that allow this
Add a second guyline at an angle from upper attachment point:

Adding a second guyline and stake reduces load on the first stake and also increases support against a wider wind direction arc
This excellent Hilleberg video illustrates some of the above, as well as additional guying and pegging concepts.
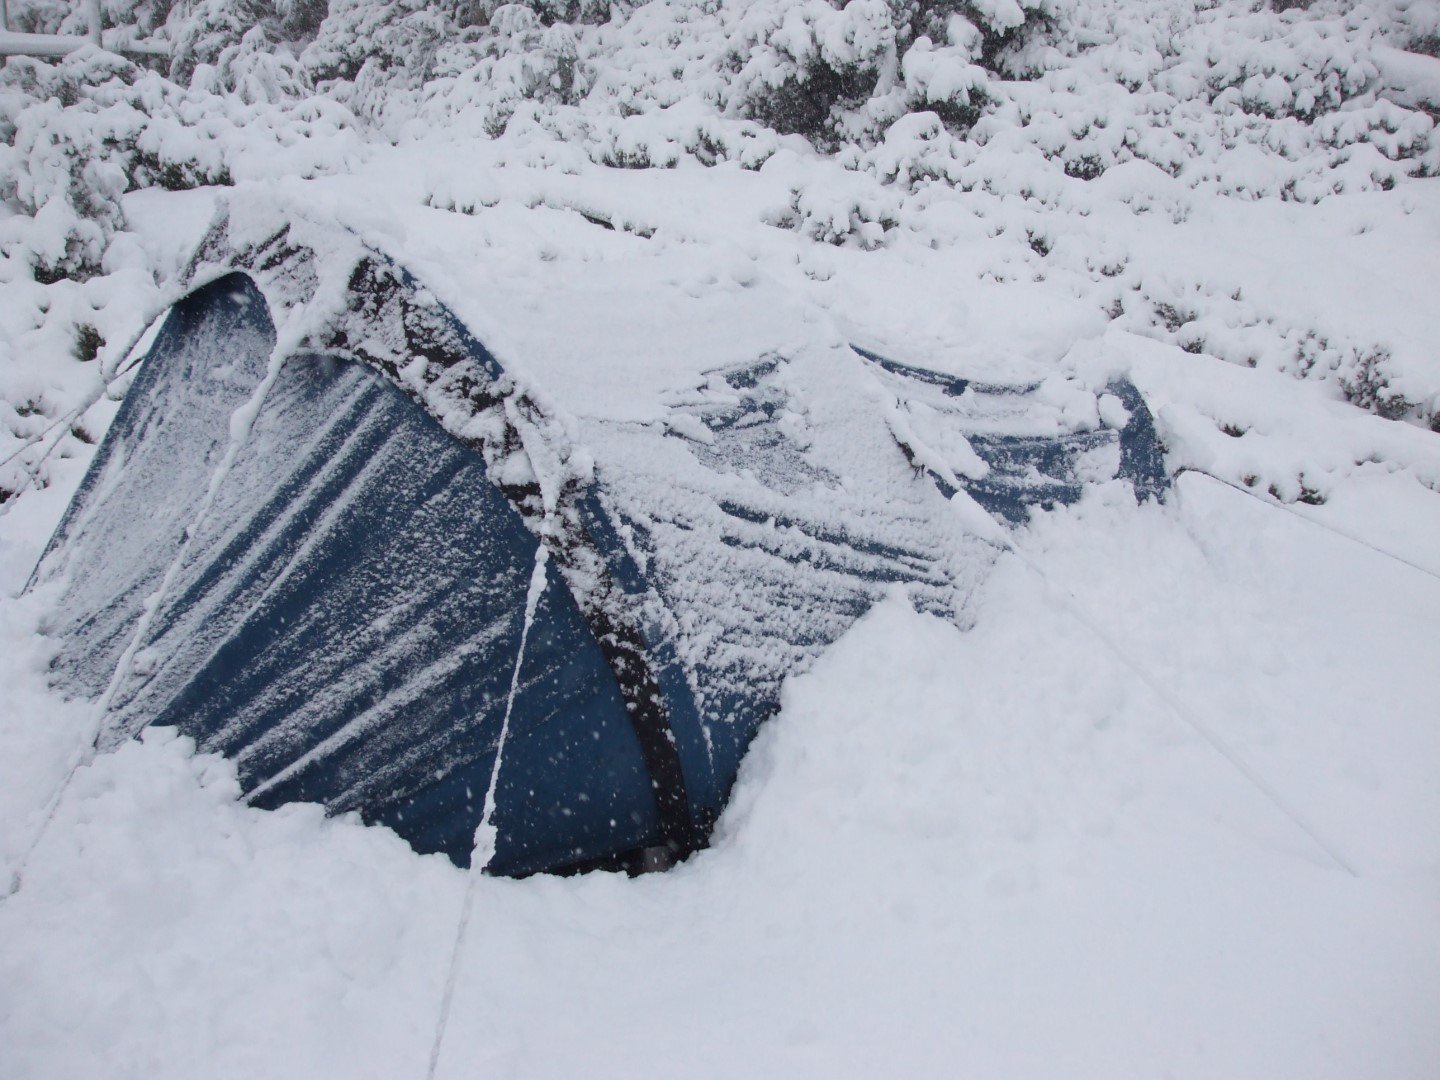
Strong Winds plus Rain or Sleet
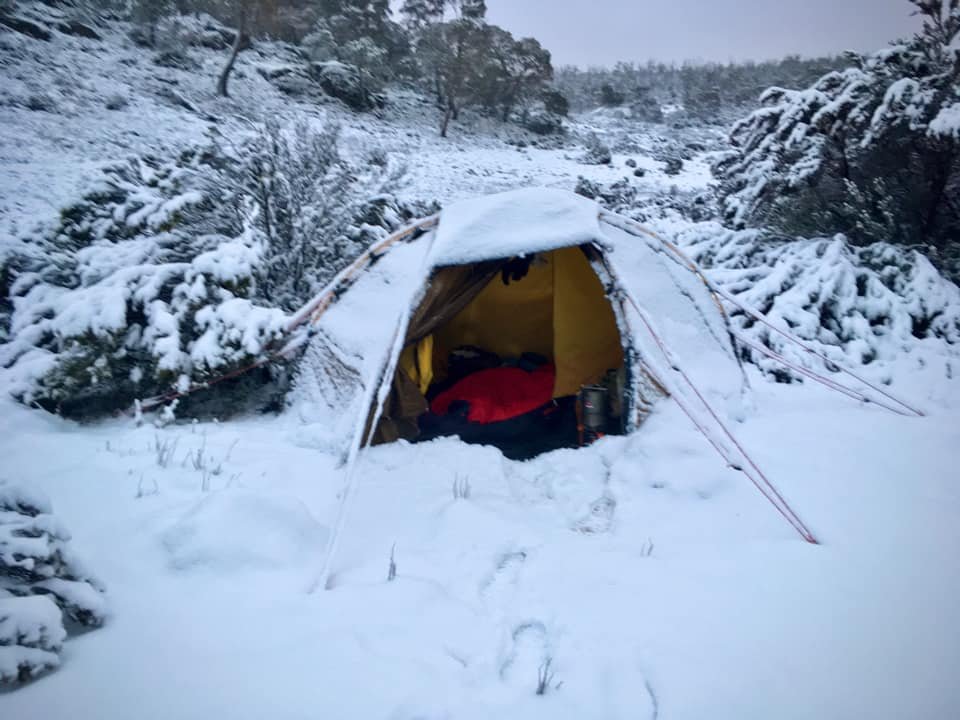
Strong winds on their own are difficult enough, but they are often accompanied by rain, sleet or snow. The inside of your tent and gear gets drenched during pitching, or perhaps afterwards in tents that are fine in rain without wind, but which fail when the wind finds every tiny gap to blow in the water. In cold weather, hypothermia is of real concern.
Tents that set up fly-first or all-in-one (aka integral pitch) are essential in cold, wet climates like the UK, or when camping in winter or alpine areas in countries like NZ and Australia. Our Macpac Aspiring tent is bombproof once set up but cannot be erected fly first: in driving rain, it is impossible to keep the inner dry during setup and this is a deal-breaker failing.
Single wall/hybrid tents of course set up all-in-one; numerous fly-first or all-in-one double wall designs exist including the Stratospire Li and XMids, all pyramids, as well as all Hilleberg and many freestanding models (but not the popular MSR Hubba-Hubba, unless you use a footprint). If you expect to camp often in inclement weather, a fly first or all-in-one pitch option is non-negotiable.

The Mont Kryptonite can be set up all-in-one - essential if you’re regularly pitching in windy and wet conditions. Image Credit: Geoff Murray
The wind-resistant SlingFin Portal can be set up fly first - sort of - but is not specifically designed with this as a priority as are Hilleberg tents, which don’t require you to crawl awkwardly underneath to insert or clip poles. You can imagine trying to imitate the SlingFin video in a howling gale with driven rain, solo: not easy. SlingFin’s Crossbow model is specifically designed for 4-season use and can be set up all-in-one.
Tim of SlingFin says,
“Our WebTruss system, which is present on most of our 4-season tents, is designed to allow easy setup in high winds. Because tents rely on all poles being in place to achieve the full strength of the pole structure, you’re at the highest risk of breaking a pole during setup before all the poles are inserted. When you only have 3 poles of a 4-pole tent set up, you’re nowhere near 3/4 of the tent’s potential strength.
“This is why most modern tent pole-supported tents use clips, rather than sleeves. With sleeves, you greatly increase the surface area of the tent before all the poles are in, and you’re basically trying to wrestle a parachute. When you have a tent body or flysheet catching the wind before all the poles are in, it allows the pole to deform past its yield strength because the pole is unsupported, potentially leading to pole failure. However, sleeves are stronger (once the tent is up), as a pole sleeve captures the pole along its entire length, distributing stress and reducing pole flexion.
The WebTruss separates the pole sleeves from the tent body, allowing the user to completely erect the poles with minimal surface area before installing the tent body or fly. This provides the extra strength of pole sleeves while still allowing the tent to be set up in high winds. Because the WebTruss isn’t sewn into the tent body, it can be tensioned independently to further reduce flex in the poles. Pole sleeves are a major disadvantage of many tents that set up all-in-one. Some tents (like most Hillebergs) have workarounds for this; some do not. Setting up a sleeve tent in high winds can be impossible.”

Slingfin’s Webtruss here seen in a conventional setup but, if the fly has been attached to the tent before pitching, you get a true integral pitch that will keep the inner dry even when setting up in rain. Image Credit: SlingFin. This video shows the integral setup.
This video of a Nemo Dragonfly 2P shows another workaround for a tent that isn’t fly first or integral pitch, but you can immediately tell it would be a complete PITA doing this in genuinely strong winds and rain on successive days, with fiddly velcro and clips and potential to poke holes in the fly. Such techniques are worth knowing, but they are always a dodgy fix at best. A tent to suit conditions will always be superior.
it’s is no coincidence that practically all Scandinavian tent manufacturers produce tents that can be set up fly-first or all-in-one.
SlingFin Crossbow 4-season tent (Image Credit: Blackbird Guides)
Therefore, if expecting to camp often in windy plus wet and cold conditions, tent models that
can be pitched lower with small or no gaps between the fly and the ground, and/or high bucket floors
have inners
have inners that are solid rather than mesh
have wider overhangs on the fly
have storm valances/snow or sod skirts
have well-protected or closeable vents
can be pitched fly first or all-in-one
are all preferable to tents without these characteristics. Here’s Ryan again, with spindrift causing problems at 25:12.
Splashback, when driving heavy rain bounces off hard ground and back under the fly into the tent, can be exacerbated by strong wind but is often prevented by a lower pitch, solid inner, deeper bucket floor and/or a wider fly overhang. Choosing softer surfaces for your pitch such as grass also helps.

A full day of bucketing rain on bare ground splashed mud onto the side of the bucket floor and outside surface of the Triplex fly, but none entered the tent.
Sometimes simply placing packs inside vestibules to block gaps on the upwind side, or logs to block gaps along flies outside on the upwind side, may be enough to prevent wind and water entering, as well as helping to deflect wind up and over the tent rather than catching underneath it.
Human Factors and Strong Winds
We’ve considered wind, tents, terrain and pitching, but there is one more crucial component to a successful pitch - that’s right, it’s YOU!
Most camping and hiking mishaps happen due to human factors: decisions that we make, rather than tent or environmental (terrain and wind) factors per se. Mishaps occur not due to a low skill level, but because we are attempting to operate beyond our skill level, whatever that level happens to be.
For example, if we don’t understand our tent’s limitations, we may use it in conditions for which it is unsuited. Geoff and I chose the Duplex for an extended summer hike in the Tasmanian highlands without understanding its poor performance in wind-blown snow; our down quilt would have been saturated. It was nothing more than luck that no storm happened during our nine days: on subsequent trips, we took the Stratospire Li with a solid inner instead. If we did most of our camping in the Tassie highlands, we’d get a ‘4-season’ tent that reliably resists rain and snow loading in combination with strong wind.

Our Duplex on the Overland Track in summer. Although there is a hut for backup, and the tent handles strong wind very well, we were lucky in that no snowstorm occurred and would choose a different tent now we understand how poorly most hybrid DCF designs handle spindrift. On the other hand, our Triplex tent was the perfect choice for the more benign conditions of the Bibbulmun Track thru- hike in Western Australia.
Or, we have incorrectly assessed terrain or weather, and conditions exceed the tent’s capabilities.
Or, we may have overestimated our own ability to make calm choices while under pressure, when sideways rain or sleet combine with a wildly flapping tent and frozen clumsy fingers and everything quickly turns to sh$t.
All of these are multiple small, seemingly unrelated decisions that we have made in the leadup to disaster, and hiking history is littered with examples of people, now dead, who ventured into conditions beyond their skill level. In aviation it is known colloquially as the Swiss cheese effect (the holes in the cheese safety slices all line up) and, during my time as Senior Safety Officer for our hang gliding club, I saw it in every serious accident.
Therefore, there is a big difference in camping in strong winds in otherwise benign conditions, than camping in remote alpine areas of Australia and New Zealand where blizzards occur in midsummer, or in Northern Hemisphere winters: in both examples, consequences can be far more serious. Never underestimate them.
Why bother with such a heavy tunnel tent? T-shirt weather one day in the Tassie highlands in spring… (Image Credit Roger Norton)
… Not so much T-shirt weather the next day! Northern Hemisphere hikers often misjudge our snow in temperatures around 0C +/- 5C; dampness is much more likely to drench gear. And our snow can arrive unexpectedly and seriously at any time of year. (Image Credit: Roger Norton)
The Scarp tent video from Part 2 Terrain and Wind demonstrates a classic cascade of human factor errors that destroyed a tent. The hikers were only a short distance from their car so it wasn’t serious, as it would be for anyone on a longer hike, days away from alternative shelter.
If deliberately hiking into extreme conditions, we need to understand every aspect: tent, weather, terrain and ourselves. Only one needs to fail for all to fail, and it’s no suprise that many hiking fatalities comprise tourists who are experiencing unfamiliar weather in unfamiliar countries in unfamiliar terrain; it highlights why we should always heed the advice of locals. Conversely, should we unexpectedly encounter bad weather, understanding it, terrain and our tent guarantees a better outcome.
When we are under pressure, such as in wind plus bucketing rain or hail, or we are exhausted, it is much, much easier to make mistakes: half of our mind is on getting inside rather than the task at hand. Panic, or even just adrenaline and nerves, impact clear thinking so this is when it is even more important to work methodically rather than hurrying. We suspect this was a compounding factor for the Scarp owner as the wind and hail arrived. Eagerness can also prevent us recognising potential problems: in the video, the trio had sensibly decided to camp at lower elevation due to the forecast, but they did not analyse what might happen in the chosen location with the forecast storm, or perhaps they lacked sufficient understanding of terrain to identify the predictable problems they encountered.
Be proactive and flexible rather than goal-oriented. Just because we’ve planned to camp in a particular spot, doesn’t mean we must. Countless people have died while fixated on a pre-determined course of action that becomes more inappropriate with every step. Should we walk past that sheltered pitch hoping that our intended camp two kilometres away at higher elevation might be okay, when it’s already blowing a gale? Or even, should we turn back?
Just because other hikers are doing something, does not mean it is appropriate for you to do the same. They may have more experience or fitness, or different equipment, or be more familiar with the location. On straightforward hikes in benign weather, you can be reassured that thousands of ordinary hikers have done the same but, in challenging conditions and terrain, assess each hike and decision relative to your own parameters.
There is no substitute for hands-on familiarity with our equipment. This does not mean watching a pitching video a few times, it means actually pitching our tent at least a few times in difficult conditions. We don’t want to discover something we don’t understand while trying to pitch in a gale. If our gear is new and we have never or rarely deployed it before, the chance for mistakes increases greatly, as happened when the Scarp tent owner, who had never used the crossing poles, forgot two crucial attachments.

Tarptent Scarp with crossing poles correctly attached; the poles help in wind but are primarily intended for snowloading. Image Credit: Alan Adge Dimelow
We can mitigate these human factor effects through insight (recognising the limits of our skill and knowledge), practice, routines and checks. For example, regardless of weather, Geoff and I each walk around our tent before we get inside it (if you are a couple, you must both do it, or one do it all the time: you can’t swap around). We check every stake and every point that needs assembly: it’s basically a ‘preflight’ of our tent instead of our hang gliders. This practice is helpful because, when we are pitching in difficult conditions, conscious, repeated routines and checks are more likely to happen.
For a thorough understanding of human factors and making better decisions when hiking, see our series Human Factors and Decision-making for Hiking Safety.
To Conclude:
If your pitch isn’t perfect or you’re unsure of your tent’s ability to withstand the weather, a storm is highly stressful… but when you’re in a tent that you trust and know is pitched solidly, hunkering down to ride it out can be exciting in the best way. It will be noisy, because all tents are noisy in strong winds (some hikers carry ear plugs for storms!) but it will be Type 1 or Type 2 Fun, not Type 3!
Now that you understand how your tent behaves in wind, how to choose a great pitch, and how to set up your tent even when it’s howling, your chance of a successful trip is so much better, especially if you practise … so get out there - safely! - in the next blow and grow those skills!